Windows 8 Server With GUI, Minimal Server Interface & Server Core Lesson with the Desktop Experience Feature

I’m one of those people that run Windows Server on their desktop workhorse. The reason for this is that this gives me the server features for rapid testing, scripting and taking screenshots for documentation. When you tweak it right you have a very nice desktop that doesn’t lack anything in functionality compared to a desktop but you do get the extras I just mentioned. An alternative is to run a Virtual Machine locally. The latter has become a lot easier & better now we have Hyper-V in the client Open-mouthed smile.

This subject leads to another interesting capability of Windows 8. You can install Windows 8 as Server Core or Server with GUI, which is the full GUI option. But there is a world between those. This is the Minimal Server Interface option. How do these differ? Well actually “only” by the features that are enabled.

image_thumb[2]

The feature Graphical Management Tools and Infrastructure is the set of features that makes up the difference between a Server Core installation and the Minimal Server Interface option of a Full server installation. This means that uninstalling this feature will convert a Full server to a Server Core installation. Server Graphical Shell cannot live without the Graphical Management Tools and Infrastructure as both are needed to get the full GUI server.

Server Graphical Shell is the same user interface that is installed by default when you choose the Server with GUI installation option during Setup. This always installs “Graphical Management Tools and Infrastructure” as a prerequisite. To decrease the servicing requirements of your server while still being able to use Microsoft Management Console (MMC) locally, you can uninstall the Server Graphical Shell using Server Manager, leaving you with the Minimal Server Interface. As stated above the Minimal Server Interface requires the “Graphical Management Tools and Infrastructure” feature to be installed.

The real good news is that you can switch between these server options with reinstalling. You can switch from Full Server with all whistles & bells to Server Core by enabling or disabling features. This an very nice improvement compared to Windows 2008 (R2) as with those versions you’re stuck with your choice and only a reinstall is the way to change this. Not only that but I can help out when you need the GUI for some reason temporarily.

A Walk Through of Installing The Desktop Experience

Even for lab environments it also can be handy to have some tools available. On my Windows Server 8 Beta Machine I needed the Snipping Tool for example. So I had to install the Desktop Experience feature.

Using the GUI

In Windows Server 8 you’ll find that under Server Manager, Manage “Add Roles and Features”.

image

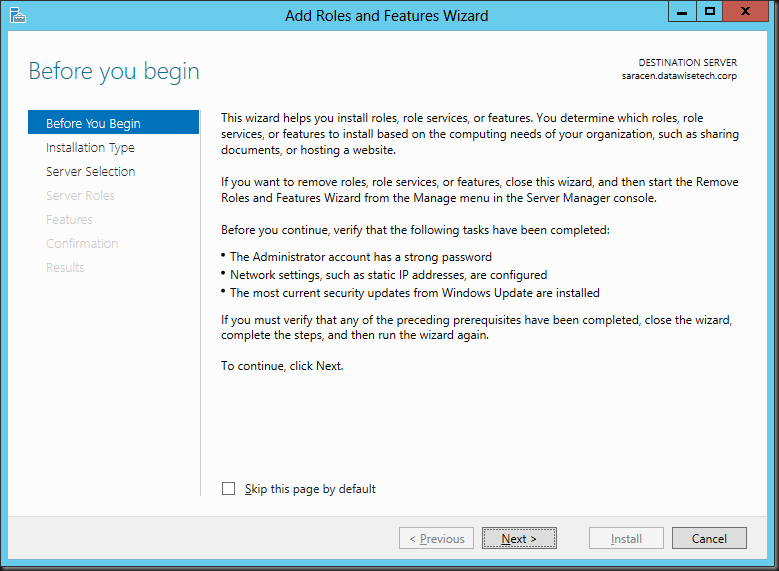
The “Add Roles and Features Wizard “ pops up at the default start screen which you can elect to skip for future use.

Addrole1

Select the Installation Type.

missing step_thumb[1]

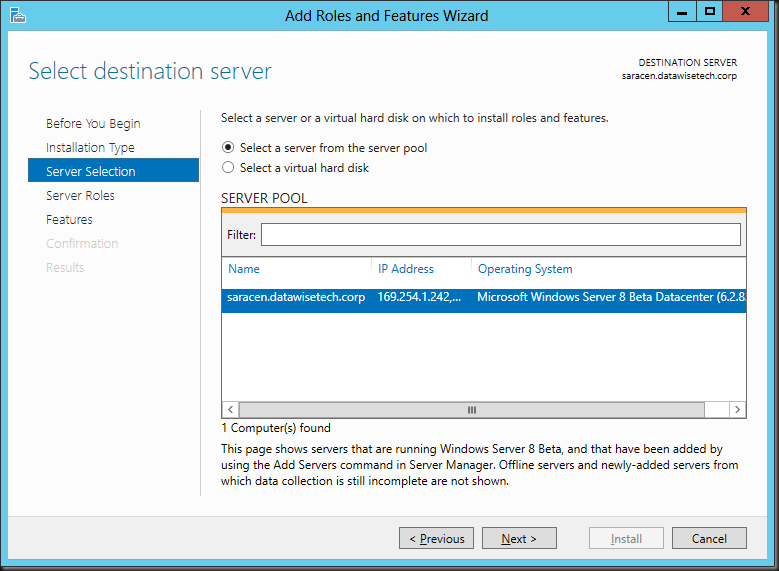
Select the server on which you want to work.

Addrole2

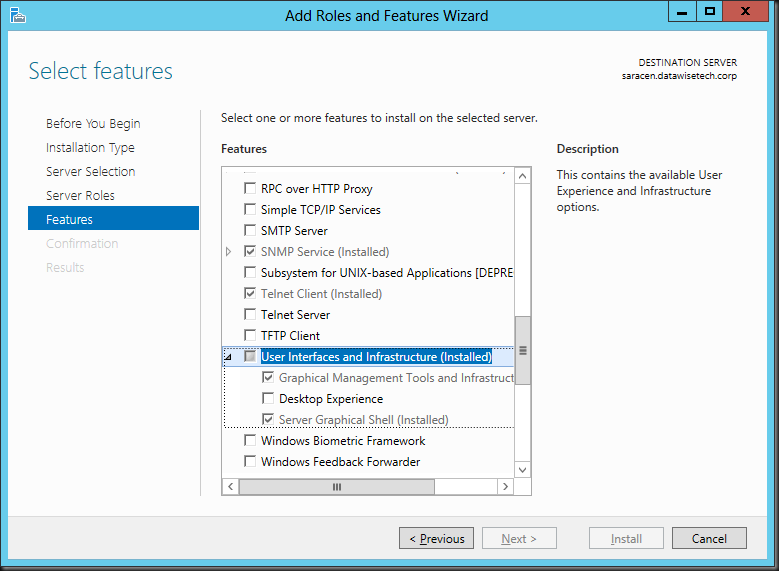
The Desktop Experience is a feature so go straight to “Features”. Scroll down until you see User Interfaces & Infrastructure (Installed), open the tree and you’ll see that you can select Desktop Experience.

Addrole3

As you can see The Desktop Experience feature requires that you also install the Graphical Management Tools and Infrastructure and Server Graphical Shell features, meaning it will only run of the Full Server GUI option.

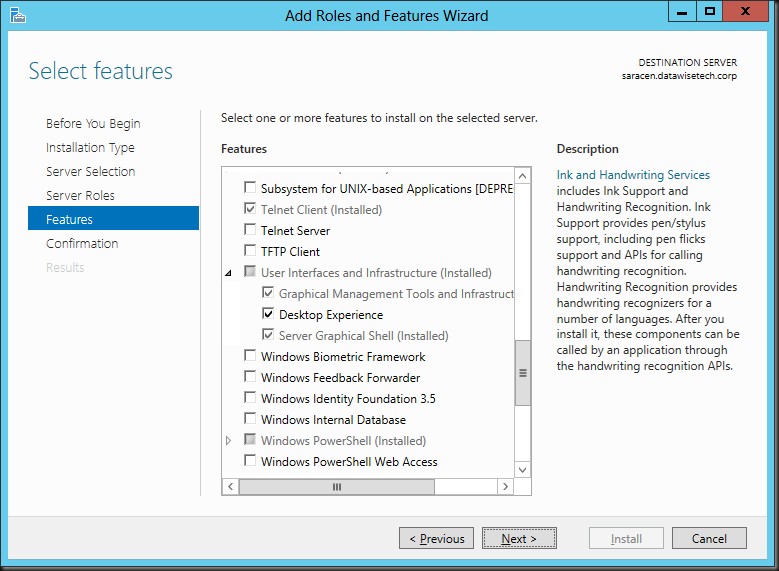
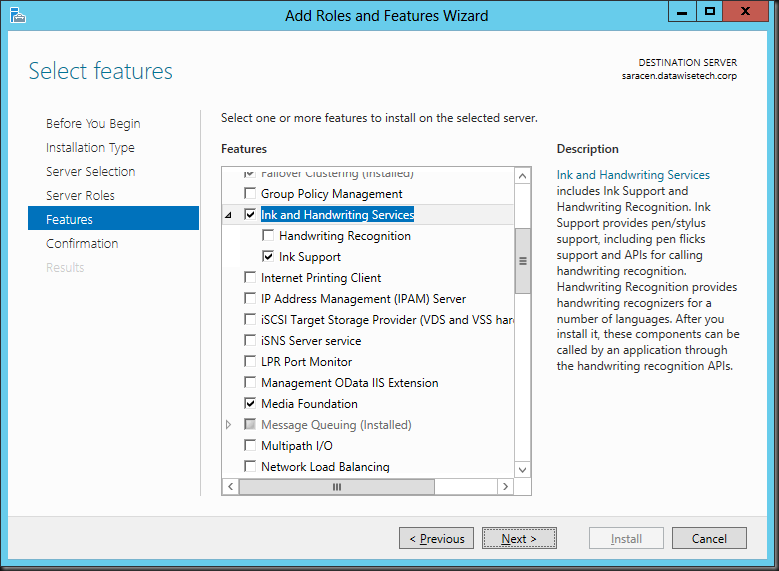
Once you select that a message will pop up telling you that the Ink Support feature under Ink and Handwriting services and the Media Foundation Feature are required for the Desktop Experience feature. Accept the defaults and click Add Features.

image

You can scroll along the GUI to check these features have indeed been selected.

Addrole5png

Addrole6

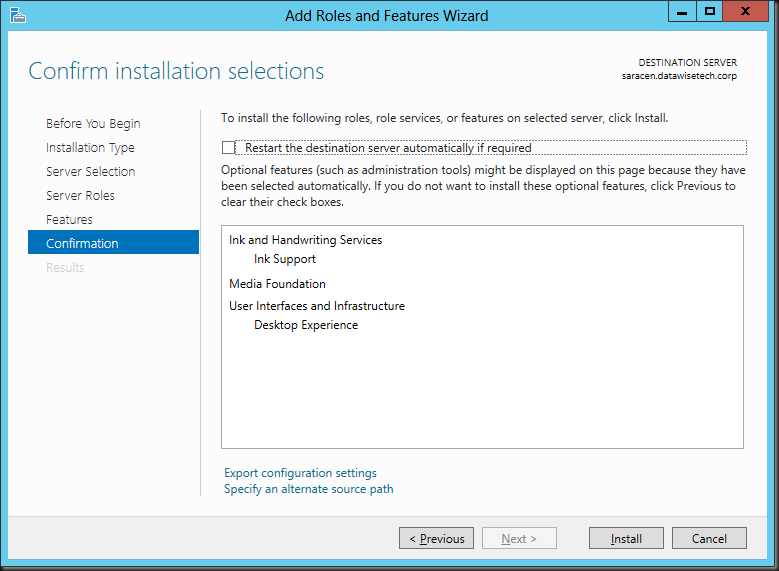
Click next and you’ll be asked to confirm the installation of the features. You can opt to restart automatically when needed.

Addrole7

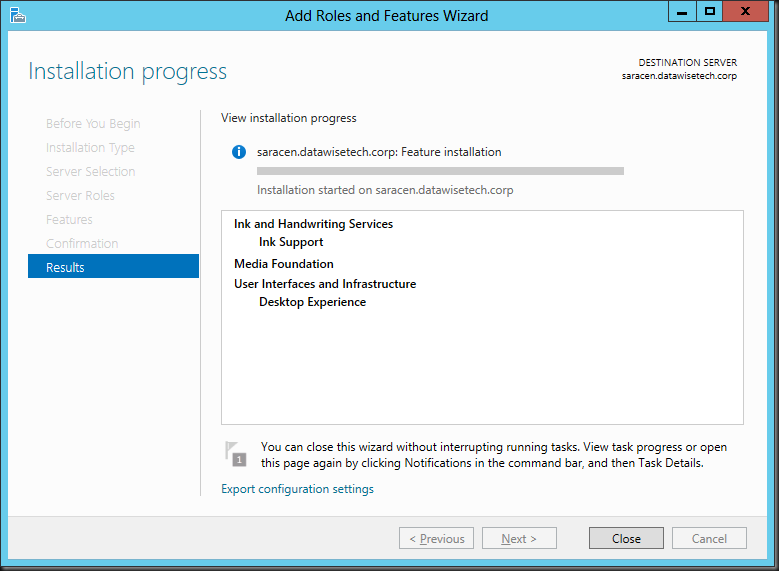
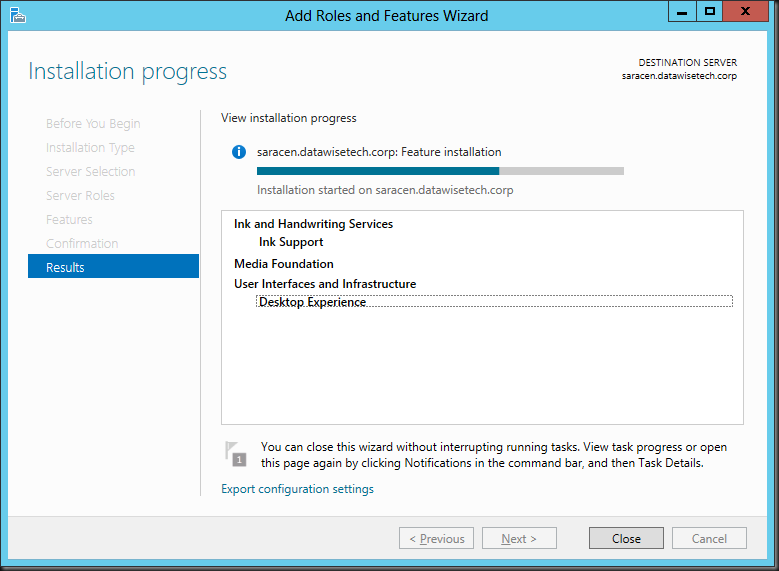
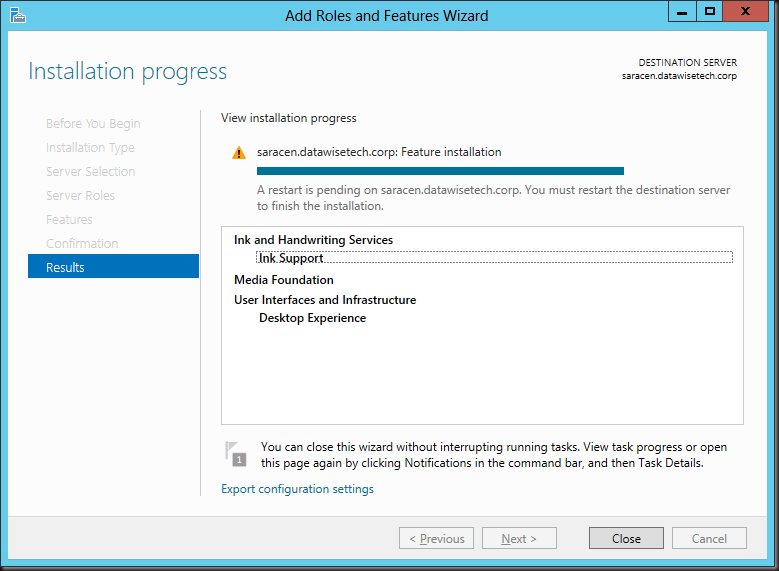
The Add Roles and Features Wizard starts the installation/ Please note that you can close the wizard and get o with something else. You don’t have to baby sit the GUI.

Addrole8

Addrole9

When finished the shows you need a restart.

Addrole10

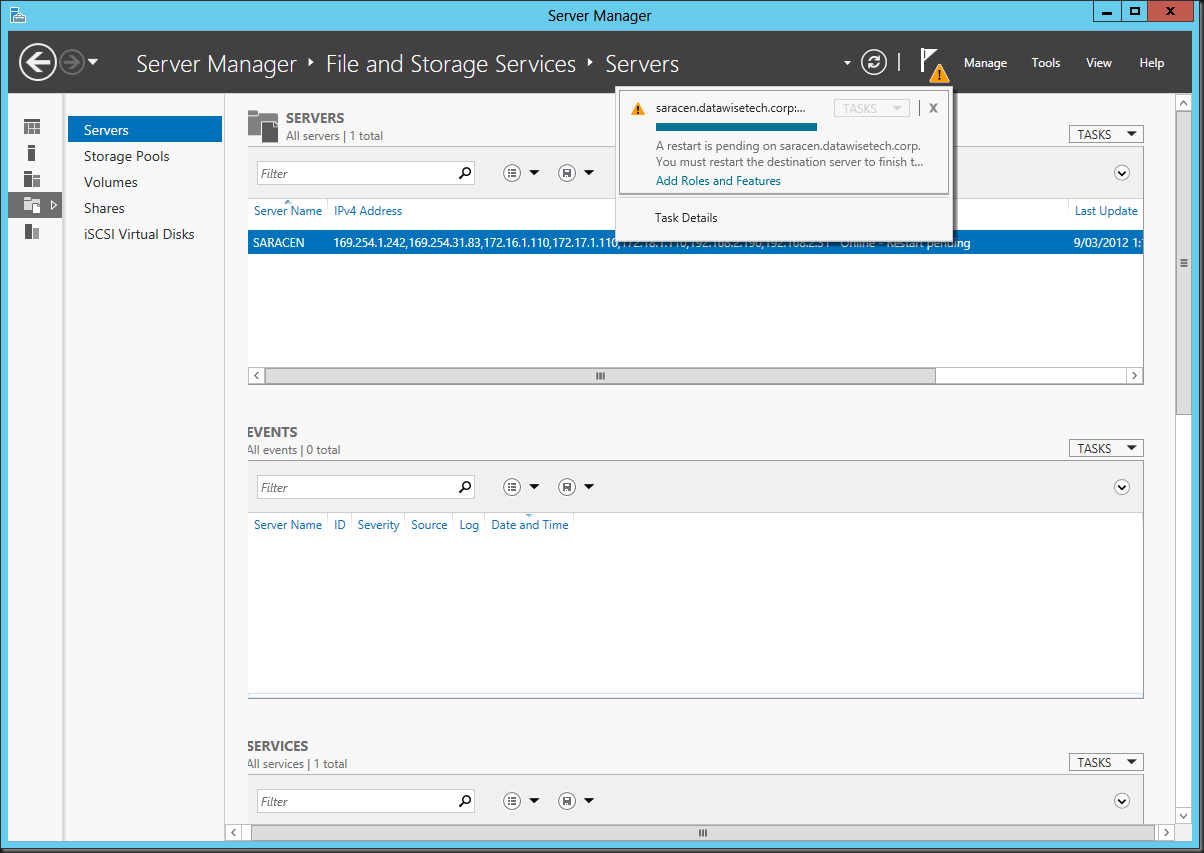
If you closed the wizard and came back to server manager late it will warn you about the fact something is pending with the yellow exclamation mark.

image

Addrole12

Using PowerShell

To install Desktop Experience with Windows PowerShell, use the following commands:

Import-Module ServerManager

Install-WindowsFeature Desktop-Experience

You’ll find that this also installs the “Ink Support” under “Ink and Handwriting Services” automatically for you. Note below than wen using DISM you’ have to manage all that yourself.

To install Media Foundation with Windows PowerShell, use the following commands:

Import-Module ServerManager

Install-WindowsFeature Server-Media-Foundation

Using DISM

This works but you need to do some more work. Each and every single feature part needs to be installed separately. You need Server Media Foundation, Desktop Experience, but here you’ll need to add Ink Support AND the yourself or you may run in to issues. In the Example below we left out ink support.

dism /online /enable-feature /all /featurename:ServerMediaFoundation

dism /online /enable-feature /all /featurename:DesktopExperience

image_thumb[11]

That means It looks like you have no Desktop Experience installed in the GUI while the extra tools do appear on your desktop.

image_thumb[6]

image_thumb[10]

So to fix this we need to add Ink Support but also Ink And Handwriting Services as top level feature. If you don’t it wont be “grayed in” to indicate sub features have been selected (in our case the Ink Support).

dism /online /enable-feature /all /featurename:InkAndHandwritingServices

dism /online /enable-feature /all /featurename:InkSupport

You might have noted that DISM is a bit more hands on than PowerShell. PowerShell is perhaps the best automation tool to use but don’t forget that DISM has off line editing capabilities that can come in handy for all kinds of stuff from injecting drivers to fine tuning your deploy image. Powerful stuff!

Upgrading Windows Server 2008R2 Editions With DISM

When an environment evolves (growth, mergers, different needs) you have might very well have resource needs above and beyond the  limits of the original Windows edition that was installed. Scaling out might not the right (or possible) solution you so scale up is alternative option. Today with Windows Server 2008 R2 this is very easy. However, again and again I see people resorting labor intensive and often tedious solutions. Some go the whole 9 yards and do a complete clean install and migration. Others get creative and do a custom install with the windows media to achieve an in place upgrade. But all this isn’t needed at all. Using DISM (Windows Edition-Servicing Command-Line Options) you can achieve anything you need and every role, feature, app on your server will remain in good working condition. Recently I had to upgrade some standard edition Hyper-V guest servers to the enterprise edition to make use of more than 32 GB of RAM. Another reason might be to move from Windows Server 2008 R2 Enterprise Edition to Data Center Edition for hyper-v host to make use of that specific licensing model for virtual machines.

Please note the following:

  • You can only do upgrades. You CANNOT downgrade
  • The server you upgrade cannot be a domain controller (demote, upgrade, promote)
  • This works on Standard, Enterprise edition, both full & core installations.
  • You cannot switch form core to full or vice versa. It’s edition upgrade only, not  for switching type of install.

This is how to find the possible target editions for your server:

C:Windowssystem32>DISM /online /Get-TargetEditions

Deployment Image Servicing and Management tool
Version: 6.1.7600.16385

Image Version: 6.1.7600.16385
Editions that can be upgraded to:

Target Edition : ServerDataCenter
Target Edition : ServerEnterprise

The operation completed successfully.

So I went to Enterprise Edition by executing this process takes some time but is painless but for one reboot.

C:Windowssystem32>Dism /online /Set-Edition:ServerEnterprise /ProductKey:489J6-VHDMP-X63PK-3K798-CPX3Y

Deployment Image Servicing and Management tool
Version: 6.1.7600.16385

Image Version: 6.1.7600.16385

Starting to update components...
Starting to install product key...
Finished installing product key.

Removing package Microsoft-Windows-ServerStandardEdition~31bf3856ad364e35~amd64~~6.1.7601.17514
[==========================100.0%==========================]
Finished updating components.

Starting to apply edition-specific settings...
Restart Windows to complete this operation.
Do you want to restart the computer now (Y/N)?

You either use a MAK key (if you don’t have a KMS server) or the default key for your volume license media. When you have KMS in place (and the matching server group KMS key A, B, or C) the activation will be done automatically and transparent for you. Standard trouble shooting applies if you run into an issue there.

These are the public keys for use with a KMS server:

  • Windows 7 Professional – FJ82H-XT6CR-J8D7P-XQJJ2-GPDD4
  • Windows 7 Professional N – MRPKT-YTG23-K7D7T-X2JMM-QY7MG
  • Windows 7 Enterprise – 33PXH-7Y6KF-2VJC9-XBBR8-HVTHH
  • Windows 7 Enterprise N – YDRBP-3D83W-TY26F-D46B2-XCKRJ
  • Windows 7 Enterprise E – C29WB-22CC8-VJ326-GHFJW-H9DH4
  • Windows Server 2008 R2 HPC Edition – FKJQ8-TMCVP-FRMR7-4WR42-3JCD7
  • Windows Server 2008 R2 Datacenter – 74YFP-3QFB3-KQT8W-PMXWJ-7M648
  • Windows Server 2008 R2 Enterprise – 489J6-VHDMP-X63PK-3K798-CPX3Y
  • Windows Server 2008 R2 for Itanium-Based Systems – GT63C-RJFQ3-4GMB6-BRFB9-CB83V
  • Windows Server 2008 R2 Standard – YC6KT-GKW9T-YTKYR-T4X34-R7VHC
  • Windows Web Server 2008 R2 – 6TPJF-RBVHG-WBW2R-86QPH-6RTM4

Don’t worry this is public information (KMS Client Setup Keys), these will only activate if you have a KMS server and the to key make that KMS server work.

Either way there is no need for reinstall & migration or upgrade installation in for a simple upgrade scenario So do your self a  favor and always check if you can use DSIM to achieve your goals!

DELL PE1850 Domain Controller Upgrade to Windows 2008 R2

UPDATE May 20th 2010: DELL changed the location of the pdf’s I updated the links to them on this blog post as I see lost of people clicking on them. Hope this helps.

Just in case someone needs to do something similar, I’m posting some of issues I needed to resolve when I did an Active Directory upgrade for a partner’s IT department (September/October 2009). There was a need for Windows 2008 R2 DNS (for Direct Access), the Active Directory Recycle Bin as well as the desire to have as much servers as possible running the same OS to keep management easy. This is not an extensive manual of any tool used but it will give you some pointers.

The hardware in use was DELL. Seven Power Edge 1850’s servers spread around the country in corporate HQ and large branch offices. Those servers where 3 years old at the time and had 2 years support remaining on the contract. A hardware replacement or virtualization was not an option. So we needed to find out if the upgrade was possible. The good news was we could get our hands on a spare PE1850 for testing and if need be a "swing type" migration. But to reduce the work an in-place upgrade was preferred. The original installation of these domain controllers where x64 bit, otherwise that would have been a no go, W2K8R2 is x64 bit only. It was quite a smart and forward looking chap who did the original project. OK, I admit it was me, so this is blatant self-promotion. The anti-virus had W2K8R2 support; we got an updated agent for the UPS from the vendor, etc. It all looked pretty good.

I checked the following support documents on the dell website:

Microsoft® Windows Server® 2008 R2 for Dell™ PowerEdge™ Systems

Important Information Guide

https://support.dell.com/support/edocs/software/win2008/WS08_R2/en/IIG/WS08R2IG.pdf

Microsoft® Windows Server® 2008 R2 for Dell™ PowerEdge™ Systems

Installing Microsoft Windows Server 2008 R2

http://support.dell.com/support/edocs/software/win2008/WS08_R2/en/ING/WS08R2In.pdf

There found that all drivers and firm ware updates needed to support W2K8R2 on a PE1850 where available except for one and that was the driver for the raid controller, a PERC4e/si. That was a potential show stopper, but a driver was coming. So I kept a close eye on the DELL FTP site and around 3 September it showed up. Using the SUU 6.1 DVD or manually download installation packets I upgraded the firmware of the servers (BIOS, DRAC).

I also ran the upgrade advisor and found that we need to remove the Dell Open Manage Server Assistant version as the aging Dell® OpenManage Diagnostic Service used an unsigned driver (C:Program Files (x86)DellSysMgtoldiagspackagesPORTACCESSOR64.sys). All potential problematic software, unneeded tools and drivers like video, anti-virus, UPS … where removed as well as this makes any upgrade process less risky.

No Native RAID Driver

As the DELL PERC 4e/Si is not natively supported by Windows 2008 R2 we need to use the DELL driver (R227150.exe)
from the FTP site. You could put the drivers in a subfolder $WinPEDriver$ on the root of a volume that Windows can find during the upgrade (hard disk, usb thumb drive…). Now to make absolutely sure we didn’t have any issues with the raid controller we decided to inject the driver in to WIM files to build a custom ISO. That might be redundant but we wanted to have an ISO with all needed drivers for disaster recovery purposes anyway. The drivers need to be injected into the boot.wim and thee install.wim files using DISM (Deployment Image Servicing and Management from the WAIK for Windows 7 en W2K8R2) see The Windows® Automated Installation Kit (AIK) for Windows® 7 @ http://www.microsoft.com/downloads/details.aspx?familyID=f1bae135-4190-4d7c-b193-19123141edaa&displaylang=en.

We used the x64 bit versions of the tools as our WIM files are x64 bit

The following commands inject the driver into the boot wim file’s two indexes:

DISM /MOUNT-WIM /WIMFILE:D:InjectDriverboot.wim /INDEX:1 /MOUNTDIR:D:MOUNTHERE

DISM /IMAGE:D:MOUNTHERE /ADD-DRIVER /DRIVER:D:DRIVERSDELLR227150

DISM /UNMOUNT-WIM /MOUNTDIR:D:MOUNTHERE /COMMIT

DISM /MOUNT-WIM /WIMFILE:D:InjectDriverboot.wim /INDEX:2 /MOUNTDIR:D:MOUNTHERE

DISM /IMAGE:D:MOUNTHERE /ADD-DRIVER /DRIVER:D:DRIVERSDELLR227150

DISM /UNMOUNT-WIM /MOUNTDIR:D:MOUNTHERE /COMMIT

Index 1 is the Microsoft Windows Preinstallation Environment (WinPE) and Index 2 is the actual Windows Setup that you can run when booted into WinPE. DISM has a command to find out more info about the image files: DISM.exe /Get-WimInfo. The documentation in the WAIK is quite good. Read it!

The following commands inject the driver into the install wim file. You need to do that for any index you want or need (Web, Standard, Enterprise, core and full install …) Just paste everything you need in a cmd file and you’re good to go.

DISM /MOUNT-WIM /WIMFILE:D:InjectDriverinstall.wim /INDEX:1 /MOUNTDIR:D:MOUNTHERE

DISM /IMAGE:D:MOUNTHERE /ADD-DRIVER /DRIVER:D:DRIVERSDELLR227150

DISM /UNMOUNT-WIM /MOUNTDIR:D:MOUNTHERE /COMMIT

Video Driver Injection Hiccup

As we wanted to have a good screen resolution for the sys admins we also embedded the video drivers. The screen resolution with the native driver wasn’t very good so we looked around to find one that would work. We found the Radeon 7000M driver (ATI_Radeon-7000M_A00_R177829.exe) on the DELL website and also injected them into the boot.wim and install.wim image files using DISM. That way we didn’t need to update the video drivers after installation. Cool. Most video drivers are packed twice. The trick is that you still need to expand the drivers after you extracted them from the installer using WinZip, 7Zip, WinRAR or whatever it is your use or prefer. Otherwise you’ll get an error like this after dism has found the inf:

Searching for driver packages to install…Found 2 driver package(s) to install.
Installing 1 of 2 – D:DRIVERSDELLR177829DriverXP6A_INFCA_58688.inf: Error – An error occurred. The driver package could not be installed.For more information, check for log files in the <windir>inf folder of the target image.
Installing 2 of 2 – D:DRIVERSDELLR177829DriverXP_INFCX_58688.inf: Error – An error occurred. The driver package could not be installed.For more information, check for log files in the <windir>inf folder of the target image.

For more information, check for log files in the <windir>inf folder of the target image.  

Error 30

The command completed with errors. For more information, refer to the log file.

The DISM log file can be found at C:WindowsLogsDISMdism.log

If you look in the dism.log you’ll find an error code like 0x8007001E as the cause of the error. This is rather cryptic. Any way you can prevent this by extracting them:

Expand D:DRIVERSDELLR177829DriverXP6A_INFB_58469*.* D:DriversExpanded

Copy the expanded files into a copy of the original folder structure to replace the original files. Make sure that you repeat this exercise for any subfolder as well if needed or you’ll only expand none or only a portion of the files. When you’ve done that you can add the drivers to the WIM files. Beware that adding those large video drivers can take rather long.

Now that we have added all drivers to the wim files we write the customized installation to an ISO file (oscdimg.exe, WAIK). We can burn this to a CD to add to the disaster recovery kit or mount the ISO using the DRAC media.

"C:Program FilesWindows AIKToolsamd64oscdimg.exe" -n -m -bD:W2K8R2WithDellPerc4esiDriverW2K8R2bootetfsboot.com "D:W2K8R2WithDellPerc4esiDriverW2K8R2" "D:W2K8R2WithDellPerc4eDiAndRadeon7000M.iso"

Using the custom install we were able to upgrade the domain controllers fast and without any issues. All what was left to do after the upgrade was check if all was well with the DC. After that we had to clean up the post upgrade artifacts, install anti-virus, UPS software, Dell Management tools and provide for and schedule the backups.

So in in all we did 7 in place upgrades and now they have been running in native Windows 2008 Domain & forest functional level for over 4 months without any issues. Nice job. That’s the good thing about that partner, they always have some interesting jobs to do and helping out is always appreciated.