NUMA Spanning and Virtual NUMA in Hyper-V

When it comes to NUMA Spanning and Virtual NUMA in Hyper-V or anything NUMA related actually in Hyper-V virtualization this is one  subject that too many people don’t know enough about. If they know it they often could be helped by some more in depth information and examples on anything NUMA related in Hyper-V virtualization.

image

Some run everything on the defaults and  never even learn more l they read or find they need to dive in deeper for some needs or use cases. To help out many with some of the confusion or questions they struggled with in regards to Virtual NUMA, NUMA Topology, NUMA Spanning and their relation to static and dynamic memory.image

As I don’t have the time to answer all questions I get in regards to this subject I have written an article on the subject. I’ve published it as a community effort on the StarWind Software blog and you can find it here: A closer look at NUMA Spanning and virtual NUMA settings

I think t complements the information on this subject on TechNet well and it also touches on Windows Server 2016 aspects of this story. I hope you enjoy it!

Client Access & Windows Server 2016 Site Aware Stretched Clusters

Introduction

There’s more to business continuity than having multiple locations. When it comes to high availability, or perhaps more accurately disaster recovery and business continuity people tend to focus on the good news. Some managers don’t want to be bothered by the details of our incompetency (i.e. reality and laws of physics) and vendors only like to focus on what they can sell with the biggest profit margin. Anything raining on that party falls under annoying details. When such a manager and such a sales man find each other it’s a match made in heaven. You’re the one who’s bringing the rain. It comes under the form of a simple question. How are we going to expose the failed over services internally and externally to the users and customers? What you mean that million-dollar investment in multiple SANs, clusters and consultants isn’t sufficient? Nope!

clip_image002

One piece of very good news is that in Windows Server 2016 Failover Clustering we can now leverage a cloud witness as well, next to a file share witness. This has the benefits we do not need a 3rd site for the file share witness. Which was not always feasible, sometimes a bit convoluted to achieve in the cloud via IAAS or depended on a rather less dependable server or PC somewhere in a branch office.

What’s the problem?

The problem is that failing over the workload with the services (VMs, SQL, File Servers, …) in a healthy, consistent state is only part of the challenge. The other part is to make sure that your clients (human or machines) can actually access those failed over services. If required or possible without noticing or with the smallest possible interruption possible. Even when you can achieve failover with only seconds of service interruption, some applications just can handle this gracefully or not at all.

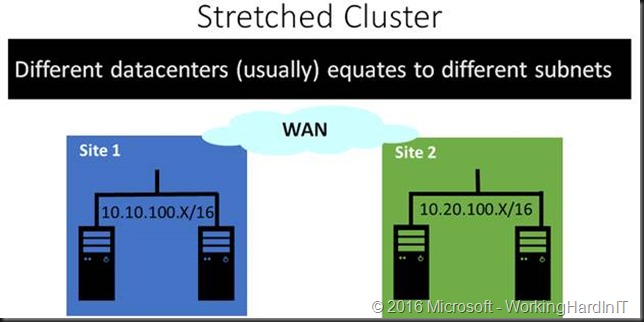
The thing is when you have multiple sites that often means distinct separate subnets / networks. So when that VM with IP address of 10.10.100.124 on default untagged VLAN 100 fails over to the other site how will the clients in the various branch offices or on the internet access it services? DNS point to 10.10.100.124 under normal conditions.

Well when the IP address can be updated for the DNS record thanks to “Multi-Subnet Resource Configuration” (SQL Server, File Share) thing will work again, eventually, given enough time.

clip_image004

Multi-Subnet Resource Configuration works as follows. We have a single network name resource which we make dependent on multiple IP Address resources. In cluster terms that’s a “OR” decency when looking at the validation report. The secret sauce is that only one of the IP address resources of the network name resource is online at any given time. This gets registered in DNS and that’s what the clients use to access the service.

This works but the DNS record need to be upgraded, DNS replication needs to happen, client their DNS cache needs to expire and update etc. You can be looking at half an hour of down time actually.

But what if Multi-Subnet Resource Configuration isn’t an option or we’re in a hurry? What are options and how well and fast do these work? That’s the point at which the storage vendor is already counting the profits, the PM states the job’s done and the boss has already decided the project is a success and the network guys have some questions about YOUR problems. Let’s discuss some of options to deal with accessing services after a site activation.

Note: Hyper-V replica has the ability inject an alternate IP address on failover but we’re talking about a stretched cluster here, where replication happens at the storage level, not at the application level (Hyper-V) for the virtual machines.

Software Defined Networking Aka Network Virtualization.

Using Hyper-V Network Virtualization (HNV) abstract VMs logical subnet boundaries. This gives each virtual network the illusion it is running as a physical network. The typical example for this is multiple tenants that have the same IP space. The fact that it overlays physical network is also very handy when it comes to one and the same tenants in multi-site scenarios. Virtual networks allow VMs to move across different physical networks without re-configuring IP address in guest OS.

clip_image005

This totally abstracts the networks and it works great for virtual machines (Hyper-V). It doesn’t have to be limited to a single DC or site. Do note that there’s things to discuss around CSVs, Live Migration cluster wise and routing, gateways, DNS, geo load balancing access wise but you get the idea. When it comes to different subnets, different sites in regards to clustering things are not as easy as it seems. For this discussion we’re limiting ourselves to client connectivity to resources that move to another site and don’t dive into the details of network virtualization either.

Network Name Properties

There’s two cluster network name resource property setting you can configure to help reducing downtime after a failover.

RegisterAllProvidersIP cluster network name resource property

Remember our first story of “Multi-Subnet Resource Configuration” with the DNS updates and cache that has to expire? Well this can be enhanced as long as the applications can hand handle it. We can configure the DNS registration behavior via the RegisterAllProvidersIP property of a cluster networks name resource.

Get-ClusterResource MySQLServer |

Set-ClusterParameter RegisterAllProvidersIP 1

By setting this to TRUE all the IP address resources, on line and off line, are registered in DNS. If you have a “enlightened” application that can check for and handle multiple IP addresses and determine which one to use it allows for faster client reconnects. This works great with SQL Server.

HOstRecordTTL cluster network name resource property

This is great but has limited scope as the application has to have the logic to handle multiple registered IP addresses for the same resource and figure out when to use which one. SQL Server can do this, so can Exchange. What about a file server? RegisterAllProvidersIP won’t work but we can reduce the time to live of the DNS record for a cluster network resource IP address on the client from 20 minutes to 5 minutes or lower.

Get-ClusterResource MyFileShare |

Set-ClusterParameter HostRecordTTL 300

This is not an option for Hyper-V, there network virtualization works better or we use other options. Read on!

Stretch your VLANs

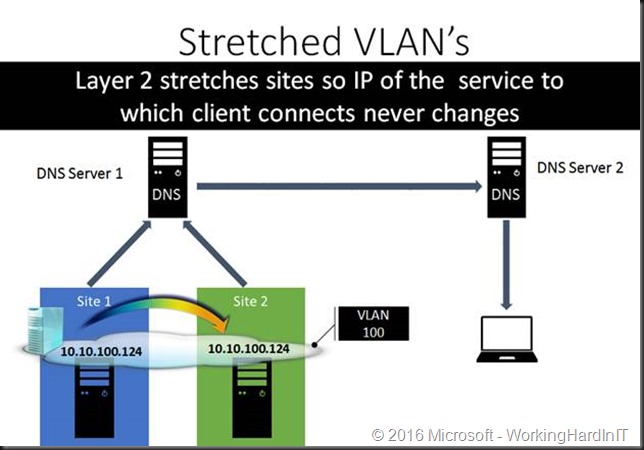
Here the VLAN(s) stretch across the sites. This means that the IP address of the service (VMs, SQL Servers, File Shares, …) never changes making it very easy to have the clients reconnect very fast.

clip_image007

Easy for the apps and the system administrators. Well sort of, chances are that the networks admins will chip in and put a kill contract out on you with some assassins. Just saying. In a perfect world this would be a good idea. In reality layer 2 and spanning tree are making sure you’ll sort of regret it or at least deal with the drawback and fall out. Choose wisely.

Abstract the network devices

This is a network vendors provided solution and I don’t see it very much in the wild. In this approach the network devices use a 3rd IP address that get registered in DNS for use by the clients. The fact that the workload switches between subnets when failing over between sites is irrelevant to the clients.

clip_image018

Cisco has this in a couple of solutions where NAT or a VIP is used to achieve this. As this is network appliance/ hardware based it works with any workload.

SLA your way out

Some people “mitigate” the prolonged down time by having a separate SLA for local failover versus site failover. Cool, but if I was cynical I could state that this is just lawyer behavior. You create fine print and “cover your ass” for that scenario. It’s not really solving anything but accepting longer down time and having all involved parties recognize and accept that fact. This is a valid approach.

Be creative & drive towards maximum portability

In an ideal world you can provision apps & services so fast you only need to protect and failover the persistent data. A world of micro services, containers where servers and virtual machines are cattle. But many of us will have to deal with servers being holey cows for now.

The above approaches are the most common options. There are more variations to these. One of those could be bases around the use of a dedicated management domain on both sites. It’s a concept I’ve used a couple of time where and when allowed.

It has some drawbacks or at least some complexities to deal with and one such example might be when configuring host based backups that need access to the guest VMs. This requires some extra firewall configuration. Nothing that would prevent you from doing so with good backup products like Veeam and it’s something you’re probably used to doing already for monitoring and backups across domains anyway.

But it also has serious benefits as the actual business domains are completely separate from the management domain and potentially 100% virtualized but that’s not a hard requirement as long as you keep the remaining physical servers in their own site dependent subnet which routes, these don’t move anyway, and they should have workloads that are distributed anyway like AD, Exchange DAGs, etc. The big benefits compared to a stretched cluster is that you can have the same subnet(s) on both sides of the stretched cluster for your virtual machines and you change the routing and endpoints for your public and private access to the services. Instead of making the changes to the cluster resources you do so higher up at the stack. It’s a bit like moving your data center to new location “as is” and directing the clients to the new location. This removes the need for stretched VLAN, or implementing network virtualization, at the cost of a bit more down time & work to “switch”. It’s worth considering.

It helps to leveraging DNS and geo load balancing technologies in this but the core infrastructure (the site ware stretched cluster) can run in a fully routed / Layer 3 fashion.

Sure you’ll still need to make sure the traffic from the offices goes to the correct data center now and it really rocks if you have your internet presence geo-load balanced in some way but let’s face it. But you needed to have that in order for any approach anyway.

Closing thoughts

There is a lot more detail and complexity to all of this than I covered in this short article. This is meant an eye opener, a point from where to start the discussion with the business demanding 24/7, 99.999% a zero cost and effort. Like Amazon or Azure but then better, cheaper and on premises. Ouch! As you might expect, this can’t be dealt with in just a few pages. Getting a solid, working disaster avoidance, recovery and business continuity plan & process is going to take some effort to create and maintain.

Fully failing over without any work or a second of downtime is a very expensive illusion and you might be better off with 15 to 20 minutes of down time for 90% of the workload and 30 to 60 minutes for the remaining 10% that trying to chase the ultimate perfection of 100% zero downtime ever for all services. Chances are you’ll go broke trying and pretending, which means failing. Remember that when your primary data center was just taken down or worse, burnt down, dealing with a couple of hours of down time to get you secondary site up and running 100 % isn’t actually as bad as it seems when discussing 2 or 3 hours of down time in a management meeting. Somehow it always seems a bigger deal when not faced with the alternative of the business being wiped out.

One final note, don’t forget to tell your bosses you’re going to have to practices this a couple of times per year. Doing it for real count’s a practice only if it’s the 3rd time you do it. Good luck!

Issues to watch out for when configuring Discrete Device Assignment

When you’re discovering how to get discrete device assignment to work you have some potential bumps that might trip you up. So what are the issues to watch out for when configuring Discrete Device Assignment? We’ll share some here but note this is from testing with Windows Server 2016 Technical Preview 4. Changes can and probably will happen before RTM.

Make sure your VMs are running on the latest configuration version. That means 7.x at the time of writing. Many of the new features require this as discussed in Windows Server 2016 TPv4 Hyper-V brings virtual machine configuration version 7

Check the configuration version of the VM

When you try to add a GPU to a VM via Discrete Device Assignment you’ll get an error when the VM has version 5.0 in stead of 7.x. This can easily happen when you move VMs from older versions to a shiny new Windows 2016 environment as in the example below:

image

Naturally all of this is logged in the Hyper-V-VMMS Admin logs as well

‘W2K12R2’ cannot add device ‘Virtual Pci Express Port’ until the virtual machine is upgraded. (Virtual machine ID 592A920F-B0E9-480C-9052-A397B377BCC9)

Mind your Dynamic Memory settings

Another thing you need to watch out for is that when you use dynamic memory the startup memory and the minimum memory values have to match. So minimum memory cannot be lower than the startup memory. Do not that this is TPv4 and things might change.

image

Cannot add the device to ‘W2K12R2’ as that virtual machine has Dynamic Memory configured with different startup memory and minimum memory values. When adding a device, the virtual machine must be configured with equal startup memory and minimum memory values.(Virtual machine ID 592A920F-B0E9-480C-9052-A397B377BCC9)

If you try to change this on a VM with discrete device assignment enabled you’ll also find that this isn’t allowed.

image

Cannot perform the operation for ‘W2K12R2’ as the specified memory settings are not compatible for device assignment. The startup memory size and minimum memory size must be equal when Dynamic Memory is enabled and devices are also assigned.(Virtual machine ID 592A920F-B0E9-480C-9052-A397B377BCC9)

Set the automatic stop action to “Turn off the virtual machine”

I already mentioned this in the blog but you need to make sure that the automatic stop action for the virtual machine is set to “turn off the virtual machine and not to the default of “save the virtual machine state”. You cannot use DDA unless you do so.

image

Cannot add the device to ‘W2K12R2’ as that virtual machine is configured to go to saved state on host shutdown. (Virtual machine ID 592A920F-B0E9-480C-9052-A397B377BCC9)

Again, changing this on a VM that has DDA assigned will not work.

image

Discrete means one on one

Remember that you cannot assign a device to more than one VM. The thing here is it won’t block you when both VMs are shut down, at least not in TPv4.  But It’s dedicated and won’t work. When you do and you try to start any of those VMs it won’t work.

image

An error occurred while attempting to start the selected virtual machine(s).

‘RFX-WIN10ENT’ failed to start.

Virtual Pci Express Port (Instance ID 9B15DD32-5F94-46EF-8524-501007830322): Failed to Power on with Error ‘The device is in use by an active process and cannot be disconnected.’.

When you try to assign a GPU to a VM that is assigned to a running VM it will block you!

The dive Cleary identifies the VM the device is already assigned to.

Add-VMAssignableDevice -LocationPath $LocationPathOfDismountedDA -VMName RFX-WIN10ENT
Add-VMAssignableDevice : ‘RFX-WIN10ENT’ failed to add resources to ‘RFX-WIN10ENT’.
Virtual Pci Express Port (Instance ID EA7CB907-C38A-4396-97E0-A9A8F3C2D1B0): Failed to Power on with Error ‘The device
is in use by an active process and cannot be disconnected.’.
‘RFX-WIN10ENT’ failed to add resources. (Virtual machine ID 425A366E-E380-4D8C-AADE-DE16EAC0A104)
‘RFX-WIN10ENT’ Virtual Pci Express Port (Instance ID EA7CB907-C38A-4396-97E0-A9A8F3C2D1B0): Failed to Power on with
Error ‘The device is in use by an active process and cannot be disconnected.’ (0x80070964). (Virtual machine ID
425A366E-E380-4D8C-AADE-DE16EAC0A104)
Could not allocate the PCI Express device with the Plug and Play Device Instance path
‘PCIP\VEN_10DE&DEV_0FF2&SUBSYS_101210DE&REV_A1\6&17F903&0&00400010’ because it is already in use by another VM.
At line:1 char:1
+ Add-VMAssignableDevice -LocationPath $LocationPathOfDismountedDA -VMN …
+ ~~~~~~~~~~~~~~~~~~~~~~~~~~~~~~~~~~~~~~~~~~~~~~~~~~~~~~
+ CategoryInfo          : NotSpecified: (:) [Add-VMAssignableDevice], VirtualizationException
+ FullyQualifiedErrorId : OperationFailed,Microsoft.HyperV.PowerShell.Commands.AddVmAssignableDevice

Shut down your VM to make change to DDA

Last but not least to use DDA (assign, configure) with a VM you have to shut it down.  Removing devices whilst the VM is running isn’t blocked. But, he results can be quite “harsh”. This is me removing a DDA GPU form a Windows 2012 R2 VM whilst it’s running.

image

The fun part is that you can add it again while the VM is running and with will work, but it’s not a healthy thing to do.

As stated above, these notes are from testing with Windows Server 2016 Technical Preview 4 so thing can still change. Happy testing!

Setting up Discrete Device Assignment with a GPU

Introduction

Let’s take a look at setting up Discrete Device Assignment with a GPU. Windows Server 2016 introduces Discrete Device Assignment (DDA). This allows a PCI Express connected device, that supports this, to be connected directly through to a virtual machine.

The idea behind this is to gain extra performance. In our case we’ll use one of the four display adapters in our NVIDIA GROD K1 to assign to a VM via DDA. The 3 other can remain for use with RemoteFX. Perhaps we could even leverage DDA for GPUs that do not support RemoteFX to be used directly by a VM, we’ll see.

As we directly assign the hardware to VM we need to install the drivers for that hardware inside of that VM just like you need to do with real hardware.

I refer you to the starting blog of a series on DDA in Windows 2016:

Here you can get a wealth of extra information. My experimentations with this feature relied heavily on these blogs and MSFT provide GitHub script to query a host for DDA capable devices. That was very educational in regards to finding out the PowerShell we needed to get DDA to work! Please see A 1st look at Discrete Device Assignment in Hyper-V to see the output of this script and how we identified that our NVIDIA GRID K1 card was a DDA capable candidate.

Requirements

There are some conditions the host system needs to meet to even be able to use DDA. The host needs to support Access Control services which enables pass through of PCI Express devices in a secure manner. The host also need to support SLAT and Intel VT-d2 or AMD I/O MMU. This is dependent on UEFI, which is not a big issue. All my W2K12R2 cluster nodes & member servers run UEFI already anyway. All in all, these requirements are covered by modern hardware. The hardware you buy today for Windows Server 2012 R2 meets those requirements when you buy decent enterprise grade hardware such as the DELL PowerEdge R730 series. That’s the model I had available to test with. Nothing about these requirements is shocking or unusual.

A PCI express device that is used for DDA cannot be used by the host in any way. You’ll see we actually dismount it form the host. It also cannot be shared amongst VMs. It’s used exclusively by the VM it’s assigned to. As you can imagine this is not a scenario for live migration and VM mobility. This is a major difference between DDA and SR-IOV or virtual fibre channel where live migration is supported in very creative, different ways. Now I’m not saying Microsoft will never be able to combine DDA with live migration, but to the best of my knowledge it’s not available today.

The host requirements are also listed here: https://technet.microsoft.com/en-us/library/mt608570.aspx

  • The processor must have either Intel’s Extended Page Table (EPT) or AMD’s Nested Page Table (NPT).

The chipset must have:

  • Interrupt remapping: Intel’s VT-d with the Interrupt Remapping capability (VT-d2) or any version of AMD I/O Memory Management Unit (I/O MMU).
  • DMA remapping: Intel’s VT-d with Queued Invalidations or any AMD I/O MMU.
  • Access control services (ACS) on PCI Express root ports.
  • The firmware tables must expose the I/O MMU to the Windows hypervisor. Note that this feature might be turned off in the UEFI or BIOS. For instructions, see the hardware documentation or contact your hardware manufacturer.

You get this technology both on premises with Windows Server 2016 as and with virtual machines running Windows Server 2016; Windows 10 (1511 or higher) and Linux distros that support it. It’s also an offering on high end Azure VMs (IAAS). It supports both Generation 1 and generation 2 virtual machines. All be it that generation 2 is X64 bit only, this might be important for certain client VMs. We’ve dumped 32 bit Operating systems over decade ago so to me this is a non-issue.

For this article I used a DELL PowerEdge R730, a NVIIA GRID K1 GPU. Windows Server 2016 TPv4 with CU of March 2016 and Windows 10 Insider Build 14295.

Microsoft supports 2 devices at the moment:

  • GPUs and coprocessors
  • NVMe (Non-Volatile Memory express) SSD controllers

Other devices might work but you’re dependent on the hardware vendor for support. Maybe that’s OK for you, maybe it’s not.

Below I describe the steps to get DDA working. There’s also a rough video out on my Vimeo channel: Discrete Device Assignment with a GPU in Windows 2016 TPv4.

Setting up Discrete Device Assignment with a GPU

Preparing a Hyper-V host with a GPU for Discrete Device Assignment

First of all, you need a Windows Server 2016 Host running Hyper-V. It needs to meet the hardware specifications discussed above, boot form EUFI with VT-d enabled and you need a PCI Express GPU to work with that can be used for discrete device assignment.

It pays to get the most recent GPU driver installed and for our NVIDIA GRID K1 which was 362.13 at the time of writing.

clip_image001

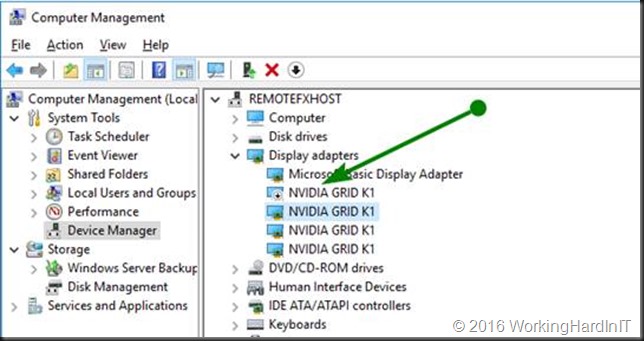
On the host when your installation of the GPU and drivers is OK you’ll see 4 NIVIDIA GRID K1 Display Adapters in device manager.

clip_image002

We create a generation 2 VM for this demo. In case you recuperate a VM that already has a RemoteFX adapter in use, remove it. You want a VM that only has a Microsoft Hyper-V Video Adapter.

clip_image003

In Hyper-V manager I also exclude the NVDIA GRID K1 GPU I’ll configure for DDA from being used by RemoteFX. In this show case that we’ll use the first one.

clip_image005

OK, we’re all set to start with our DDA setup for an NVIDIA GRID K1 GPU!

Assign the PCI Express GPU to the VM

Prepping the GPU and host

As stated above to have a GPU assigned to a VM we must make sure that the host no longer has use of it. We do this by dismounting the display adapter which renders it unavailable to the host. Once that is don we can assign that device to a VM.

Let’s walk through this. Tip: run PoSh or the ISE as an administrator.

We run Get-VMHostAssignableDevice. This return nothing as no devices yet have been made available for DDA.

I now want to find my display adapters

#Grab all the GPUs in the Hyper-V Host

$MyDisplays = Get-PnpDevice | Where-Object {$_.Class -eq “Display”}

$MyDisplays | ft -AutoSize

This returns

clip_image007

As you can see it list all adapters. Let’s limit this to the NVIDIA ones alone.

#We can get all NVIDIA cards in the host by querying for the nvlddmkm

#service which is a NVIDIA kernel mode driver

$MyNVIDIA = Get-PnpDevice | Where-Object {$_.Class -eq “Display”} |

Where-Object {$_.Service -eq “nvlddmkm”}

$MyNVIDIA | ft -AutoSize

clip_image009

If you have multiple type of NVIDIA cared you might also want to filter those out based on the friendly name. In our case with only one GPU this doesn’t filter anything. What we really want to do is excluded any display adapter that has already been dismounted. For that we use the -PresentOnly parameter.

#We actually only need the NVIDIA GRID K1 cards, let’s filter some #more,there might be other NVDIA GPUs.We might already have dismounted #some of those GPU before. For this exercise we want to work with the #ones that are mountedt he paramater -PresentOnly will do just that.

$MyNVidiaGRIDK1 = Get-PnpDevice -PresentOnly| Where-Object {$_.Class -eq “Display”} |

Where-Object {$_.Service -eq “nvlddmkm”} |

Where-Object {$_.FriendlyName -eq “NVIDIA Grid K1”}

$MyNVidiaGRIDK1 | ft -AutoSize

Extra info: When you have already used one of the display adapters for DDA (Status “UnKnown”). Like in the screenshot below.

clip_image011

We can filter out any already unmounted device by using the -PresentOnly parameter. As we could have more NVIDIA adaptors in the host, potentially different models, we’ll filter that out with the FriendlyName so we only get the NVIDIA GRID K1 display adapters.

clip_image013

In the example above you see 3 display adapters as 1 of the 4 on the GPU is already dismounted. The “Unkown” one isn’t returned anymore.

Anyway, when we run

$MyNVidiaGRIDK1 = Get-PnpDevice -PresentOnly| Where-Object {$_.Class -eq “Display”} |

Where-Object {$_.Service -eq “nvlddmkm”} |

Where-Object {$_.FriendlyName -eq “NVIDIA Grid K1”}

$MyNVidiaGRIDK1 | ft -AutoSize

We get an array with the display adapters relevant to us. I’ll use the first (which I excluded form use with RemoteFX). In a zero based array this means I disable that display adapter as follows:

Disable-PnpDevice -InstanceId $MyNVidiaGRIDK1[0].InstanceId -Confirm:$false

Your screen might flicker when you do this. This is actually like disabling it in device manager as you can see when you take a peek at it.clip_image015

When you now run

$MyNVidiaGRIDK1 = Get-PnpDevice -PresentOnly| Where-Object {$_.Class -eq “Display”} |

Where-Object {$_.Service -eq “nvlddmkm”} |

Where-Object {$_.FriendlyName -eq “NVIDIA Grid K1”}

$MyNVidiaGRIDK1 | ft -AutoSize

Again you’ll see

clip_image017

The disabled adapter has error as a status. This is the one we will dismount so that the host no longer has access to it. The array is zero based we grab the data about that display adapter.

#Grab the data (multi string value) for the display adapater

$DataOfGPUToDDismount = Get-PnpDeviceProperty DEVPKEY_Device_LocationPaths -InstanceId $MyNVidiaGRIDK1[0].InstanceId

$DataOfGPUToDDismount | ft -AutoSize

clip_image019

We grab the location path out of that data (it’s the first value, zero based, in the multi string value).

#Grab the location path out of the data (it’s the first value, zero based)

#How do I know: read the MSFT blogs and read the script by MSFT I mentioned earlier.

$locationpath = ($DataOfGPUToDDismount).data[0]

$locationpath | ft -AutoSize

clip_image021

This locationpath is what we need to dismount the display adapter.

#Use this location path to dismount the display adapter

Dismount-VmHostAssignableDevice -locationpath $locationpath -force

Once you dismount a display adapter it becomes available for DDA. When we now run

$MyNVidiaGRIDK1 = Get-PnpDevice -PresentOnly| Where-Object {$_.Class -eq “Display”} |

Where-Object {$_.Service -eq “nvlddmkm”} |

Where-Object {$_.FriendlyName -eq “NVIDIA Grid K1”}

$MyNVidiaGRIDK1 | ft -AutoSize

We get:

clip_image023

As you can see the dismounted display adapter is no longer present in display adapters when filtering with -presentonly. It’s also gone in device manager.
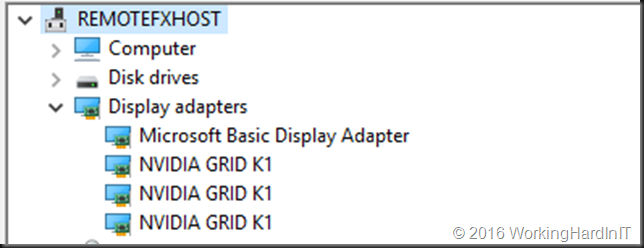
clip_image024

Yes, it’s gone in device manager. There’s only 3 NVIDIA GRID K1 adaptors left. Do note that the device is unmounted and as such unavailable to the host but it is still functional and can be assigned to a VM.That device is still fully functional. The remaining NVIDIA GRID K1 adapters can still be used with RemoteFX for VMs.

It’s not “lost” however. When we adapt our query to find the system devices that have dismounted I the Friendly name we can still get to it (needed to restore the GPU to the host when needed). This means that -PresentOnly for system has a different outcome depending on the class. It’s no longer available in the display class, but it is in the system class.

clip_image026

And we can also see it in System devices node in Device Manager where is labeled as “PCI Express Graphics Processing Unit – Dismounted”.

We now run Get-VMHostAssignableDevice again see that our dismounted adapter has become available to be assigned via DDA.

clip_image029

This means we are ready to assign the display adapter exclusively to our Windows 10 VM.

Assigning a GPU to a VM via DDA

You need to shut down the VM

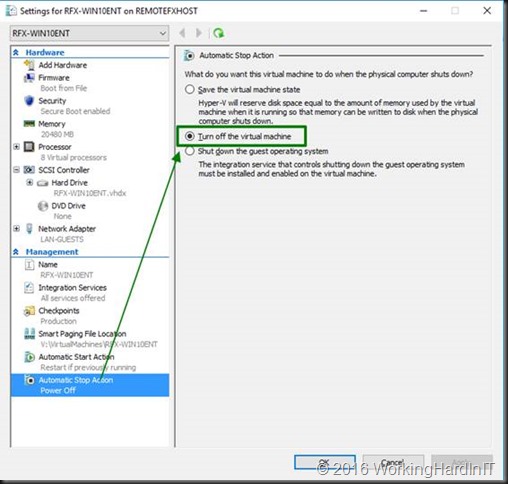
Change the automatic stop action for the VM to “turn off”
clip_image031

This is mandatory our you can’t assign hardware via DDA. It will throw an error if you forget this.

I also set my VM configuration as described in https://blogs.technet.microsoft.com/virtualization/2015/11/23/discrete-device-assignment-gpus/

I give it up to 4GB of memory as that’s what this NVIDIA model seems to support. According to the blog the GPUs work better (or only work) if you set -GuestControlledCacheTypes to true.

“GPUs tend to work a lot faster if the processor can run in a mode where bits in video memory can be held in the processor’s cache for a while before they are written to memory, waiting for other writes to the same memory. This is called “write-combining.” In general, this isn’t enabled in Hyper-V VMs. If you want your GPU to work, you’ll probably need to enable it”

#Let’s set the memory resources on our generation 2 VM for the GPU

Set-VM RFX-WIN10ENT -GuestControlledCacheTypes $True -LowMemoryMappedIoSpace 2000MB -HighMemoryMappedIoSpace 4000MB

You can query these values with Get-VM RFX-WIN10ENT | fl *

We now assign the display adapter to the VM using that same $locationpath

Add-VMAssignableDevice -LocationPath $locationpath -VMName RFX-WIN10ENT

Boot the VM, login and go to device manager.
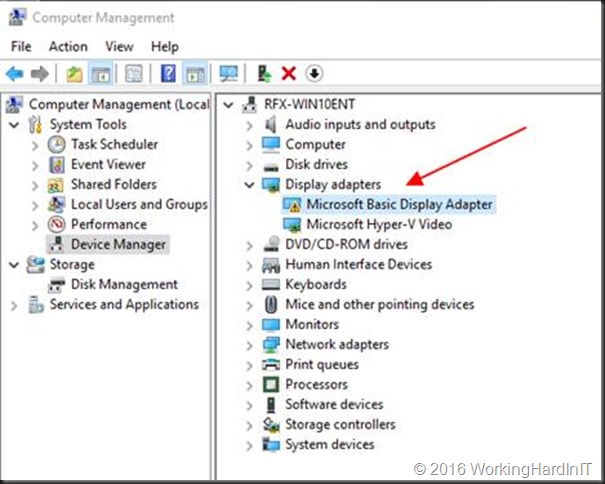
clip_image033

We now need to install the device driver for our NVIDIA GRID K1 GPU, basically the one we used on the host.
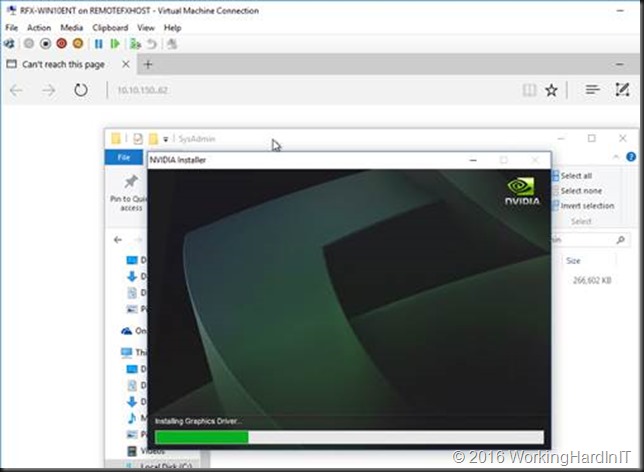
clip_image035

Once that’s done we can see our NVIDIA GRID K1 in the guest VM. Cool!
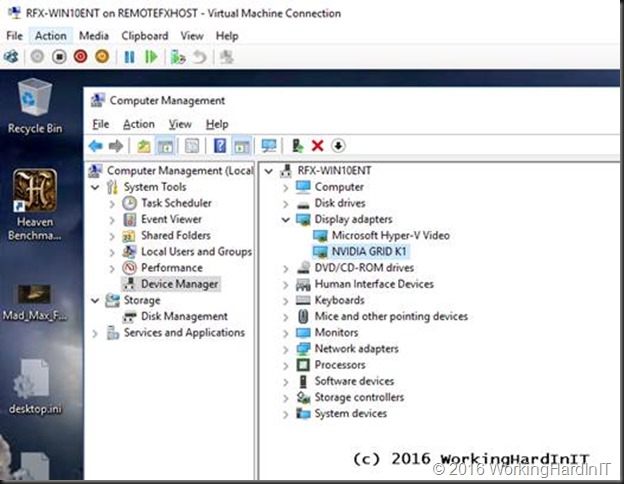
clip_image037

You’ll need a restart of the VM in relation to the hardware change. And the result after all that hard work is very nice graphical experience compared to RemoteFX
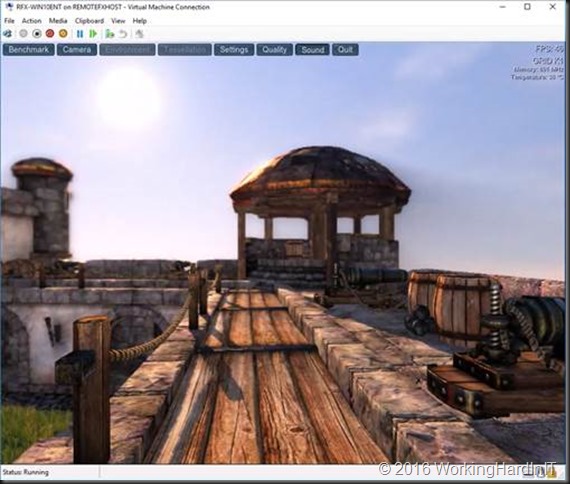
clip_image039

What you don’t believe it’s using an NVIDIA GPU inside of a VM? Open up perfmon in the guest VM and add counters, you’ll find the NVIDIA GPU one and see you have a GRID K1 in there.
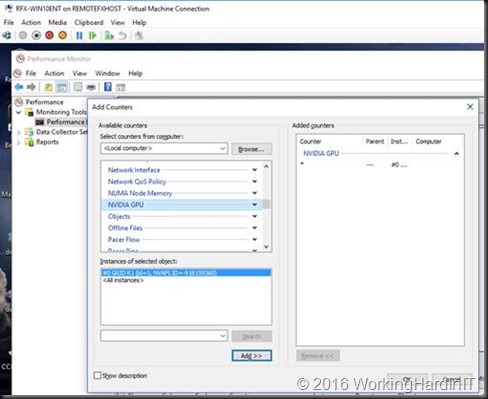
clip_image041

Start some GP intensive process and see those counters rise.

image

Remove a GPU from the VM & return it to the host.

When you no longer need a GPU for DDA to a VM you can reverse the process to remove it from the VM and return it to the host.

Shut down the VM guest OS that’s currently using the NVIDIA GPU graphics adapter.

In an elevated PowerShell prompt or ISE we grab the locationpath for the dismounted display adapter as follows

$DisMountedDevice = Get-PnpDevice -PresentOnly |

Where-Object {$_.Class -eq “System” -AND $_.FriendlyName -like “PCI Express Graphics Processing Unit – Dismounted”}

$DisMountedDevice | ft -AutoSize

clip_image045

We only have one GPU that’s dismounted so that’s easy. When there are more display adapters unmounted this can be a bit more confusing. Some documentation might be in order to make sure you use the correct one.

We then grab the locationpath for this device, which is at location 0 as is an array with one entry (zero based). So in this case we could even leave out the index.

$LocationPathOfDismountedDA = ($DisMountedDevice[0] | Get-PnpDeviceProperty DEVPKEY_Device_LocationPaths).data[0]

$LocationPathOfDismountedDA

clip_image047

Using that locationpath we remove the DDA GPU from the VM

#Remove the display adapter from the VM.

Remove-VMAssignableDevice -LocationPath $LocationPathOfDismountedDA -VMName RFX-WIN10ENT

We now mount the display adapter on the host using that same locationpath

#Mount the display adapter again.

Mount-VmHostAssignableDevice -locationpath $LocationPathOfDismountedDA

We grab the display adapter that’s now back as disabled under device manager of in an “error” status in the display class of the pnpdevices.

#It will now show up in our query for -presentonly NVIDIA GRIDK1 display adapters

#It status will be “Error” (not “Unknown”)

$MyNVidiaGRIDK1 = Get-PnpDevice -PresentOnly| Where-Object {$_.Class -eq “Display”} |

Where-Object {$_.Service -eq “nvlddmkm”} |

Where-Object {$_.FriendlyName -eq “NVIDIA Grid K1”}

$MyNVidiaGRIDK1 | ft -AutoSize

clip_image049

clip_image051

We grab that first entry to enable the display adapter (or do it in device manager)

#Enable the display adapater

Enable-PnpDevice -InstanceId $MyNVidiaGRIDK1[0].InstanceId -Confirm:$false

The GPU is now back and available to the host. When your run you Get-VMHostAssignableDevice it won’t return this display adapter anymore.

We’ve enabled the display adapter and it’s ready for use by the host or RemoteFX again. Finally, we set the memory resources & configuration for the VM back to its defaults before I start it again (PS: these defaults are what the values are on standard VM without ever having any DDA GPU installed. That’s where I got ‘m)

#Let’s set the memory resources on our VM for the GPU to the defaults

Set-VM RFX-WIN10ENT -GuestControlledCacheTypes $False -LowMemoryMappedIoSpace 256MB -HighMemoryMappedIoSpace 512MB

clip_image053

Now tell me all this wasn’t pure fun!