Some Feedback On How to defrag a Hyper-V R2 Cluster Shared Volume

Hans Vredevoort posted a nice blog entry recently on the defragmentation of Clustered Shared Volumes and asked for some feedback & experiences on this subject. He describes the process used and steps taken to defrag your CSV storage and notes that there may be third party products that can handle this automatically. Well yes, there are. Two of the most know defragmentation products support Cluster Shared Volumes and automate the process described by Hans in his blog.  Calvin made a very useful suggestion to use Redirected Access instead of Maintenance mode. This is what the commercial tools like Raxco PerfectDisk and Diskeeper also do.

As the defragmentation of Cluster Shared Volumes requires them to be put into Redirected Access you should not have “always on” defragmentation running in a clustered Hyper-V node. Sure the software will take care of it all for you but the performance hit is there and is considerable. I might just use this point here as yet another plug for 10 Gbps networks for CSV. Also note that the defragmentation has to run on the current owner or coordinator node. Intelligent defragmentation software should know what node to run the defrag on, move the ownership to the desired node that is running the defragmentation or just runs it on all nodes and skips the CSVs storage it isn’t the coordinator for. The latter isn’t that intelligent. John Savill did a great blog post on this before Windows 2008 R2 went RTM for Windows IT Pro Magazine where he also uses PowerShell scripts to move the ownership of the storage to the node where he’ll perform the defragmentation and retrieves the GUID of the disk to use with the  defrag command. You can read his blog post here and see how our lives have improved with the commands he mentions would be available in the RTM version of W2K8R2 (Repair-ClusterSharedVolume  with –defrag option).

For more information on Raxco PerfectDisk you can take a look at the Raxco support article, but the information is rather limited. You can also find some more information from Diskeeper on this subject here.  I would like to add that you should use defragmentation intelligently and not blindly. Do it with a purpose and in a well thought out manner to reap the benefits. Don’t just do it out of habit because you used to do it in DOS back in the day.

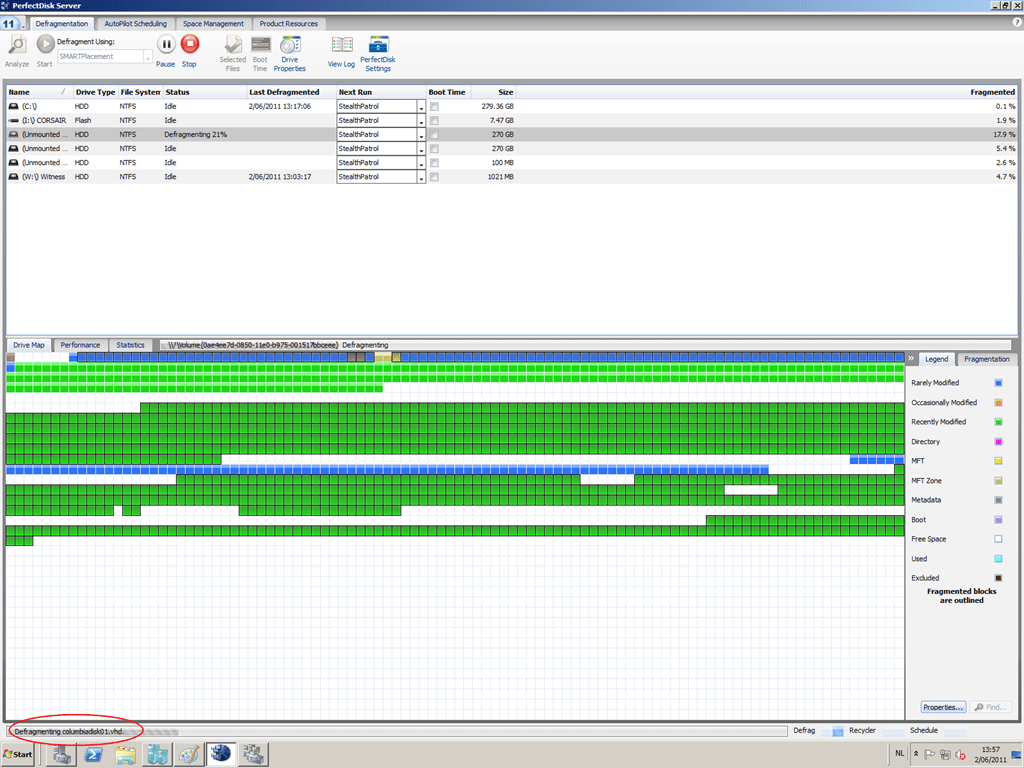
To conclude I’ll leave you with some screenshots from my lab, take during the defragmentation of a Hyper-V cluster node.

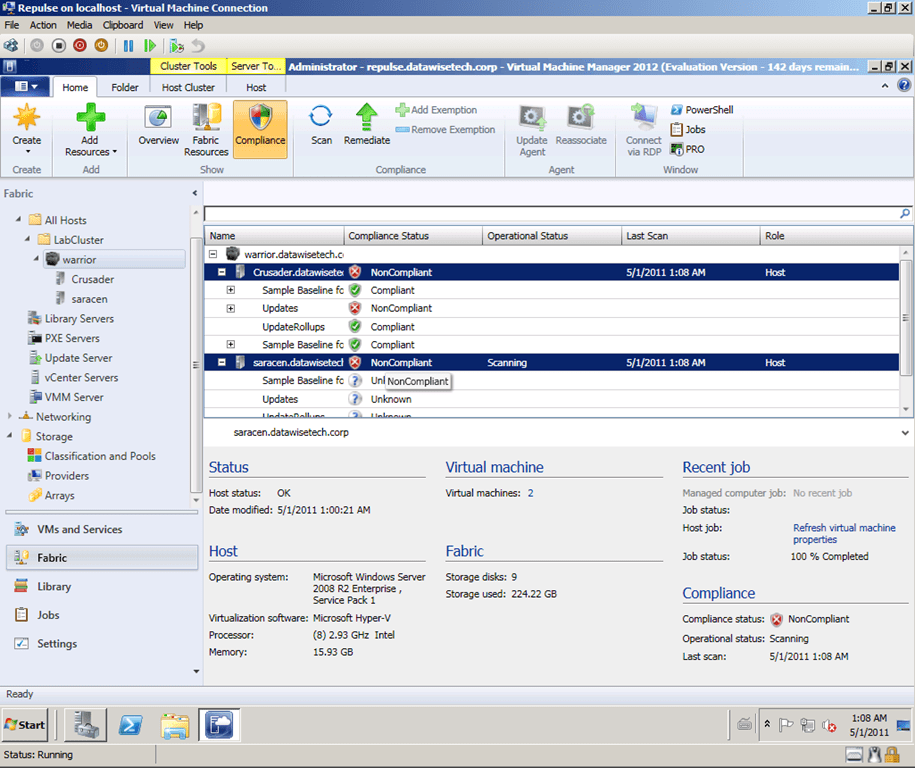
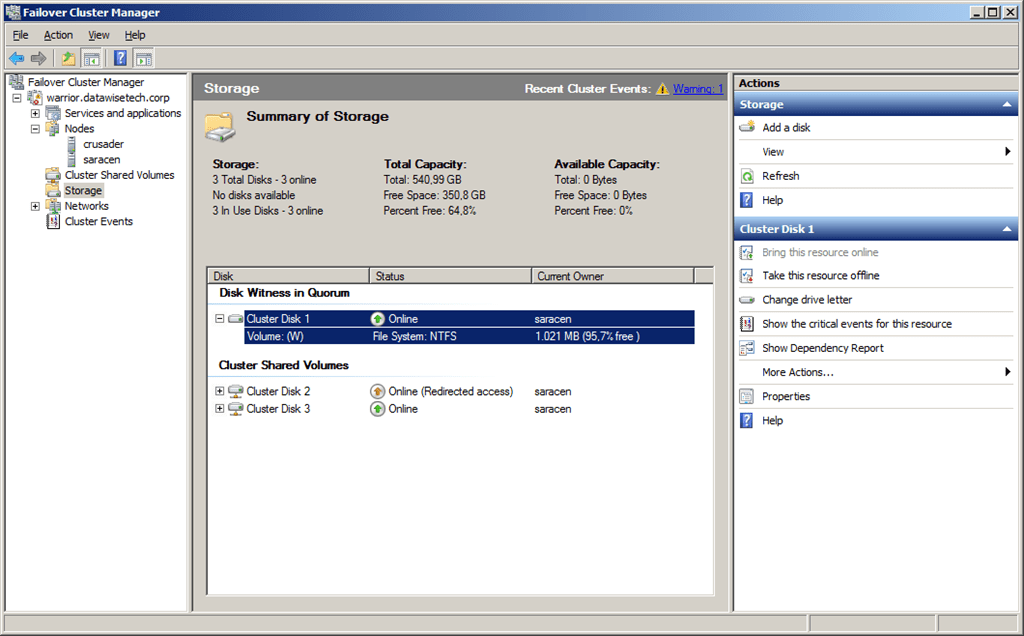
As you can see the CSV storage is put into redirected access:

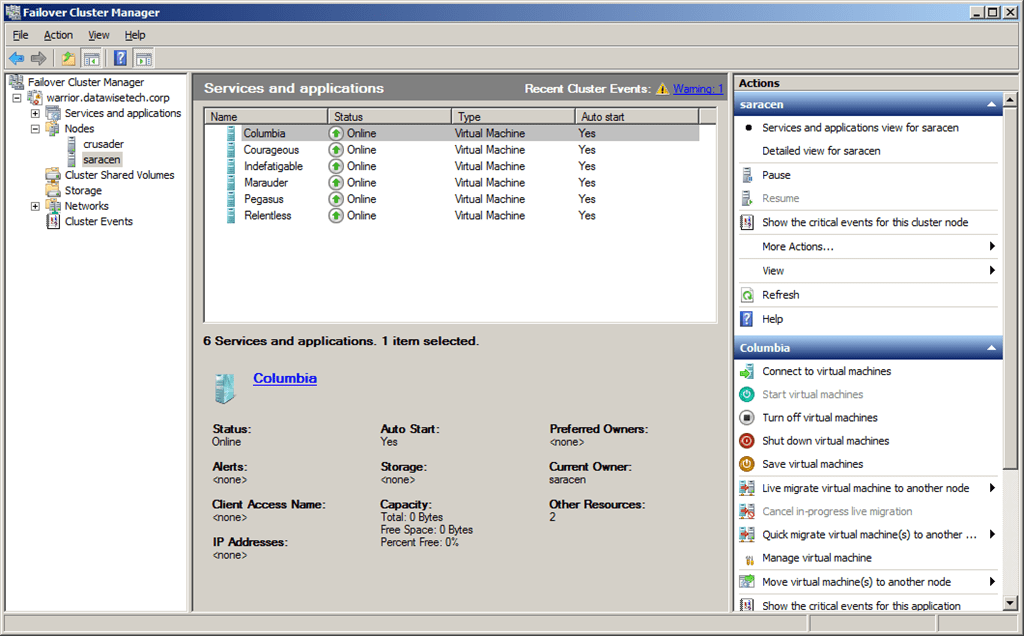
And our machines remain online and available:

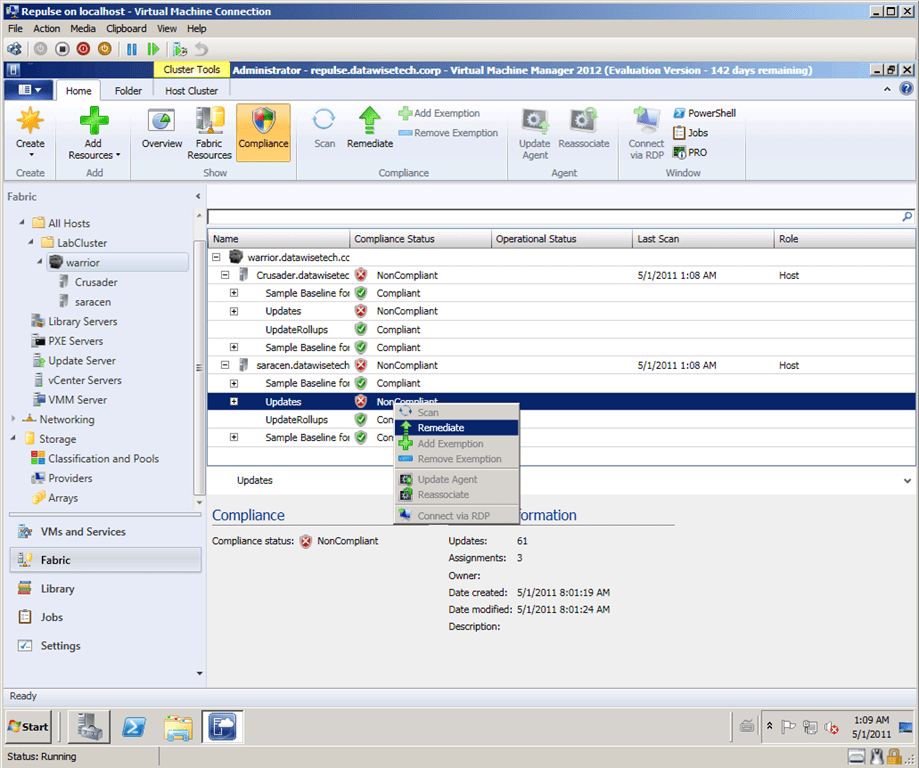
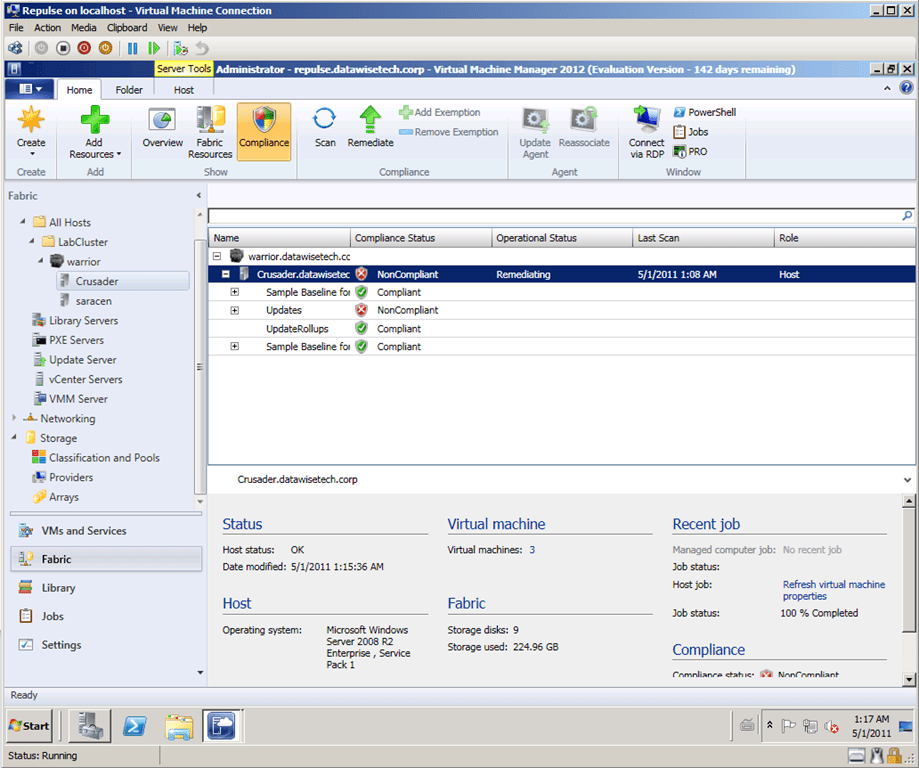
This is because we started to defrag it on the Hyper-V cluster node:

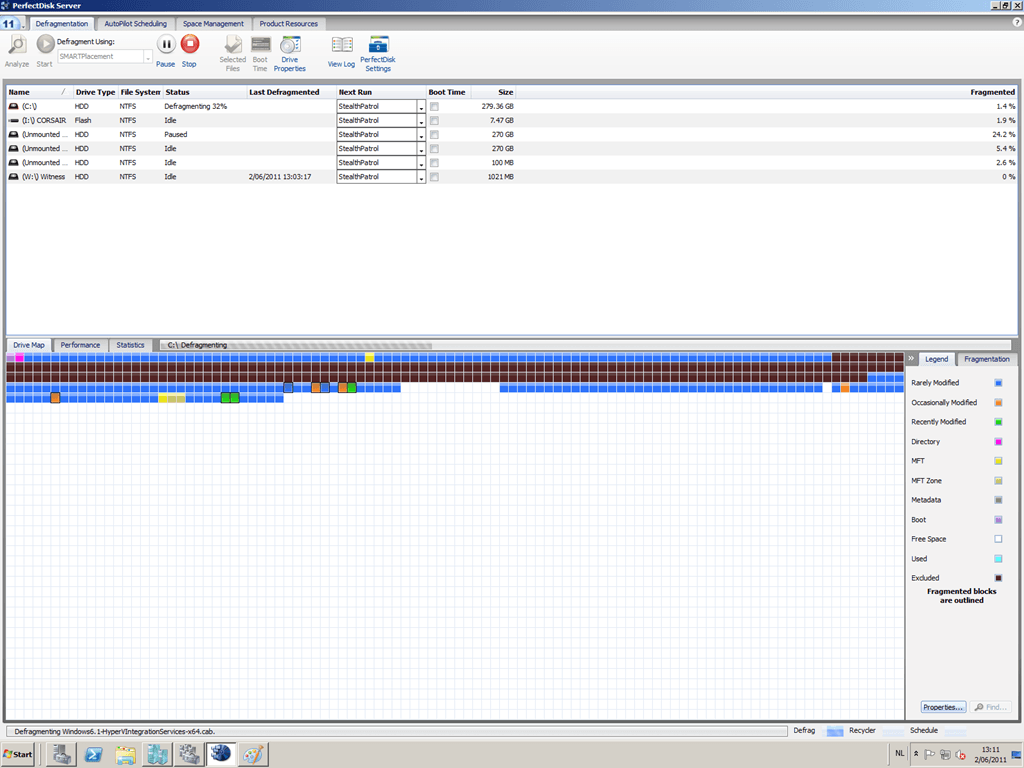
Here you can see that the guest files are indeed being defragmented, in this case, the VHD for the guest server Columbia (red circle at the bottom):

Hyper-V, KEMP LoadMaster & DFS Replication Provide FTP Solutions For Surveyors Network

Remember the blog entry about A Hardware Load Balancing Exercise With A Kemp Loadmaster 2200 KEMP Loadmaster to provide redundancy for a surveyor’s GPS network? Well, we got commissioned to come up with a redundant FTP solution for their needs last month and this blog is about what we came up with. The aim was to make due with what is already available.

FTP 7.5 in Windows 2008 R2

We use the FTP Server available in Windows 2008 R2 which provides us with all functionality we need: User Isolation and FTP over SSL.

The data from all the GPS stations is sent to the FTP server for safekeeping and is to be used to overcome certain issues customers might have with missing data from surveying solutions. This data is not being made available to customers by default, it’s only for special cases & purposes. So we need to collect the data in its own folder named after its account so we can configure user isolation. This also prevents GPS Stations from writing in locations where it shouldn’t.

As every GPS Station slogs in with the “Station” account it ends up in the “Station” folder as root FTP folder and can’t read or write out of that folder. The survey solution service desk can FTP into that folder and access any data they want.

The data that’s being provided by the software solution (LanSurvey01 and lanSurvey02) is to be sent to its own folder “Data” that is also set up with user Isolation to prevent the application from reading or writing anywhere else on the file system.

The data from should be publicly available to the customers and for this, we created a separate FTP site called “Public” that is configured for anonymous access to the same Data folder but with read permissions only. This way the customers can get all the data they need but only have read access to the required data and nothing more.

For more information on setting up FTP 7.5 and using FTP over SSL you might take a look here http://learn.iis.net/page.aspx/304/using-ftp-over-ssl/ and read my blog on FTP over SSL Pollution of the Gene Pool a Real Life “FTP over SSL” Story

High Availability

In the section above we’ve taken care of the FTP needs. Now we still need redundancy. We could use Windows NLB but since this network already uses a KEMP Loadmaster due to the fact that the surveyor’s software has some limitations in its configuration capabilities that don’t allow Windows Network Load Balancing being used.

We want both the GPS stations and the surveyor’s application servers to be able to send FTP data when one of the receiving FTF servers is down for some reason (updates, upgrades, maintenance, or failure). What we did is set up a VIP for use with FTP on the Kemp Loadmaster. This VIP is what is used by the GPS Stations and the application to write and by the customers to read the FTP data.

DFS-R to complete the solution

But up until now, we’ve been ignoring an issue. When using NLB to push data to hosts we need to ensure that all the data will be available on all the nodes all of the time. You could opt to only have the users access the FTP service via an NLB VIP address and push the data to both nodes without using NLB. The latter might be done at the source but then you have twice the amount of data to push out. It also means extra work to configure and maintain the solution. We could copy the data to one FTP node and copy it from there. That works but leaves you very vulnerable to a service outage when the node that gets the original copy is down. No new data will be available. Another issue is the fact that you need a rock-solid way to copy the data and have it done it a timely manner, even after downtime of one or more of the nodes.

As you read above we provide an NLB VIP as a target for the surveyor’s application and the GPS Stations to send their data to. This means the data will be sent to the FTP NLB array even if one of the nodes is down for some reason. To get the data that arrives from 2 application servers and from 40 GPS Stations synchronized and up to date on both the NLB nodes we use the Data File System – Replication (DFS-R) built into Windows 2008 R2. We have no need for a DFS-Namespace here, so we only use the replication feature. This is easy and fast to set up (add the DFS service from the File Server Role) and it doesn’t require any service downtime (no reboot required). The fact that both the FTP nodes are members of a Windows 2008 R2 domain does help with making this easy. To make sure we have replication in all direction we opt to set it up as a full and the replication schedule is 24/7, no days off J Since we chose to replicate the FTP root folder we have both the Data and the Stations folders covered as well as the folder structure needed to have FTP user Isolation function.

This solution was built fast and easily using Windows 2008 R2 out of the box functionality: FTP(S) with User Isolation and DFS-R. The servers are running as hyper-V guests in a Hyper-V cluster providing high availability through Live Migration.

Move that DFS Namespace to Windows 2008 Mode

As promised a while back (Busy, busy, busy) here’s a quick heads up for all you people out there who are still running there DFS namespaces in Windows 2000 mode. Well, when your sporting Windows 2008 (R2) you should get those namespaces moved to Windows 2008 mode sooner or later anyway. For some reason, there is no GUI or PowerShell command let to do this. It’s pretty amazing how many of those of you that can change to the Windows 2008 mode didn’t do it yet. Perhaps the somewhat involved manual process has something to do with this? But OK, if you still see this when you look at the properties of your DFS namespace …

image

… then perhaps it’s time to go visit TechNet you’ll find some info to do it semi-automated as they call it: Migrate a Domain-based Namespace to Windows Server 2008 Mode

Here’s a recap of the steps to take:

  1. Open a Command Prompt window and type the following command to export the namespace information to a file, where \domainnamespace is the name of the appropriate domain and namespace and pathfilename is the path and file name of the export file: Dfsutil root export \domainnamespace pathfilename.xml
  2. Write down the path (\servershare) for each namespace server. You must manually add namespace servers to the recreated namespace because Dfsutil cannot import namespace servers.
  3. In DFS Management, right-click the namespace and then click Delete, or type the following command at a command prompt, where \domainnamespace is the name of the appropriate domain and namespace: Dfsutil root remove \domainnamespace
  4. In DFS Management, recreate the namespace with the same name, but use the Windows Server 2008 mode, or type the following command at a command prompt, where \servernamespace is the name of the appropriate server and share for the namespace root: Dfsutil root adddom \servernamespace v2
  5. To import the namespace information from the export file, type the following command at a command prompt, where \domainnamespace is the name of the appropriate domain and namespace and pathfilename is the path and file name of the file to import: Dfsutil root import merge pathfilename.xml \domainnamespace  In order to minimize the time that is required to import a large namespace, run the Dfsutil root import command locally on a namespace server.
  6. Add any remaining namespace servers to the recreated namespace by right-clicking the namespace in DFS Management and then clicking Add Namespace Server, or by typing the following command at a command prompt, where \servershare is the name of the appropriate server and share for the namespace root: Dfsutil target add \servershare

Be sure to read the community comments as the ampersand issue might affect you. As always it’s good to do some research on possible updates affecting the technology at hand so that’s what I did. And look here what “Binging” for “DFS windows 2008 R2 updates” produced: List of currently available hotfixes for Distributed File System (DFS) technologies in Windows Server 2008 and in Windows Server 2008 R2. We might as well put them into action and be on the safe side.

If you’re not using DFS-N or DFS-R yet give it a look. No, it’s not the perfect solution for every scenario, but for namespace, abstraction (server replacements, moving data, server renaming, …) and keeping data available during maintenance or at the right place (branch offices for example) it’s a nice tool to have.  As another example,  I just recently used DFS-R in full mesh to synch the nodes in an NLB FTP solution where about 45 devices put data on the FTP servers (Windows 2008 R2) via the VIP so they have resilient FTP service.

System Center Virtual Machine Manager 2012 Using WSUS To Update Hyper-V Cluster Hosts & Other Fabric Servers

One very neat feature in System Center Virtual Machine Manager 2012 (SCVMM2012), which is currently in Béta, is the integration with WSUS to automate the patching of Hyper-V cluster hosts (+ the Library servers, SCVMM servers and the update servers, i.e the fabric). The fact that SCVMM 2012 will give you the complete toolset to take care of this is yet a great addition to the functionality available in Virtual Machine Manager 2012. More and more I’m looking forward to using it in production as it has so many improvements and new features. Combine that with what’s being delivered in System Center Operations Manager (SCOM2012) and the other member of the System Center family and I’m quite happy with what is coming.

But let’s get back to the main subject of this blog. Using WSUS and SCVMM2012 to auto-update the Hyper-V cluster hosts without interruption to the virtual machines that are running on it. Up until now, we needed to script such a process out with PowerShell even tough having SCVMM2008R2 makes it easier since we have Maintenance Mode in that product which will evacuate all VMs from that particular host, one by one. The workflow of this script looks like this:

  • Place the Host Node in Maintenance Mode in SCOM 2007 R2 (So we don’t get pesky alerts)
  • Place the Host Node in Maintenance Mode in SCVMM2008R2 (this evacuates the VMs from the host via Live Migration to the other nodes in the cluster)
  • Patch the Host and restart it
  • Stop Maintenance Mode on the host node in SCVMM2008R2 (So it can be used to run VMs again)
  • Stop Maintenance Mode on the host node in SCOM 2007 (We want it to be monitored again)
  • Rinse & Repeat until all Host nodes are done. Depending on the size of the cluster you can do this with multiple nodes at the same time. Just remember that there can be only one Live Migration action taking place per node. That means you need at least 4 nodes to do something like Live migrate from Node A to Node B and Live Migrate from Node C to node D. So you need to work out what’s optimal for your cluster depending on load and number of nodes you have to work with.
  • Have the virtual machines redistributed so that the last host also gets its share or virtual machines

Now with SCVMM2012 we can do this out of the box using WSUS and all of this is achieved without ever interrupting any services provided by the guests as all virtual machines are kept running and are live migrated away from the host that will be patched. If you’re a shop that isn’t running System Center Configuration Manager you can still do this thanks to the use of WSUS and that’s great news.  There is an entire sub-section on the subject of Managing Fabric Updates in VMM 2012 already available on TechNet. But it goes beyond the Hyper-V host. It’s also the SCVMM server, the library server, and the Update Server that get patched. But don’t go wild now, that’s the entire scope of this. That means you still need regular WSUS or SCCM for patching the virtual machine guests and other physical servers. The aim of this solution is to patch your virtualization solution’s infrastructure as a separate entity, not your entire environment.

So how do we get this up and running? Well, it isn’t hard. Depending on your needs and environment you can choose to run WSUS and SCVMM on the same server or not. If you choose the latter please make sure you install the SWSUS Administration Console on the SCVMM server. This is achieved by downloading  WSUS 3.0 SP2 and installing it. Otherwise, just use the WSUS role from the roles available on Windows 2008 R2. This handles the prerequisites for you as well. It is also advisable to install the WSUS role on a separate server when your SCVMM 2012 Infrastructure is a highly available clustered one. For more information see http://technet.microsoft.com/en-us/library/gg675099.aspx . Time-saving tip: create a separate domain account for the WSUS server integration, it can not be the SCVMM 2012 service domain account.

Make sure you pay attention to the details in the documentation, don’t forget to install the WSUS 3.0 SP2 Administration Console on the SCVMM 2012 server or servers and to restart the SCVMM service when asked to. That will safe you some trouble. Also, realize that this WSUS Server will only be used for updating the SCVMM 2012 fabric and nothing else. So we do not configure anything except the operating system (W2K8R2) , and the languages needed. All other options & products that are not related to virtualization are unchecked as we don’t need them. Combine this with dynamic optimization to distribute the VM’s for you and you’re golden. A good thing to note here is that you’re completely in control. You as the virtualization infrastructure / SCVMM 2012 Fabric administrator control what happens regarding updates, service packs, …

You do need to get used to the GUI a bit when playing around with SCVMM2012 for the first time to make sure you’re in the right spot, but once you get the hang of it you’ll do fine. I’ll leave you with some screenshots of my lab cluster being scanned to check the compliance status and then being remediated. It works pretty neatly.

Here are the hosts being scanned.

You can right-click and select remediate per baseline or select the host and select remediate form context menu or the ribbon bar.

The crusader host is being remediated. I could see it being restarted in the lab.