Don’t Let Live Migration Settings Behavior Confuse You

Configuring live migration settings on a cluster

In the cluster under Networks, Live Migration Settings you can select what networks are available for live migration and their order of preference.image

image

Basically this setting determines what NICs can be used. It also determines and in what order of preference the available networks can be used by Live Migration. It does not determine bandwidth aggregation or failover. All it does is provide the order in which the redundant networks will be used. It’s up to the cluster service NETFT, Multichannel or SMB Direct to provide the bandwidth aggregation if possible As you can see we use LM/CSV over SMB and as our two NICS are RDMA capable 10Gbps NIC, multichannel will discover RDMA capabilities & leverage SMB Direct if it can be establish otherwise it will just stick with multichannel. If you would  team that NIC shows up as just one network. Also not that if you lose a NIC during live migration it might fail for some VMs under certain scenarios, but you cluster nodes will maintain the capability & recover. The  names of the network reflect this: LM1+CSV2 & CSV1+LM2 will be used both but if for some reason multichannel goes completely south the names reflect the metrics of these networks. The lowest is CSV1+LM2 and the second lowest is LM1+CSV2, reflect on how NETFT will select to use which automatically based on the metrics. I.e. It’s “self documentation” for human consumption.

image

Sometimes you might get surprising results. An example. If you’ve selected SMB for Live Migration and you have selected only one of the NICs here.image Still when you look at perform you might see both being used! What’s happening is that multichannel will kick in (and use two or more similar NICs when it finds them and if applicable move to RDMA.

image

So here we select SMB for the live migration type and the two equally capable 10GBps NICs available for live migration it will use them, even if you selected only one of them in the cluster network settings for live migration.

Why is that? Well, there is still another location where live migration settings are defined and that is in Hyper-V Manager. Take a look at the screenshot below.

image

The Incoming live migration settings is set to “Use any available network for live migration”. If you have this on it will still leverage both as when one is used multichannel drag the other one into action anyway, no matter what you set in network settings for live migration in the Cluster GUI (it set to use only one and dimmed out).

Do note that on Hyper-V Manager the settings for live migrations specify “Incoming live migrations”. That leads us to believe that it’s the target, the node where the VMs are migrated to that determines what NICs get used. But let’s put this to the test.

Testing A Hyper-V cluster with two nodes – Node A and Node B

On the cluster network settings you select only one network.

image

On  Hyper-V cluster Node A you have configured the following for live migration via Hyper-V Manager to “Use these IP addresses for live migration”. You cannot add or remove networks, the networks used are defined by the cluster.

image

On  Hyper-V cluster Node B you have configured the following for live migration via Hyper-V Manager to “Use any available network for live migration”.

As we now kick of a live migration from node A to node B we’ll see both NICs being used. Why well because Node B is the target and Node B has the setting “Use any available network for live migration”. So why then only these 2, why not pick up any other suitable NICs? Well we’ve configured the live migration on both nodes to use SMB. As this cluster is RDMA capable that means it will leverage multichannel/SMB direct. The auto configuration will select the best, equally capable NICs for this and that’s these two in our scenario. Remember the capabilities of the NICs have to match. So no mixtures of 1 * 1Gbps and 1 *10Gbps or 1 * multichannel and 1 SMB Direct.

The confusion really sets in that even if live migrate from Node B to A it will also use both NICs! Hum, that is “Incoming Live Migrations” is not always “correct” it seems, not when using SMB as a performance option at least. Apparently multichannel will kick in in both directions.

If you set both to Node A and Node B to “Use these IP addresses for live migration” and leave the cluster network setting with only one network it does only use one, even with SMB as a performance option for live migration. This is expected.

Note: I had one interesting hiccup while testing this configuration: when doing the latter one of the VMs failed in live migration of the entire host. I ran it again and that one VM still used both networks. All others went well during host migration with just one being used. That was a bit of a huh Confused smile moment and it sure tripped me up & kept me busy for a while. I blame RDMA and the position of the planets & constellations.

Things aren’t always what they seem at first and it’s good to keep that in mind. The moment you think you got if figured out, you’re wrong Winking smile. So look again & investigate.

An Early Look At Live Migration Over TCP/IP & Multichannel In Windows Server 2012 R2 Preview

Introduction

With Windows Server 2012 R2 (Preview) we can Live Migrations over TCP/IP like before. That’s either using a single NIC or by teaming two or more NICs. We also have compression and Multichannel. In this blog post we’ll play with TCP/IP and Multichannel.

  • We have a dual port 10Gbps Mellanox RDMA card (RoCE) in each host. But for these tests we have disable the RDMA capabilities of these NICs. As in the RMDA blog post, one pair of the ports are interconnected via a direct attach cable. The other one is connected over a Force10 S4810 switch. We’re using in box Windows Server 2012 R2 preview drivers for everything as we have found drivers not to install properly (or not at all) on this release and cause issues.
  • We are using one VM running Windows 2012 RTM with upgraded Integration Services components. This VM has 4 vCPUs and 55GB of fixed memory assigned. For this purpose we had no workload running in the VM. The servers are standard DELL PowerEdge R720 kit running the Windows Server 2012 Preview bits.

Results

No Performance tweaking

We test a a Live Migration over one 10Gbps NIC. It’s fast but I don’t like the jig saw effect and we don’t push the bandwidth to the limit yet.image

We can move the 55GB Memory VM in about 70 seconds on average. You have a bit more CPU load here but nothing to bad. Most often the Hyper-V host has ample of CPU cycles left so this will not hinder performance. I also remember Aidan Finn’s work testing a truck load of concurrent live migrations with a host that has only 1 low end CPU with 4 cores making it throttle the number of CPUs it would start to save guard the workload.

image

So let’s do what we’ve always done. Turn on Jumbo Frames. This helps to peek to 1.25GB/s and improves speeds (10% or more) but the jig saw is still a bit visible. As I think we can do better we move in the big guns and we optimize our power setting as discussed in Still Need To Optimizing Power Settings On DELL 12th Generation Servers For Lightning Fast Hyper-V Live Migrations? and  Optimizing Live Migrations with a 10Gbps Network in a Hyper-V Cluster. Now with C & C1E states disabled and both processor & memory optimized for performance we see this.image

Now that’s power. We have faster Live Migrations (54 seconds on average) with top bandwidth use during the entire migration process and we see 50% better blackout times. What’s not to like here? CPU usage isn’t that bad and you’ll likely have some cycles to spare unless you’re over 60-70% of CPU use by your VMs and then you need to fix that anyway Smile as you’re out of the save zone. So, Jumbo Frames & Power Optimization are key!

Of cause we’re always looking for better and more. In Live Migrations terms that means speed. So let’s see what Multichannel can do for us. So let’s switch to SMB. As we have disable RDMA on the NICs this “only” gives us multichannel. The cool thing is, the second NIC doesn’t have Jumbo frames enabled yet. I have always found Jumbo Frames to matter and now with multichannel I have a very nice way of demonstrating  / visualizing this. Here’s a screen shot of moving our test VM back and forward. As you can see we have one NIC with Jumbo frames disabled and one with Jumbo frames enabled. You don’t have to guess which one is which I guess. Yup Jumbo frames do matter Smile When you push to the limits. We are getting about 31 seconds on average here with the 55GB VM.

image

Here’s the same with Jumbo Frames enabled on both NICs. And guess what we just cut another 3 seconds of the Live Migration time Smile. 28 seconds flat.

image

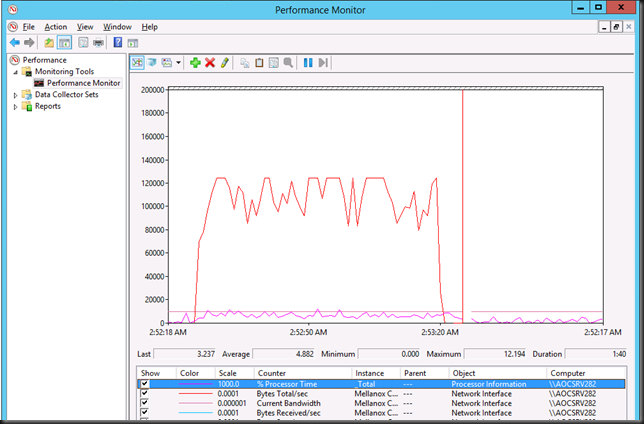
In a histogram it looks like this. That’s what maximum throughput looks like.image

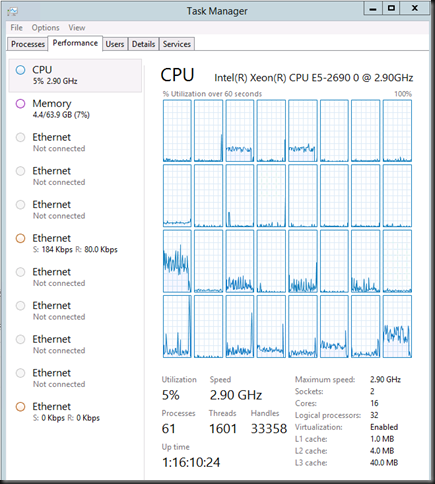
Let’s see what our CPUs are up to during all this. Some core are rather busy dealing with the interrupts. But this is just one VM.image

If you wonder why with 2*10Gbps you only see 2*4 CPUs doing work while the default RSS queues are at 8  and you’d expect 16. It’s because Multichannel defaults to 4. So we get 8. This I configurable and testing will show what difference this could make and whether it’s wise to tweak. It all depends.

Sure this is only one large memory VM but what if we do more? Like 6 VMs with 9GB of memory. Not to bad. image

image

What if that host is running  30 or 40 VMs? That adds up. Well that’s what RDMA is for Smile! But that yet another blog post.

Do keep in mind this is al just the Preview bits … MSFT does two things now until R2 is released. They kill bugs and tweak for speed. I tune my Live Migration setting in production so that get the most bang for the buck I try to avoid dips in bandwidth like you see above. So the work is not finished yet Smile

Conclusion

I can conclude that all the hints & tips of the past to optimize Live Migration still hold true. Yes, you should enable Jumbo Frames and yes you should still optimize your host for performance over power savings. That said, the times that you’d only get 16% of bandwidth usage out of a 10Gbps NIC when you do power optimize have long gone ever since Windows Server 2012. But if you feel the need for (even more) speed …, then by all means go for it.vlcsnap-2013-07-06-17h18m58s175

If you want to conserve energy & be environmentally sound make the most of the least number of nodes possible and use Dynamic Optimization / Power Optimization to shut them down when not needed and fire them up to rise to the occasion Smile

Oh yes, test people, test. Trust but verify and determine the best possible configuration for both your environment and needs.

Now we’ll have a look at compression  … but again that’s another blog post!

Configuring Performance Options for Live Migration In Windows Server 2012 R2 Preview

New Options For Optimizing Live Migrations

In Windows Server 2012 R2 we have a whole range of options to leverage Live Migration of our environment and needs. Next to the new default (Compression) we can now also leverage SMB 3.0 (Multichannel, RDMA) for all forms of Live Migration and not just for Shared Nothing Live Migration  (see  Shared Nothing Live Migration Leverages SMB 3.0 Under the Hood) or Storage Live Migration when both the source and the target are SMB 3.0 storage.

TCP/IP

Here you can use a one NIC or a NIC Team for bandwidth aggregation for live migration (see  Teamed NIC Live Migrations Between Two Hosts In Windows Server 2012 Do Use All Members). This is the process you have known in Windows Server 2012. You can select multiple NICs or even Teams of NICs  but only one of those (one NIC or one Team) will be used. The other(s)will only be used when the first one is not available.

Compression

This option leverages spare CPU cycles to compress the memory contents of virtual machines being migrated. Only then is it sent over the wire via TCP/IP connection. This speeds up the Live Migration Process. This process is CPU load aware so it will only use idle cycles to protect the workload on the hosts. This is the default setting in Hyper-V running on Windows Server 2012 R2 Preview.

SMB

This setting will leverage two SMB 3.0 features. Multichannel and, if supported by and for the NICs involved, RDMA.

  • SMB Direct (RDMA) will be used when the network adapters of both the source and destination servers have Remote Direct Memory Access (RDMA) capabilities enabled.
  • SMB Multichannel will automatically detect and use multiple connections when a proper SMB Multichannel configuration is identified.

Where to set these options?

In Hyper-V Manager go to “Hyper-V Settings” in the Actions pane.image

Expand the Live Migrations node under Server in the left pane (click the “+”) and select to “Advanced Features”.image

Select the option desired under" “Performance Options”.image

Happy testing!


EDIT: Aidan Finn posted the PowerShell commands to configure the performance options in Configuring WS2012 R2 Hyper-V Live Migration Performance Options Using PowerShell The MVP community at work & it rocks Smile

I’m Ready To Test Windows Server 2012 R2 Live Migration Over Multichannel & RDMA!

I’m so ready for the first Windows 2012 R2 preview bits. Yes that’s what our current setup looks like. Two RDMA capable NICs at the ready Winking smile … let the bits come. I’m pretty excited to test Live Migration over Multichannel & RDMA.

image.

We choose to get RDMA NICs for new servers and replace non RDMA card in host where there’s a clear benefit. By the way have you seen the news on the Mellanox ConnectX®-3 Pro Single/Dual-Port Adapters => NIC support for NVGRE is here people!