Introduction
In this article, I share my first design & configuration for fixed port 802.1x authentication via the Hyper-V switch. This is geared especially toward developers and engineers. These are a mixture of internal staff and contractors, using AD joined as well as BYOD clients. The gist of this article is actually you need to learn about networking, 802.1x, RADIUS/NPS. You can just consider the Hyper-V switch as an unmanaged switch in most scenarios here.
In a previous blog 802.1x Support with the Hyper-V switch is here!, I shared how you can now enable 802.1x for use with the Hyper-V switch in Windows 10 1809 and Windows Server 2019 or later. Note that this a requirement for the Hyper-V host only, lower OS versions of the guests are fine.
Enabling is as simple as adding a registry key and rebooting the host.
Reg add “HKEY_LOCAL_MACHINE\SYSTEM\CurrentControlSet\Services\vmsmp\parameters” /v 8021xEnabled /t REG_DWORD /d 1 /f
The existing situation
In the HQ and branch offices there are VLANs for AD joined fixed port clients, AD joined Wi-Fi clients (SSID CORP-WIFI), and a guest VLAN for non-authenticated device both on Wi-Fi (SSID GUEST-WIFI) and fixed ports. These VLANs are untagged and are on physical access ports (authenticated, i.e. AD joined and non-authenticated, i.e. non-AD joined) on the switch. Or they are different SSID on the WAP.
When a non-authenticated client connects to an authenticated port, Radius authentication fails but the port and as such the client is given access to the guest VLAN. It’s functionally the same as for the unauthenticated ports on guest VLAN.
There are also ports that are authenticated and will not provide guest VLAN access but discard the traffic or even shut down the port when authentication fails. These are in more security-focused parts of the branch offices.
The goal
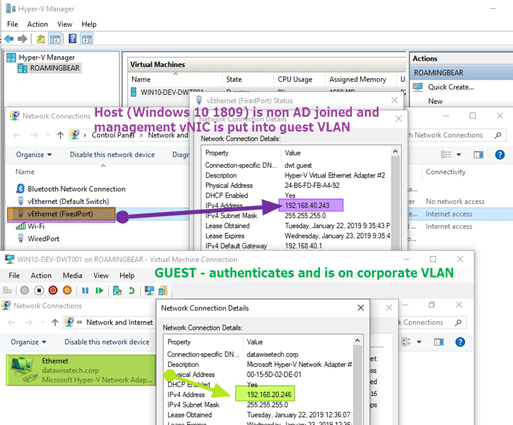
We wanted to have this functionality available to the developers running Hyper-V. It needs to work for both authenticated and non-authenticated physical clients as well as VMs. Also, we need to provide a solution for when the host has only one NIC (physical or wireless) or multiple (1 or more physical, more wireless). In the case of a desktop with only one NIC, the management vNIC has to authenticate for the host as well as for the VMs.
When you have a wireless NIC such as laptops this also works (bridge). When you dedicate a docking station ethernet port for the vSwitch you’re good to go as well but can also use wireless for the host and the physical NIC for the vSwitch. The same principles work both with AD joined and non-AD joined physical clients. This has been an issue with Hyper-V as the vSwitch did not support EAPoL and authentication was impossible.
The design and configuration
The lay of the land
I have this running in the lab with various PowerConnect switches. These are older 2800 and 5400 series as well as the 5500 series and the N2000 series. It is also in production at one organization with the 5500 series and soon also one with N2000 series.
A functional 802.1x infrastructure for both wired and wireless clients is assumed. This is not an article about configuring that. Many of you have the CA/PKI, NPS/RADIUS, GPO (cert auto enroll, wired/wireless client config) running. I have it in the lab and it’s based on computers certs as well as in production environments. If you don’t, you’ll need to take care of that first.
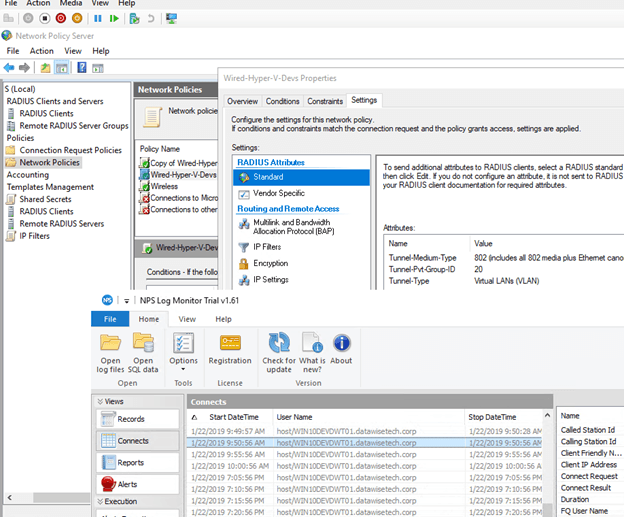
My lab NPS/radius reauthenticating my guest VM on a Windows 10 1809 Hyper-V host every 5 minutes (for demo purposes). Note the dynamic VLAN assignment in the NPS network policy.
Considerations
There are multiple ways to achieve a solution. The idea, however, is to avoid anything but access ports toward clients unless unavoidable. So, no trunk, general or however you preferred vendors call it.
To achieve our goals, we configure the physical switch ports as follows:
- We need to multi-session authentication (we have multiple devices attached to one port that all need to and must authenticate or fail. This does mean there is no option to shut down that port on failure.
- We leverage dynamic VLAN association (NPS Policy) to move successfully authenticated ports into the corporate VLAN.
- We leverage the guest VLAN to move unauthenticated ports into so those devices get minimal network access and internet connectivity. This can be a dedicated VLAN for that purpose. Call it what you want (Quarantine, VM-Guest, Isolated).
- The switch port mode remains in access mode and is not in general/trunk/hybrid mode. Now depending on the switch that might not be possible. In the old budget PowerConnect 2808, the port is in general mode actually and you configure trunk or access via PVID and untagged/tagged allowed VLANs. Let’s keep it simple here, whatever goes on behind the scenes we don’t configure the port as a trunk or so for this unless we really have to.
- It avoids having to use an unauthenticated VLAN per se (which would involve tagging and I don’t want to go there with the developers).
- This approach leverages what is already there and requires only port reconfiguration as needed for 802.1x
- If we need to disable port auth for troubleshooting RADIUS you can opt to either put the access port on the guest or even (whatever suits the needs better and is allowed) on the corporate VLAN by default.
Dynamic VLAN assignment & RADIUS/NPS policies rock here!
But based on the group membership I can give the Hyper-V Host or VM attached to the vSwitch going to that port a different VLAN via Dynamic VLAN assignment in the RADIUS network policies. You can get creative here (infra, dev, test, acceptance, …. they can be in different VLANs when required). Below is lab implementation of a scenario where people bring their own client with Hyper-V. When they need VMs that authenticate with AD that is possible while other VMs get a guest network assigned
I offer this to both internal and external employees now and reduce dependencies on workarounds, physical security and “hope” nothing bad connect to the wire. This is a sweet setup for freelancers, contractors, consultants & employees alike. Combine this with Veeam Agent for Windows 3.0 to protect your client Hyper-V host and VMs. Sweet! It has been a driving factor to upgrade for some of them.
Conclusion
802.1x via the Hyper-V switch works very well. The intricacies are the same as with 802.1x in a purely physical environment that has a mix of managed/non-managed switches going to clients. I’ll repeat myself here and state the same as I did in my other blog post. The point is you’ll have to wrap your head around port authentication with 802.1x and its various options, permutations on the switches and radius servers.
I normally deal with Windows NPS for the radius needs and the majority of my sites have DELL campus switches. But I find my way around any other model as well both big and small names.
Depending on the needs of the users (developers, IT Pros, engineers) for your VMs you will have to configure port authentication a bit differently and you’d better either own that network or have a willing and able network team to work with. Where this is running in production POC I’m in charge of the entire stack so I can move fast, effective, efficient and offer great value for money. One week after 802.1x support with the Hyper-V switch going public. That is agility, that is speed, that is IT at its best.