
Extending a Veeam Repository XFS File System
Since diving into the Veeam Backup & Replication v11 Linux hardened repository I have started to use XFS in bite-size deployments to gain experience with it. One of the things that will certainly come in handy is extending a Veeam Repository XFS File System. In this blog post, I show to do that.
Mind you that I am doing this with a virtual machine on Hyper-V (Windows Server 2019) in the lab. Not every permutation of hardware and storage controllers you can find. But still, the procedure here will not differ that much.
Determine the size of the current disk.
sudo slblk
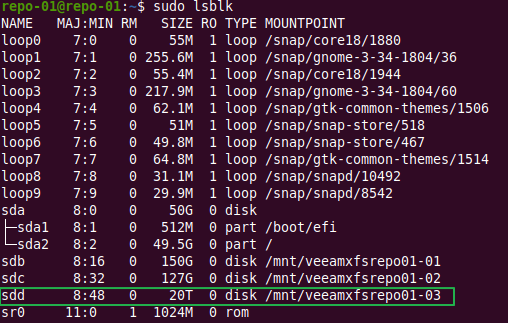
Now take note of the bytes and sectors
sudo fdisk -l

Expand the disk
In the virtual machine settings I extend the virtual disk I want to grow with the required capacity.
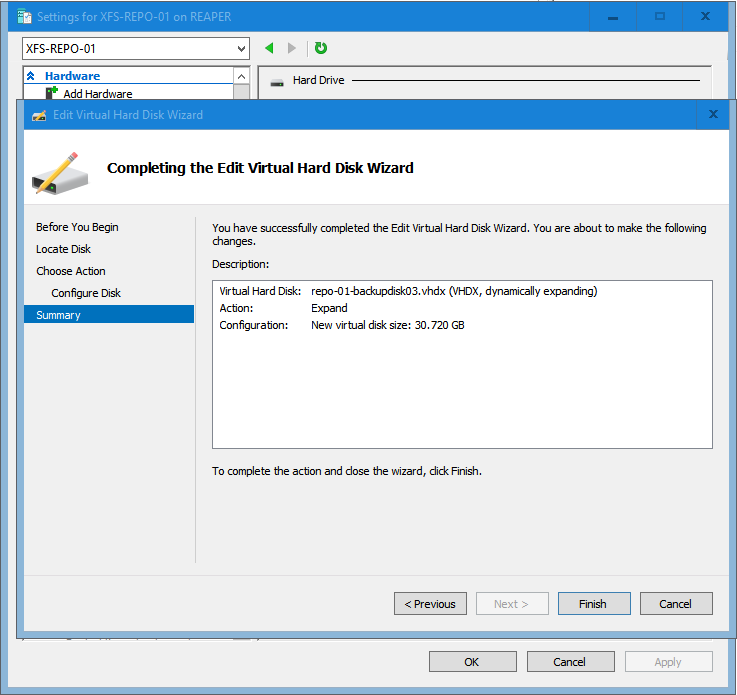
In real life that might be you growing a raid controllers’ virtual disk by adding physical disks to the raid controller, you expanding the volume on the storage array or simply adding disks to the local server and adding them to the software-based raid solution you use.
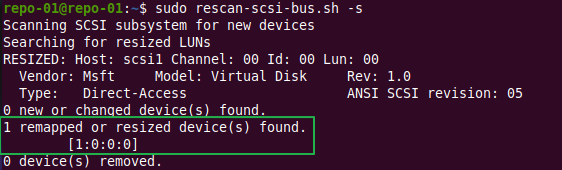
The virtual machine will pick up the extra capacity right away. For our UBUNTU 20.04.1 OS to see it up we’ll need to rescan the SCSI busses for change. In a virtual machine, this can be done via rescan-scsi-bus.sh, available scsitools that will need to be installed if not there.
Use the -s options as that will really show the resized disks.
sudo apt-get install scsitools
sudo rescan-scsi-bus.sh -s
Now let’s check the disk size again


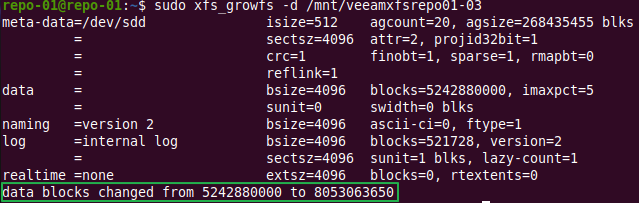
Extend the xfs volume to use the unallocated space
Now we need our xfs volume to use the unallocated capacity in this disk. We use -d as this will grow the file system to the largest possible size, 30 TB in our case.
Note: If you run the below command with -n instead of -d, this gives you the current information on your xfs volume with extending the filesystem yet.
sudo xfs_growfs -d /mnt/veeamxfsrepo-03
See Ubuntu Manpage: xfs_growfs – expand an XFS filesystem for more options
Note: What I did find is that if you just expand the disk and than extend the xfs file system, it also works. It seems to just work without rescanning the disk after extending it! The disks size in df -h will show this space then as well.
Conclusion
That was it. Short and sweet. There is not much to it once you know how to do it. One thing to remember is that you cannot shrink an XFS file system. So, as always, start smaller and grow when needed. Always leave spare capacity to work with when needed. Yes, even in 2021 this is advice to live by in the storage world. For Veeam this means that multiple smaller repositories or extents give you more wiggle room than fewer very large ones. Leave capacity in reserve, either in a spare repository/extend or unallocated. This, especially combined with a scale-out backup repository in Veeam will allow you to work your self out of most capacity pickles you might find your self in.
FYI:
Pictures not loading.
Clicking on it I got
https://blog.workinghardinit.work/wp-content/uploads/2021/01/image-7.png
406 – Client browser does not accept the MIME type of the requested page.
Tested with Firefox, Google Chrome, MSFT Chromium, …not seeing it. What language. what browser?
Tested it with Chrome , Chrome incognito, FireFox, FireFox Private, Edge, Edge InPrivate and Internet explorer and Internet Explorer InPrivate on my Windows 10 English UK Laptop.
I have also tried a Server with IE and Chrome and I got the same results.
have also problems. German and Chrome
I get error 🙁
user veeamsvc is not alloed to execute ‘/bin/rescan-scsi-bus.sh -s’ as root on SERVERNAME
You need sudo/root to run it. So login with an account that has sudo access. You could add the veeaam service account and remove it afterwards, but it is better to use the sudo account to do it directly an leave the security of the Veeam Service account as it should be.