Windows Server 2012 with Hyper-V & The New VHDX Format Leads The Way

Introduction

Whether you realize this or not but our trusted old VHD format is getting a bit old in the tooth. As a matter of fact it has been around since the last century. It has served us well but now it needs a major overhaul to better serve us at present and to prepare us for the decades to come. We (at least in the environments I support) see a continuing demand for bigger virtual disks & ever better performance. This should be no surprise. Not only does the amount of data produced keep going up year after year but we’re virtualizing more very resource intensive workloads than ever. Think image intensive data that has to be processed by number crunching virtual machines or large databases like SQL Servers. Sure 64 vCPUs and 1TB of memory are great and impressive but we also need loads of fast and ever more reliable storage. Trying to serve and support these needs with combined 2TB disks is very cumbersome (to be polite) and pass trough disks take a way a lot of the flexibility & options the VHD format gives us. So here comes the new VHDX format.  There is no back porting here, the only OS at the moment that supports VHDX is Windows Server 2012. The good news here is that we have in box tools to convert between VHD & VHDX.

Bigger, Better & Faster

Size

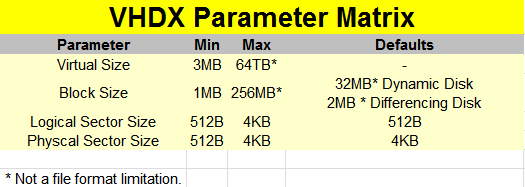
The VHDX format supports up to 64TB now. Yes that is 32 times more than the current VHD. As a matter of fact al lot of SANs still in use today won’t give you that size of LUN. Is there a need for this?  Well, I circle in some places with huge files in massive amounts so I can use big LUNs and large data VHDX files. Concatenating disks is something I do no like to do. Come upgrade/maintenance/renewal time that one bites too much for comfort.

There are also some other virtual disk formats that need to wake up and break that 2TB size boundary . Especially when Microsoft states that this is not a File format hard limitation. By that they mean they have room to increase it. Wow!

Protection Against Disk Corruption

The VHDX format also provides corruption protection during power failures for the VHDX files. This is done by a logging mechanism for the updates of the VHDX metadata structures. The logging mechanism is contained within the VHDX file so no worries, you won’t have to worry about managing log files. The overhead is minimal, as they only log metadata such as block allocations, block state updates and NOT the actual data stored. So no, it has not become a database Smile you need to manage, don’t worry. The protection works only for the VHDX file and not the data that is written to it. That job falls to NTFS or ReFS. What we discussed here was protection against VHDX file corruption.

The Need For Speed

With VHDX we also get larger block sizes up to 256MB for dynamic & differencing disks, meaning they perform better with workloads that allocate in larger chunks.

Modern Large Sector Disks

We get support to run VHDX on large sector disks without loosing performance.

I refer you to KB articles Using Hyper-V with large sector drives on Windows Server 2008 and Windows Server 2008 R2 and Information about Microsoft support policy for large-sector drives in Windows.

As you can read there the performance hit for both non fixed VHDs and applications is pretty bad. The 512e (4K physical and 512-byte logical sector size) approach is bad due to the Read-Modify-Write (RMW) process overhead in dynamic & differencing disks. 4K native (4K logical sector size) just isn’t supported by Hyper-V before Windows Server 2012. The maximum logical & physical sector size is now 4KB and that means that we get a lot better performance when running applications that are designed to use 4KB workloads in Hyper-V 3.0. VHDX structures are aligned on MB boundaries, so the need for the RMW from the disk is eliminated if the physical sector size of the virtual disk is set to 4K.
image

Storing Custom Metadata

We also get the ability to store custom metadata in the VHDX  file for information we find relevant. This could be about what’s on there, OS version or patches applied.
ODX Support. This custom data is stored using key/value pairs that support up to 1024 entries of 1MB. That should be adequate for a while Winking smile.

VHDX Leverages Offline Data Transfer (ODX)

The virtual stack allows ODX requests from the guest to flow down all the way to the hardware and as such VHDX operations benefit from this as well. Examples of this are:

  • Creating VHDX files, even such large ones has gotten an whole lot faster. Especially if you can offload this to the SAN. If your storage vendor supports ODX then you’re in VHDX creation speed heaven! As a bonus  even VHD files created in Windows Server 2012 benefit from this technology.
  • On top of that Merge & Mirror operation are also offloaded to the hardware which is great for merging snapshots or live storage migration.
  • In the future the virtual machines themselves might/will be able to pass through offload operations. This is hard core stuff  and due to the file layout far from trivial.

Please note that this only works with SCSI attached VHDX files. IDE devices have no ODX support capabilities.

TRIM/UNMAP Support

With Windows Server 2012 / VHDX we get what is described in the documentation “’Efficiency in representing data (also known as “trim”), which results in smaller file size and allows the underlying physical storage device to reclaim unused space. (Trim requires physical disks directly attached to a virtual machine or SCSI disks in the VM, and trim-compatible hardware.) It also requires Windows Server 2012 on hosts & guests.

It’s a major benefit in the “Stay Thin” philosophy associated with thin provisioning. No more running “sdelete” in your windows VMs (tedious, slow, resource intensive) or installing an agent (less tedious) to support reclaiming space. This is important to many of us and this level of support and integration makes our lives a lot easier & speeds things up. So choose you storage wisely.

TRIM is the specification for this functionality by Technical Committee T13, that handles all standards for ATA interfaces. UNMAP is the Technical Committee T10 specification for this and is the full equivalent of TRIM but for SCSI disks. UNMAP is used to remove physical blocks from the storage allocation in thinly provisioned Storage Area Networks. My understanding is that is what is used on the physical storage depends on what storage it is (SSD/SAS/SATA/NL-SAS or SAN with one or all or the above).

Basically VHDX disks report themselves as thin provision capable. That means that any deletes as well as defrag operation in the guests will send down “unmaps” to the VHDX file, which will be used to ensure that block allocations within the VHDX file is freed up for subsequent allocations as well as the same requests are forwarded to the physical hardware which can reuse it for it’s thin provisioning purpose. This means that an VHDX will only consume storage for really stored data & not for the entire size of the VHDX, even when it is a fixed one. You can see that not t just the operating system but also the application/hypervisor that owns the file systems on which the VHDX lives needs to be TRIM/UNMAP aware to pull this off. It is worth nothing this mean that it only works on the SCSI attached storage in the virtual machine, not on IDE connected VHDX disks.

Closing Thoughts On The Future Proof VHDX Format

For anyone interested in developing against the VHDX formats the specifications will be published. So that’s good news for ISVs, big and small. For all the reasons mentioned above I’m a fan of the VHDX format Open-mouthed smile and it’s yet one more reason to go full speed ahead with testing Windows 2012 so we can move forward fast and reap the benefits of reliability & scalability without sacrificing performance.

Hyper-V Shared Nothing Live Migration In Windows Server 2012– VM Mobility Rules

I see and hear some people shrug at the idea of Shared Nothing Live Migration, dismissing it as marginally useful. Some do state they’ll have it as well but that it’s not that valuable. Well I disagree totally. A lot of the time these remarks are due to a lack of understanding about how several technologies in the Microsoft stack work together. Combine this with tunnel vision and the fear of some vendors and you get a lot of FUD.

I advise you to look beyond the virtualization stack, to the issues that people who are building infrastructure for dynamic, flexible and * cloud  data centers are dealing with.

Look, as “architects” we have to design & build for failure. We all know that it’s just a matter of time before things go BOINK.  So we build in redundancy, some of this within a silo, some of this is between silos. The two approaches compliment each other. What this gives you is options and everybody who knows me, especially those who work  with me has heard my mantras: “Assumptions are the mother of all F* Ups” and “Options, options, options”. Make sure you design & build in options. This way you can maneuver your self out of a bad situation. Don’t ever assume you’re out of options, especially not when you put some in the design on purpose Winking smile. It’s also very useful beyond that because a lot of you might agree with me that silos and fork lift, down time inducing upgrades, migrations, transitions or replacements are expensive and bad. This is where Share Nothing Live Migrations comes into play. You gain mobility over silos. That silo might be a server, a cluster, storage or mixtures of them all.

With Shared Nothing Live Migration we can migrate virtual machines between those silos with nothing more than a network cable.This is huge people. You are no longer trapped in that silo. In this context it provides you with all the options & flexibility mobility gives you. even it the technology itself is not about high availability.

Some very useful scenarios

Migrate virtual machines from an old cluster to a new cluster with out any down time

  1. Migrate virtual machines from stand alone hyper-V hosts to a fail over cluster with out any down time
  2. Migrate virtual machines from one stand alone host to another one for maintenance, again, without any down time
  3. Choose different types if storage & Hyper-V deployment depending in IOPS, redundancy, availability, manageability needs. With Shared Nothing Live Migration you can be confident  that  you can move your virtual machine from one environment to the other when needs change. This is breaking the storage silo boundaries open people! This is huge … think about it.

How it works

The details are for another post but basically is made possible by the combination of Live Storage Migration and Live Migration.

First the Storage is Live Migrated

image

After the Live Storage Migration is done the state of the virtual machines is copied and synchronized.

image

This Is Mobility

I hear the competition shrug.  It isn’t high availability. Well indeed no one who understands the feature ever said it was. It’s virtual machine mobility. Look at the scenarios above and you’ll see that this ability could very well be game changer in how we look at storage & design solutions.

Speed & Performance

What did we hear on this front: “it will be too slow to be really useful”. Really? Well let’s see:

  1. The world is converging to 10Gbps and after that 40Gbps and up will come
  2. NIC Teaming in box With Windows 2012 which can provide more bandwidth.
  3. SMB 3.0 Multichannel. This provides multiple channels per connection spreading the load over multiple CPUs
  4. SMB Direct, have you seen the speeds this achieves?

Before you state that this doesn’t work on Live Migration … as confirmed at TechEd 2012 Europe with Jose Baretto this does work when both the source AND the target is an SMB 3.0 share. This means yet another reason to use SMB 3.0 share for your Hyper-V storage needs! So unlike what Tad at vLimited keeps saying, unhindered by any knowledge, it is a very valuable feature and it can be extremely fast given the right connectivity and storage that can handle the IOPS. And no, the fact that it’s unbuffered doesn’t impact this to much. Test this by using xcopy/robocopy /J with a VHD over your infrastructure.

image

Even if you’re on a budget and cannot go for the RDMA NICs & SMB 3.0 you have several options to get very decent virtual machine mobility and not be stuck in a silo. And for those who want to leverage this feature to create and agile & mobile virtual environment you have some very nice technologies available to optimize to your needs & budgets.

Conclusion

Virtual Machine mobility and storage mobility are very interesting features that provide for a previously unknown flexibility. Windows Server 2012 makes us rethink our storage approaches (I sure am) and I’m very interested in seeing how this will evolve.

Moving Clustered Virtual Machines to Windows Server 2012 with the Cluster Migration Wizard

As you might remember I did a blog post on transitioning from a Windows Server 2008 R2 Hyper-V cluster to Windows Server 2012 (well I was using the beta at the time, not the RC yet):

  1. Part 1 Upgrading Hyper-V Cluster Nodes to Windows Server 2012 (Beta) – Part 1
  2. Part 2 Upgrading Hyper-V Cluster Nodes to Windows Server 2012 (Beta) – Part 2
  3. Part 3 Upgrading Hyper-V Cluster Nodes to Windows Server 2012 (Beta) – Part 3

Microsoft has now blogged about the process themselves and they use the migration wizard in Failover Cluster Manager to get the job done where I did this using the Import, “register only” functionality.

This is the first step by step that describes the official way. You can read about the process here:

How to Move Highly Available (Clustered) VMs to Windows Server 2012 with the Cluster Migration Wizard

Upgrading Hyper-V Cluster Nodes to Windows Server 2012 (Beta) – Part 3

This is a multipart series based on some lab test & work I did.

  1. Part 1 Upgrading Hyper-V Cluster Nodes to Windows Server 2012 (Beta) – Part 1
  2. Part 2 Upgrading Hyper-V Cluster Nodes to Windows Server 2012 (Beta) – Part 2
  3. Part 3 Upgrading Hyper-V Cluster Nodes to Windows Server 2012 (Beta) – Part 3

And we have arrived at part three of my adventures while “transitioning” my Hyper-V cluster nodes to Windows Server 2012. I prefer the term transition as is more correct. We can still not do a rolling upgrade a cluster cluster. We still need to create a new cluster and recuperate the evicted nodes.

I’ll repeat myself here (again) by stating I did not reinstall the evicted nodes but upgraded them. Why, because I can and I wanted to try it out and see what happens. For production purposes I do advise you to rebuild nodes from scratch using a well defined and automated plan if possible. I already mentioned this in Upgrading Hyper-V Cluster Nodes to Windows Server 2012 (Beta) – Part 1

Moving the Storage & Hyper-V Guests

So we stopped Part 2 at a newly created cluster without any storage. That’s what we’ll be taking care of in this part.  Let’s recap what we already mentioned at the end of Part 2.

We have several options for storage here. We could assign new storage but we cannot do a Quick Storage Migration between cluster using SCVMM2008R2 but that doesn’t fly as SCVMM2008R2 can’t manage Windows 2012 clusters and I don’t know if it ever will. We can do a good old manual or scripted export to and import from the new storage of the VMs what takes a considerable amount of time. You also need to have the extra storage available.

We can also recuperate the old storage with the VMs still on there. This could get tricky as no two cluster should be able to see & use the storage at the same time. The benefit could be that we can just use the import type in Windows Server 2012 “Register the virtual machine in-place” (use the existing unique ID) and be done with it. We’ll try that one. We’ll still have some down time but it should be pretty fast. It’s only from Windows Server 2012 on that we’ll be able to do Shared Nothing Live Migrations between clusters Smile and live will be good. If you have a SAN you could also use clones to get this job done without less risk. You work on cloned data and keep the original around instead of using that for the process described below.

So how do we approach this?

Since Windows Server 2008 storage & clustering isn’t the pain it could be in earlier version. It’s the disk manager handling all that and it makes live a lot easier. All disks presented to a cluster node are off line to the operating system until you bring it online. Even if it contains data or is presented to another host, whether that is a member of another cluster or a stand alone host. Pretty cool. It also means you can have all your nodes on line during the process. The process of bringing the disk online and, if needed formatting it with NTFS and then adding it to the cluster as storage can be done on just one of the nodes.

As you recall I unplugged the evicted node from the iSCSI storage (you could also disable the ports) before I upgraded it. The entire iSCSI configuration got upgraded perfectly so all I needed to do was plug the iSCSI cables in and the storage appeared offline. My old cluster node was up and running still accessing it. Pretty slick! And great as a demo but you can play it safer. That was fun Smile but perhaps we won’t be that brave in a production environment.

Options

You could decide to bring all LUNS over at once or one at the time. The process is the same. If you do it one by one you’ll have to rely on the above behavior to protect the LUNs against corruption or you can un-present the LUNS remaining on the old cluster from the new cluster so you’ll never have an issue. We’ve done both and it works out rather fine in testing. Windows clustering is really doing it’s best to prevent you from shooting yourself in the foot Smile

Let’s say I go LUN by LUN. Now I can just remove the VMs from the old cluster using the Failover cluster GUI so they are no longer highly available on that node. When I have no more clustered VMs on a CSV LUN I can shut down all the guests in Hyper-V Manager and stop right there.

On the old cluster I remove that LUN from the CSV storage and from the cluster storage. At that moment that LUN is already taken offline for you!

image

Pardon the silly size but I didn’t have space left to make a realistic screenshot Smile

Great, Windows is protecting us against any possible data corruption! So now I can than un-present the LUN form the old cluster nodes. The next step is to enable the ISCI ports, present that LUN to the new cluster node or nodes (depends on where in the x number of node process you are) or just plug in the cable .

You’ll see the new LUN off line than on the new cluster. We can than make the LUN on line so it will be available to add to the cluster. Just right click that disk and select “Online”.

image

image


Right click on storage

image


Select an disk that’s available to add to the cluster.

02


Things has gotten a lot simpler with CSV in Windows Server 2012. No more enabling it with a funky warning message that’s well meant but is rather confusing an annoying. You just right click the disk and choose “Add to Cluster Shared Volumes” and that’s it.

image


And there it is. That disk in our new cluster is ready to use as a CSV.

image


So we can now us a nifty new capability in Windows Server 2012 Hyper-V: “Register the virtual machine in-place” (use the existing unique ID)

05


The wizard starts.

06


Select the folder where your VM or VMs live. yes you can do multiple given that your folder structure allows for this.

07


It’s found one VM in our folder

08


We click Next

10


We select “Register the virtual machine in-place” (use the existing unique ID) and click next.

11

If something is not right like some forgotten “saved” states you’ll get a change to dump those or cancel the process to deal with it properly before trying it again.

12


If virtual network names do not match you’ll get the opportunity to set correct that by specifying what virtual switch to use.

13


If all was well in the first place or after you’ve fixed any issues like the ones demonstrated above you’re good to go. Click finish and enjoy your Windows Server 2012 Hyper-V Guest.

18


At this point you can already start your VMs. I know that the next step is to make all these VMs highly available but here we have some good news as well. You can now make running VMs highly available. Yeah! They no longer need to be shut down. All this is done via the well know process so I’m not going to walk trough the entire process here. But the screen shot of a making a running VM highly available is worth posting Smile

addrunningvm