The Hyper-V amigos, @Hypervserver and working@workinghardinithardinit recently did a webinar together about Windows Server 2019 SMB Direct Best Practices. We also discuss some trends and put some things into perspective. Rachfahl IT Solutions does more of these cool webinars for you to check out (see the info at the end of the video). You can watch the webinar below on Vimeo. It’s quite an honor to be invited to talk on this subject as Carsten is one the worlds most experienced S2D practitioners.
https://vimeo.com/319818020
Windows Server 2019 SMB Direct Best Pratices Webinar
Need to know more?
I hope this get’s you started and updated. Need to know more? Want more details, advice and a deeper and more elaborate discussion. I will be talking about this on various occasions this year. One of them is the Cloud & Datacenter Conference Germany 2019 in Hanau. Register to secure your spot. It is a great conference with a lot of hands on, real life knowledge being shard. I will be around for the Hyper-V pre day and during the entire conference. This means you can find me to talk shop. Be warned, I can go one about the subject or a while
Replay Manager Configure Server There was an error loading the configuration information
When Replacing a bunch of servers with new DELL R740s (Hyper-V clusters, File clusters, backup targets etc.) I ran into an issue with the DELL Replay Manager software. The servers leverage multiple DELL EMC Storage Center SANs. The have multiple ones for Scale-Out, Redundancy, Failover, Mutliple Datacenters, …
With some of the servers I noticed that the loading of the information was slow, while most others were just fine. But with 4 out of all servers the connection never actually happens. The connectivity was just fine, and test connectivity confirmed this. As this had zero impact on the actual replays that were scheduled this went unnoticed. But when you are adding and removing servers you might need to dive into Server Configuration and that were after a minute we got the below error thrown
Configure Server There was an error loading the configuration information. Error Message: The request channel timed out while waiting for a reply after 00:01:00. Increase the timeout value passed to the call to Request or increase the SendTimeout value on the Binding. The time allotted to this operation may have been a portion of a longer timeout.
Notice that the GUI says connecting to our demo server82… but unless you need info from the server you might still see the info it get’s from the Storage Center SAN itself.
This is quite annoying as we need to be in there. So how to fix this. I have some ideas as I know this error from .NET WCF but in this case I was looking for an easier way out especially when I don’t have all the information about this 3rd party application. The good news is that it is easily fixed.
Fixing this
Replay manager stores the replays and metadata info about those replays it creates on the SAN itself. That’s why you can still see those even when you actually ca’t connect to the server. The config of servers you add and use in Replay Manager is stored locally where the client lived. This files is portable, just copy it form your profile and had it to a colleague. No big deal.
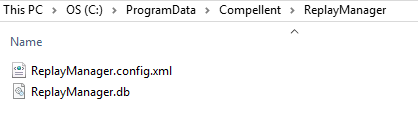
Now the server configuration you do from the Replay Manager GUI tool itself is stored on each and any server where you have the Replay Manager service installed. You will find that file, ReplayManager.config.xml, under C:\ProgramData\Compellent\ReplayManager.
Make a copy to be sure and edit the original using a text editor that has elevated permissions so you can save your changes. In the example file of one server below note that server82 (green) has 2 old Compellent SC entries (yellow) that are no longer in service. One SAN it cannot find won’t exceed the time-out windows, but it does slow the GUI down significantly. 2 or more phantom old SAN slow things down looking for them and you get the time out error.
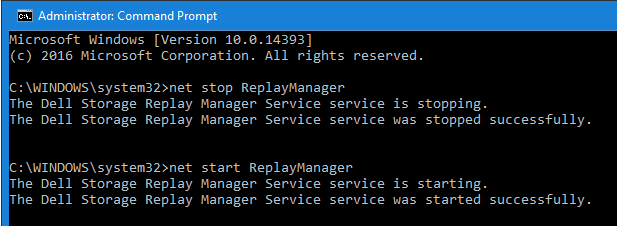
The fix is easy, cut the key values out of the file and save the file. You then restart the Replay manager service on that server via an elevated command prompt (or use the GUI): net start ReplayManager net stop ReplayManager
Restart the Replay manager service on the server you need to manager before connecting to the server again with the Replay manager client tool GUI.
When you now close and launch the Replay Manager GUI and connect to the server things will be a lot faster and certainly wont time out anymore.
Conclusion
Maintain your environment. Try to remove and decommissioned storage center SAN from your server configurations in Replay Manager before you take it off line an dispose of it.I f you forget you and run into slow loading Replay Manager GUI or hit a time out. Don’t panic. The Replay manager is actually quite solid and recoverable. We have shown you how to fix this by editing the ReplayManager.config.xml file on the server you need to connect to but can’t.You basically just remove the references to the no longer existing storage centers I hope it helps some of you out there if you run into this. Feel free to reach out in the comments if you have any questions.
Yesterday my attention was focused on some NVDIMM (Storage Class Memory, PMEN) testing. Getting them to be leveraged in a Windows Server 2019 Hyper-V virtual machine. Testing can be fun, let me tell you that 🙂 I did get distracted however.
The e-mail
My activities got halted as I saw some Slack notifications come by about Veeam Vanguard renewals. So I hit refresh on the e-mail client and I saw the mail from Rick Vanover, Director, Product Strategy at Veeam Software.
Dear Didier, I’m happy to report that your Veeam Vanguard Renewal Nomination has been approved! Through 2018, we hope you have enjoyed the Veeam Vanguard Program and are happy to extend to you an invitation to the 2019 program.
Vanguards lead the way!
2019 & beyond
This marks my 5th year of being a Veeam Vanguard. I’m one of the inaugural members and I really enjoy being part of the program. We have the webinars, the Vanguard channels, the briefings and the communication lines we have with the various Veeam experts and Vanguards who form a collective of knowledge, passion, experience and brainpower to learn from. The group has grown this year so we ‘ll have even more minds to pick and share with. As we come from all types of organizations and countries we have a divers mix of backgrounds. We avoid tunnel vision and brings new insights to old challenges. It also helps me become aware of things that had not been on my radar screen yet.
Then there is the fact that Veeam is about data protection, availability, recovery, and mobility. This suits my nature as my first questions with every project after figuring out what is need is how to handle this. I want at least 2 options to protect and restore data. I want to know how to keep it available and how to move it. It sort of comes natural to me. But, these tasks have become ever more complex and fragmented just like the IT solutions themselves.
Veeam is a company I trust, work with and rely on. It is a simple as that. People who know me can vouch that this isn’t given but earned. So, thank you Veeam. I’m humbled and proud that I am a Veeam Vanguard 2019.
This is a quick assist for those people who run into the following error when updating their DellEMC SC Series Dell Storage Manager Data Collector and/or Client.
Error applying transforms. Verify that the specified transform paths are valid.
It will want to find a path to 1033.msi in your users’ profile appdata local temp folder but it is not there. Only different ones.
When trouble shooting this error Google might lead you to use various app cleaner tool or the like. This could work or not. It can also lead to new errors. The installer might now complain that updating is only for installed apps and require your to really uninstall the application. This could leave you with a non functional application until you fix the mess.
The easy fix
The solution is easier. Just navigate to the following key in the Windows registry:
COMPUTER\HKEY_CLASSES_ROOT\Installer\Product
Their you find for the key for the Dell Storage Manager Client and/or the Dell Storage Manager Collector. There you will find a Transforms value with the path that throws you the error. Just delete that the value in that key.
Dell Storage Manager Collector
Dell Storage Manager Client
Now run your Dell Storage Manager Data Collector and/or Client installers again and things should go well. As always, take a VM checkpoint or another type of backup before you do any work on production server or at least exports the keys you modify so you can restore them