
Moving from AHCI to Raid
In the previous blog post, we moved from RAID to AHCI. Moving from AHCI to RAID can also be achieved without reinstalling Windows. With my NVME disk, I have not seen a huge performance difference between AHCI with the native Windows driver and RAID with Intel RST. If, however, you want to move back from AHCI to RAID when newer drivers become available this is also possible. Depending on your approach it can be a more tedious process with some risk, but normally you can always fall back to AHCI if it doesn’t work out and,
You can also find a procedure to move from RAID to AHCI in https://gist.github.com/chenxiaolong/4beec93c464639a19ad82eeccc828c63. I mentioned before. Make sure you read and understand it before jumping in. Also, why try the easier ways first. Read on!
I personally have used other ways to do this. Manipulating some registry settings in combination with a safe boot before booting normally does the trick as well. This works with both SATA SSD and M.2 NVMe drives and it enables relatively fast switching between back and forth between AHCI and RAID. I have described this method below. I have also tried the same process used to switch from RAD to AHCI and that works as well.
- Switch to safe boot
- Reboot into BIOS
- Change from AHCI to RAID in the BIOS
- Boot into safe mode
- Turn off safe mode and reboot normally again
Nothing else and that also did the trick, just like with moving from RAID to AHCI. So the link above and my step by step below is here for completeness. You have options in case one of them doesn’t work!
Step by step AHCI to RAID registry method
This procedure I describe below works on Windows 10 1803/1809 and has been tested on Dell Latitude E6220 an XPS 13 9360. Editing the registry is always a little risky if you have no clue what you are doing. So, beware if you mess up and can’t figure out how to get out of this pickle, you might need to redeploy/restore from backup.
To change the SATA operation mode from AHCI to RAID follow the steps below.
Prepping the registry settings
- Open the registry editor
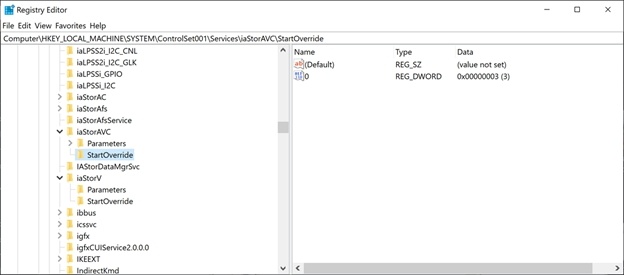
regedit - Navigate to HKEY_LOCAL_MACHINE\SYSTEM\CurrentControlSetXXX\Services\and find the some of the keys that are below (not all will exist depending on your laptop’s configuration):
- iaStor: (Intel RAID, 3 = off, 0 = on).
- iaStorAVC: (Intel Chipset SATA RAID Controller,3 = off, 0 = on).
- iaStorAV: (Intel(R) SATA RAID Controller Windows,3 = off, 0 = on).
- iaStorV:(Intel RAID Controller Windows 7, 3 = off, 0 = on)
- storAHCI: (this is AHCI, 3 = off, 0 = on)
You can put all these to 0 if you want, that doesn’t matter but normally you’ll know which one matters. AHCI is easy, there is only one entry. For the iaStor options I know I need
When you find a StartUpOverride sub key and it is set to 3 also change this to 0 for the value you want to switch to.
Just make sure you set the one you need to 0 as then it will be picked up when you switch between AHCI/RAID in the BIOS. If you’re in you can set them all to 0 as the setting in the BIOS will pick up the correct one and windows will reset the StartupOverride value where needed.
When changing values in CurrentControl001 or 002 make sure you know the one that is being used. You can find that inHKEY_LOCAL_MACHINE\SYSTEM\Select in the value named Current. If it is 1 edit CurrentControl001 if its 2 edit CurrentControl002 (that key might not even exist).
Making sure you go into safeboot mode
- After changing the registry setting set the default boot mode to Safe Mode, use msconfig.exe or open an admin cmd/PowerShell window and run:
bcdedit /set ‘{current}’safeboot minimal - Reboot and hit F2 to enter the BIOS.
- Change the SATA mode to RAID.
- Save and reboot.
- After Windows successfully boots into Safe Mode, disable Safe Mode with msconfig.exe or open an admin cmd/PowerShell window and run:
bcdedit /deletevalue ‘{current}’safeboot - Reboot again.
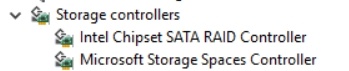
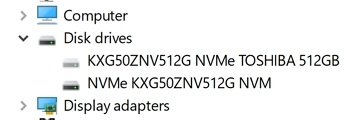
- Log in and verify in Device Manager, that you now have the Intel Chipset SATA RAID Controller device under Storage Controllers.
Updating the Intel RST driver
- You are now back to RAID but are still at the driver level that is causing your BSODs. Mine was 15.9.
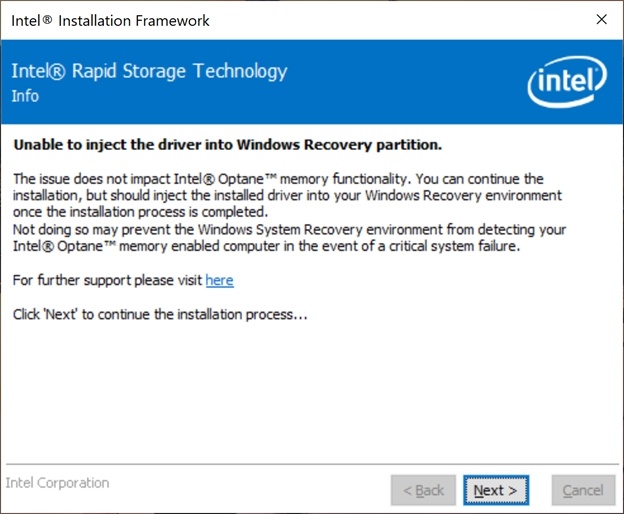
- To fix that you need to upgrade your Intel RST driver. While doing so you might get a warning about being unable to inject the driver into the recovery partition but you can ignore this and take care of that later.
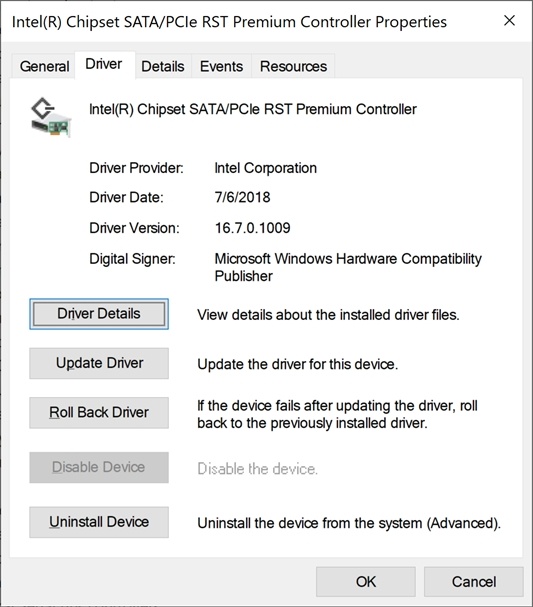
- Now reboot again and check the storage controller now in device manager. You’ll find an Intel Chipset SATA/PCIe RST Premium Controller now with driver version 16.7.0.1009 at the time of writing and that is the one I used and which fixed the BSODs for me when using RAID. Now DELL also releases updates on their support site you can try. If that doesn’t fix it, grab a more recent one from Intel if you can find one to try. That is what I did here.
- The old AHCI disk is still visible when you enable show hidden devices but also shows the disk name as know to the Intel Chipset SATA/PCIe RST Premium Controller.
Important
Note that if you have a BSOD during the installation don’t despair, try again and after a successful run and reboot you’ll have the new driver. Then you’ll have to work on the laptop and see if it still blue screens. If so, revert back to AHCI.
I hope this helps someone out there, including my future self.
“Moving from AHCI to RAID can also be achieved without reinstalling Windows. With my SATA NVME disk, I have not seen a huge performance difference between AHCI with the native Windows driver and RAID with Intel RST. ”
*SATA NVME? NVME to be on PCIe?
🙂
Correct … I will drop the SATA from that sentence 😉
Some extra info for those confused (we all are at times):
• Both M.2 SATA and M.2 NVME ( PCIE ) drives exist
• Some Dell (and other vendors) models will support both M.2 SATA & M.2 NVME (PCIe) drives while others might only support M.2 SATA drives
• The DELL M.2 connector that supports NVME there “usually” is backwards compatibility with M.2 SATA drives
Hi Didier,
I apologize for commenting on this but I’m not sure how else I could communicate with you. I read this article you wrote on the Starwind blog about Guest RDMA (https://www.starwindsoftware.com/blog/smb-direct-in-a-windows-server-2016-virtual-machine). I have the same Mellanox gear and using WinOF 5.40 I have able to get it to work! However, I am puzzled as to why they removed the Guest RDMA feature in WinOF 5.50. Do you have any idea why the feature was removed?
Thanks!
Not sure but as 10Gbps is becoming legacy we might see a focus on WinOF 2 and newer NICs for those features and engineering times goes there. Sharing RDMA with guests and host at 10Gbps might have limits making investing in it a hard sell. But this is all speculation on my side. Could have other reasons.
What entry or parameter are you actually changing in the following step ?
HKEY_LOCAL_MACHINE\SYSTEM\CurrentControlSetXXX\Services\and find the some of the keys that are below (not all will exist depending on your laptop’s configuration):
iaStor: (Intel RAID, 3 = off, 0 = on).
iaStorAVC: (Intel Chipset SATA RAID Controller,3 = off, 0 = on).
iaStorAV: (Intel(R) SATA RAID Controller Windows,3 = off, 0 = on).
iaStorV:(Intel RAID Controller Windows 7, 3 = off, 0 = on)
storAHCI: (this is AHCI, 3 = off, 0 = on)
I see some of these keys, but there are many entires within each. and some have subfolders with more entries. Can you be more specifc?
For example, what entry under iaStorAVC am I looking for to change to “0” ?
It is also confusing as well when I see the StartOverride Key showing the Name value “0” and the Data value is “0x00000003 (3)”
Since there is already a “0” and a “3” it is extremely confusing since those are the only two numbers they are used. Which is to be changed? The “Name” or the “Data” ?
Thank you for the helpful post info
As said in the blog, no harm in setting both to 0 afaik. The iaStorXX depends on your version of windows / hardware. Export your current reg setting for the key under which you change values just in case you need to recover.
Hello,
I have:
HKEY_LOCAL_MACHINE\SYSTEM\ControlSet001\Services
And
HKEY_LOCAL_MACHINE\SYSTEM\CurrentControlSet\Services
They both contain iastorV and iastorAVC
You stated:
Navigate to HKEY_LOCAL_MACHINE\SYSTEM\CurrentControlSetXXX\Services\and find the some of the keys that are below (not all will exist depending on your laptop’s configuration):
And
When changing values in CurrentControl001 or 002 make sure you know the one that is being used. You can find that inHKEY_LOCAL_MACHINE\SYSTEM\Select in the value named Current. If it is 1 edit CurrentControl001 if its 2 edit CurrentControl002 (that key might not even exist).
In which spot would I alter iastorV, iastorAVC and StartOverride?
CurrentControlSet is symbolic link to either ControlSet001 or ControlSet002. One of those 2 key is a backup for the Load Last Known Good Configuration boot option.
As I wrote: When changing values in CurrentControl001 or 002 make sure you know the one that is being used. You can find that in HKEY_LOCAL_MACHINE\SYSTEM\Select in the value named Current. If it is 1 edit CurrentControl001 if its 2 edit CurrentControl002 (that key might not even exist).
SO if you have only ControlSet001 that should be the one where you change the values. Changing it in HKEY_LOCAL_MACHINE\SYSTEM\CurrentControlSet won’t do harm, it points to HKEY_LOCAL_MACHINE\SYSTEM\CurrentControlSet001
Fun experiment: create a key under HKEY_LOCAL_MACHINE\SYSTEM\CurrentControlSet and refresh HKEY_LOCAL_MACHINE\SYSTEM\CurrentControlSet001 if that is your current value it will appear there and vice versa.
See https://web.archive.org/web/20150217152952/http://support.microsoft.com/kb/100010 for more info.
Hi this fix worked for me as well. My mainboard battery has been exhausted and setting changed back to factory default back from RAID to AHCI, my Win10 crashed for first and than it fixed itself to work with AHCI but this blocked me to use RAID again until the registry change. Setting was inside Computer\HKEY_LOCAL_MACHINE\SYSTEM\ControlSet001\Services\iaStorAVC and Computer\HKEY_LOCAL_MACHINE\SYSTEM\ControlSet001\Services\iaStorV
After the registry and BIOS cahnge to RAID Win10 started first repairing itself and after another reboot again I was in again on a RAID Win10 🙂
I think Windows did bigger damage in my time with this self remediation than just telling me something is wrong.
Anyway thanks for this article,
Saved my life 🙂
You’re welcome. Always happy to read it helped someone out. Thx for the feedback.
Many thanks! This worked flawlessly on a 2008R2 fresh build.. from AHCI to RAID. I have searched for this for years… thanks again
Happy it helped!
Uninstalling the controller driver from Device Manager would also do the swap without having to go into safe mode.
With the new UEFI you likely need to change the boot from Windows Manager to UEFI your HDD, or possibly disable fastboot (powercfg /h off) until the new driver is installed.
Interesting, did you test this?
Tried this a few different times on my Dell 7306 without success. Always ended up with inaccessible boot device bsod. Even injecting the drivers from windows RE fail. I normally wouldn’t even switch the option on, but it seems to be the only way to make the Optane drive work.
Very good tutorial and I did all steps very carefully, but I have no access. After setting save boot mode in command promt, restart and setting RAID in bios, the machine don’t boot into safe mode instead of normal mode and of course getting inaccessible boot device bsod.
Any idea of the fault?