Introduction
In previous versions of the Veeam Backup & Replication server (before version 13), we did not have a Rocky Linux-based Veeam Software appliance. We can configure a multitude of settings in the Windows Registry to fine-tune and perfect the VBR server to our needs and environment. But as we all know, there is no such thing as a registry on Linux. However, as the saying goes, everything on Linux is a file, and that applies to the Veeam Appliance as well.
In this article, I will demonstrate with a simple example how to edit these configuration files to achieve the same functionality. As some settings are Windows-specific and are not needed on the appliance, nor would they do anything useful.
How to apply custom settings to Veeam Software Appliance
On the Veeam Software Appliance, you will find configuration files that allow you to configure custom settings, just as you can in the registry of a Windows host running in Veeam Backup & Replication.
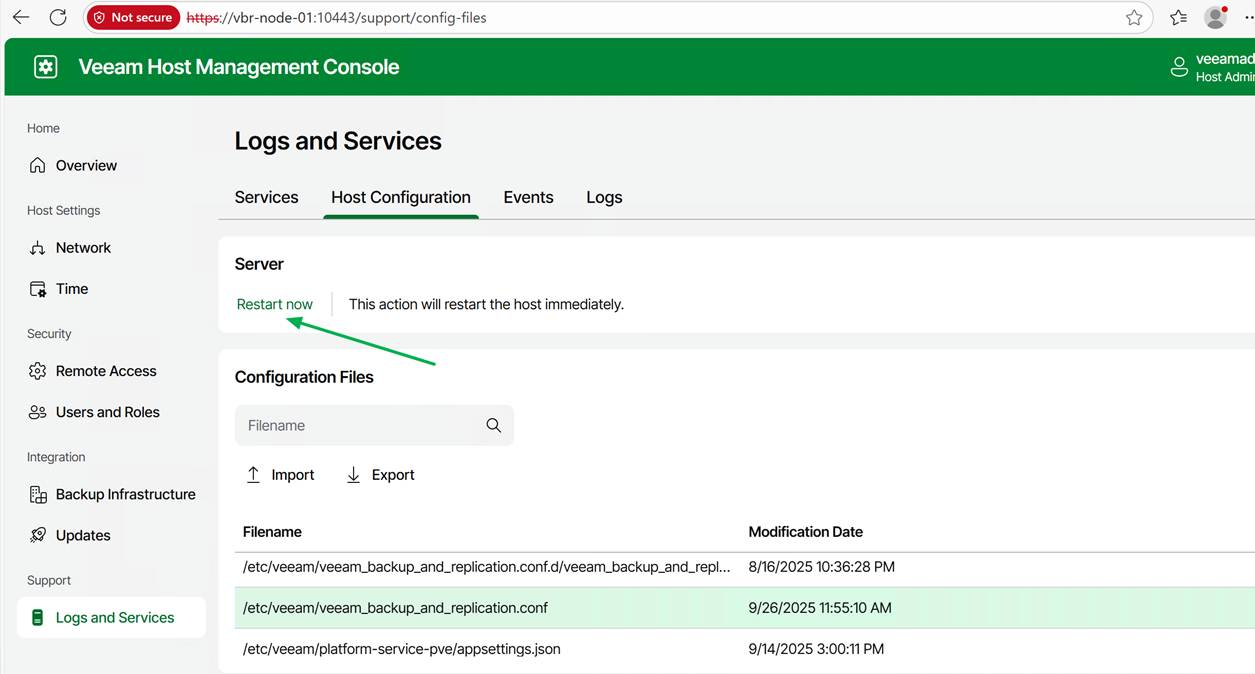
You manage these configuration files via the Veeam Host Management Console. Also see https://helpcenter.veeam.com/docs/vbr/userguide/hmc_perform_maintenance_tasks.html?ver=13#managing-configuration-files for more inf0
- Access the Veeam Host Management Console Web UI (username/password + MFA)
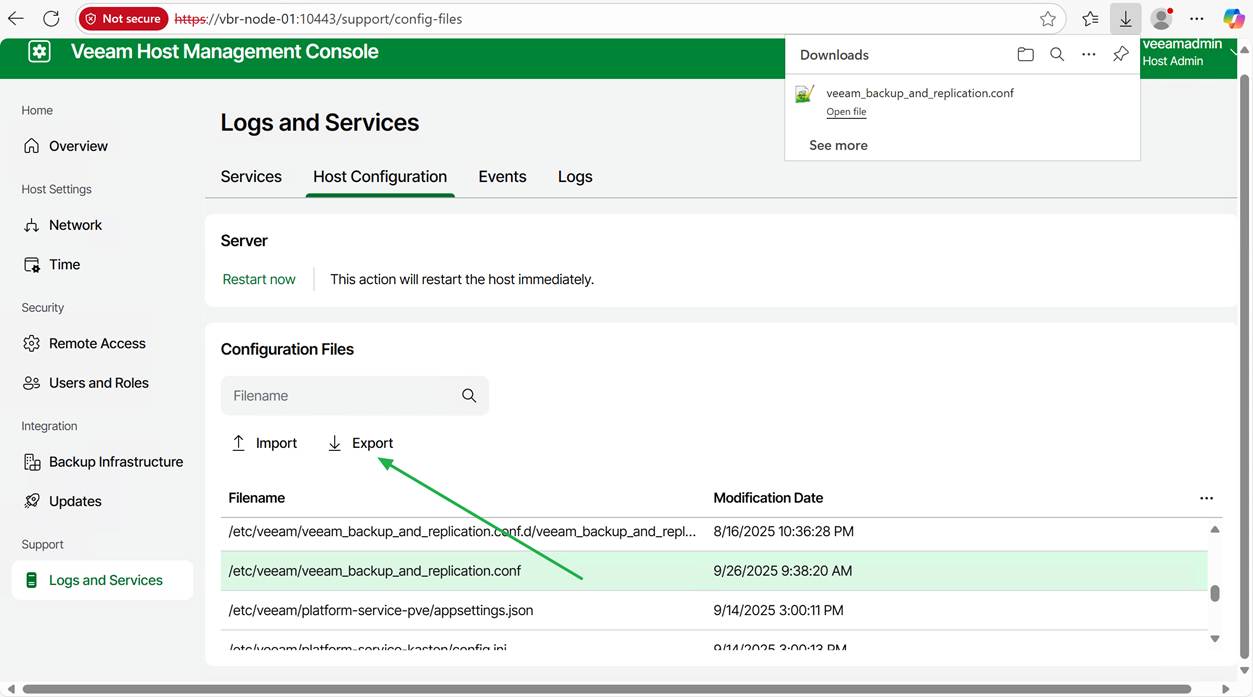
- Select Logs and Services in the left-side Navigation panel.
- Select Host Configuration within the Logs and Services view.
- From here, you can search for a specific configuration file.
The config files can be exported and imported via the Web GUI. Import required Veeam security officer approval if that is configured.
Below, you will find a selection of registry paths and their corresponding configuration files on the Veeam Software Appliance.
| Registry Key | VSA Config File |
| HKLM\SOFTWARE\Veeam\Veeam Mount Service | /etc/veeam/veeam_mount_service.conf |
| HKLM\SOFTWARE\Veeam\Veeam Backup Catalog | /etc/veeam/veeam_backup_catalog.conf |
| HKLM\SOFTWARE\Veeam\Veeam Backup and Replication | /etc/veeam/veeam_backup_and_replication.conf |
| HKLM\SOFTWARE\Veeam\Veeam Threat Hunter | /etc/veeam/veeam_threat_hunter.conf |
The names of the settings remain the same as before, making it easy for those already familiar with the customization settings from previous deployments. If anything, it is a bit more forgiving, as you cannot select an incorrect value type for the value, unlike in the registry.
Configuration File Sections
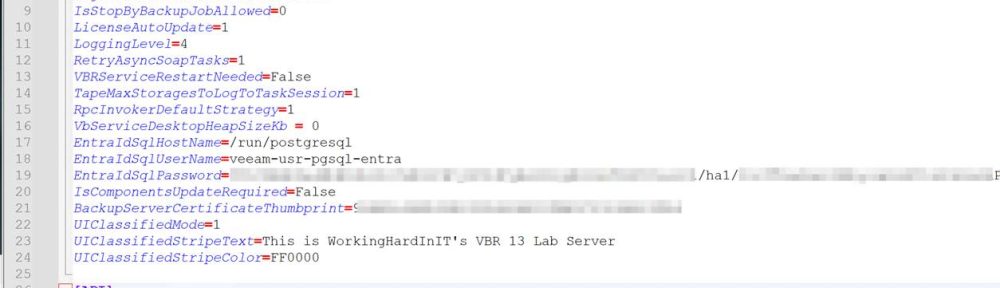
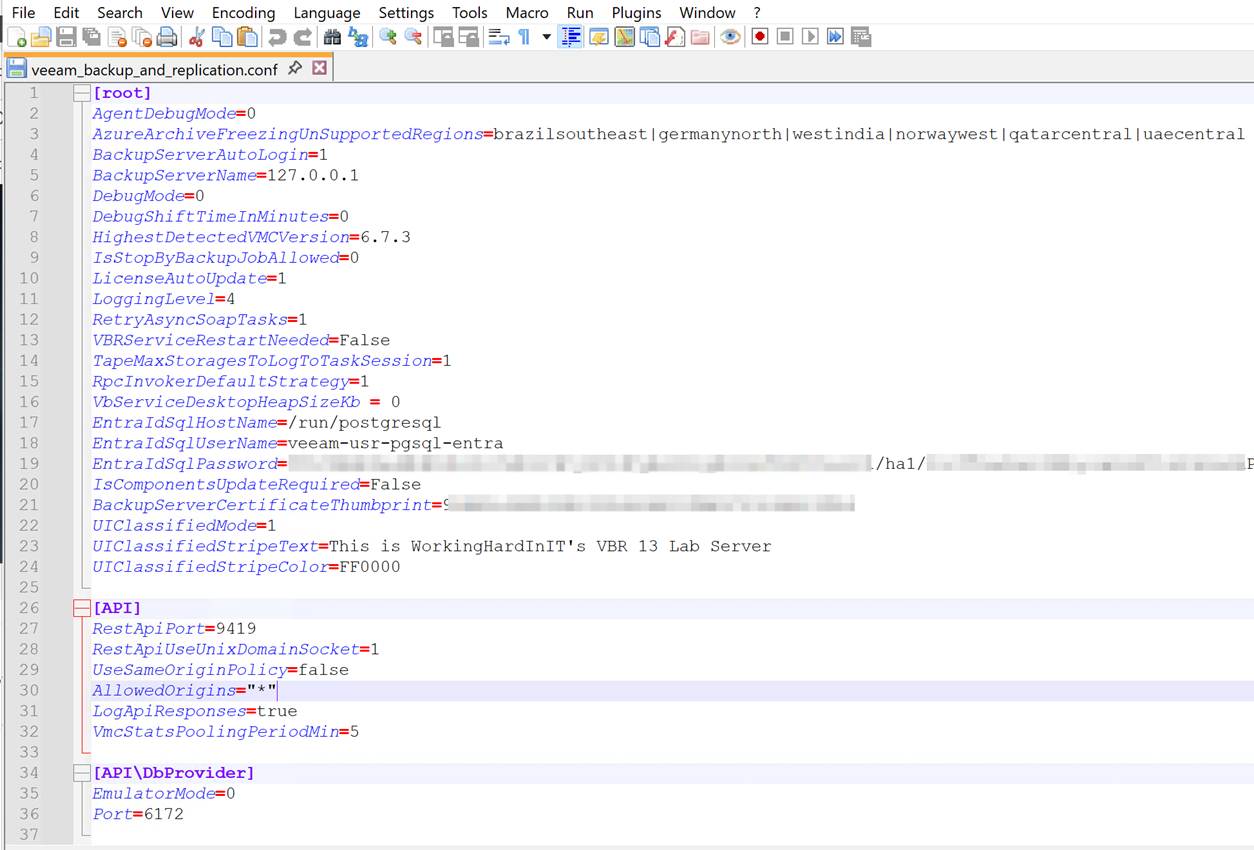
The configuration files consist of different sections in square brackets (e.g., [root]). Where [root] is the equivalent of the root of the listed key. Below, I list some examples that you will find in the /etc/veeam/veeam_backup_and_replication.conf file.
- [root] = HKLM\SOFTWARE\Veeam\Veeam Backup and Replication\
- [API] = HKLM\SOFTWARE\Veeam\Veeam Backup and Replication\API\
- [API\DbProvider] = HKLM\SOFTWARE\Veeam\Veeam Backup and Replication\API\DbProvider\
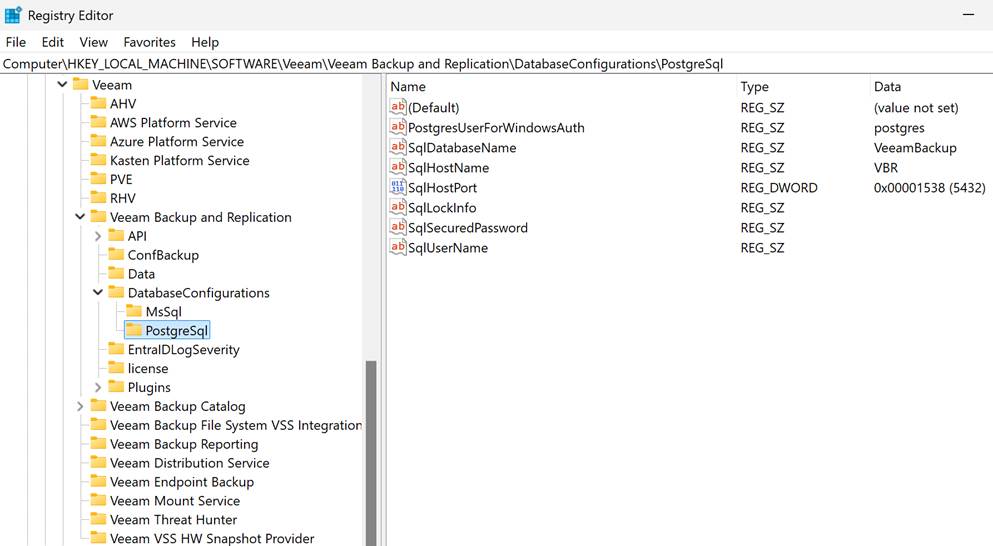
- [DatabaseConfigurations\PostgreSql] = HKLM\SOFTWARE\Veeam\Veeam Backup and Replication\DatabaseConfigurations\PostgreSql\
As you can see, these represent the registry key paths that can be found on a Windows-based Veeam Backup & Replication installation.
Step-by-step walkthrough
Export and import the files via the Web GUI. There is no need to start SSH and access the appliance. The web GUI has everything you need.
Existing files can be exported for editing and then saved and uploaded to the Veeam Software Appliance.
You can also create new files if needed and upload those. For these to be functional, they must adhere to the conventions of the config files in terms of headers and values.
Be careful editing or creating a configuration file on Windows. Some text editors can mess up the file’s line endings and other settings. Windows has typically CRLF line endings, while Unix/Linux/macOS uses LF. Just make sure whatever text editor you use doesn’t change the line ending type, or things will break. Notepad++ will serve you well.
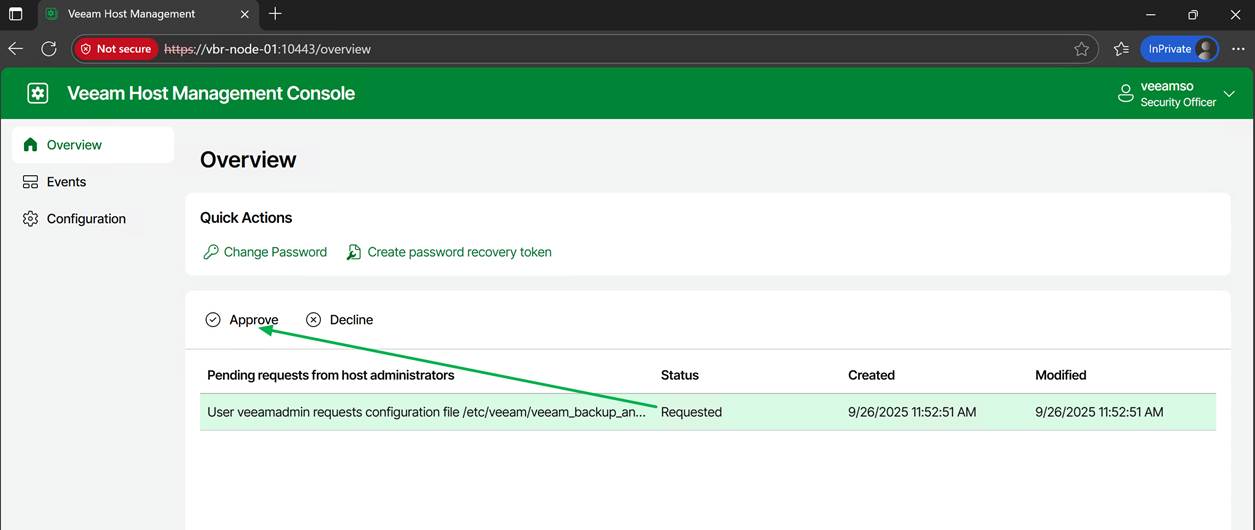
When the Security Officer role is enabled, importing an updated or new configuration file requires approval from a Security Officer.
I will demonstrate this with a handy but benign setting (in case you make a mistake). We will display a banner in the console GUI. Veeam introduced this years ago, but it makes for a nice, GUI-visible lab demonstration.
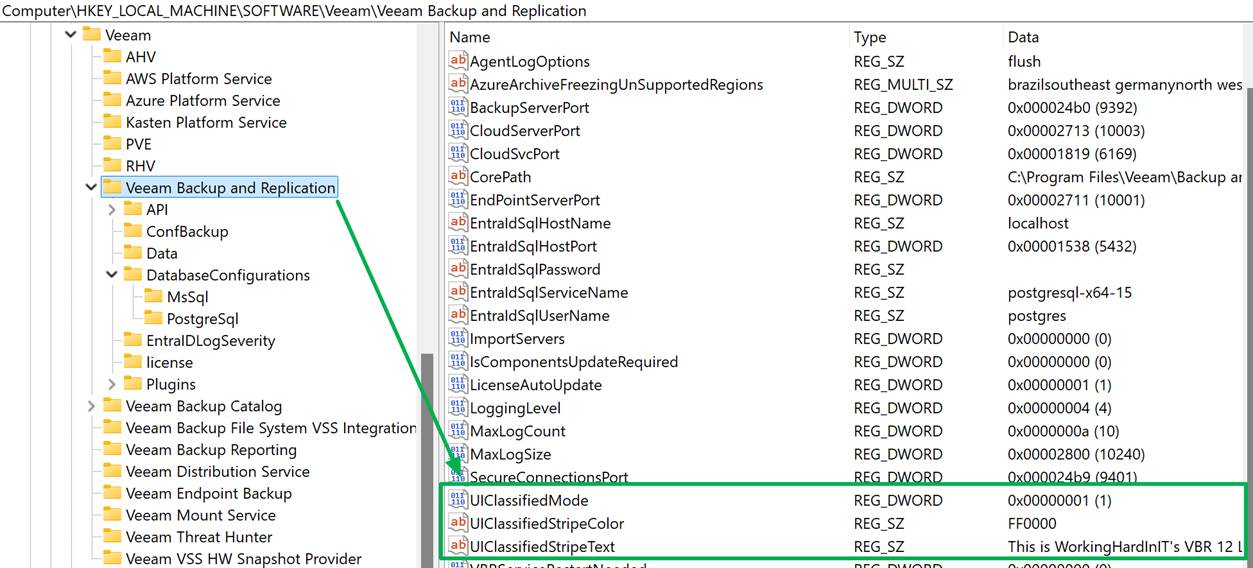
In the Windows registry, you configure this as follows:
| Registry Path | HKLM\SOFTWARE\Veeam\Veeam Backup and Replication |
| UIClassifiedMode | DWORD = 1 to enable the banner |
| UIClassifiedStripeText | REG_SZ = Your custom message |
| UIClassifiedStripeColor (optional) | REG_SZ = Hex color code (e.g., #FF0000 for red) |
We will configure the same on the Veeam Software Appliance.
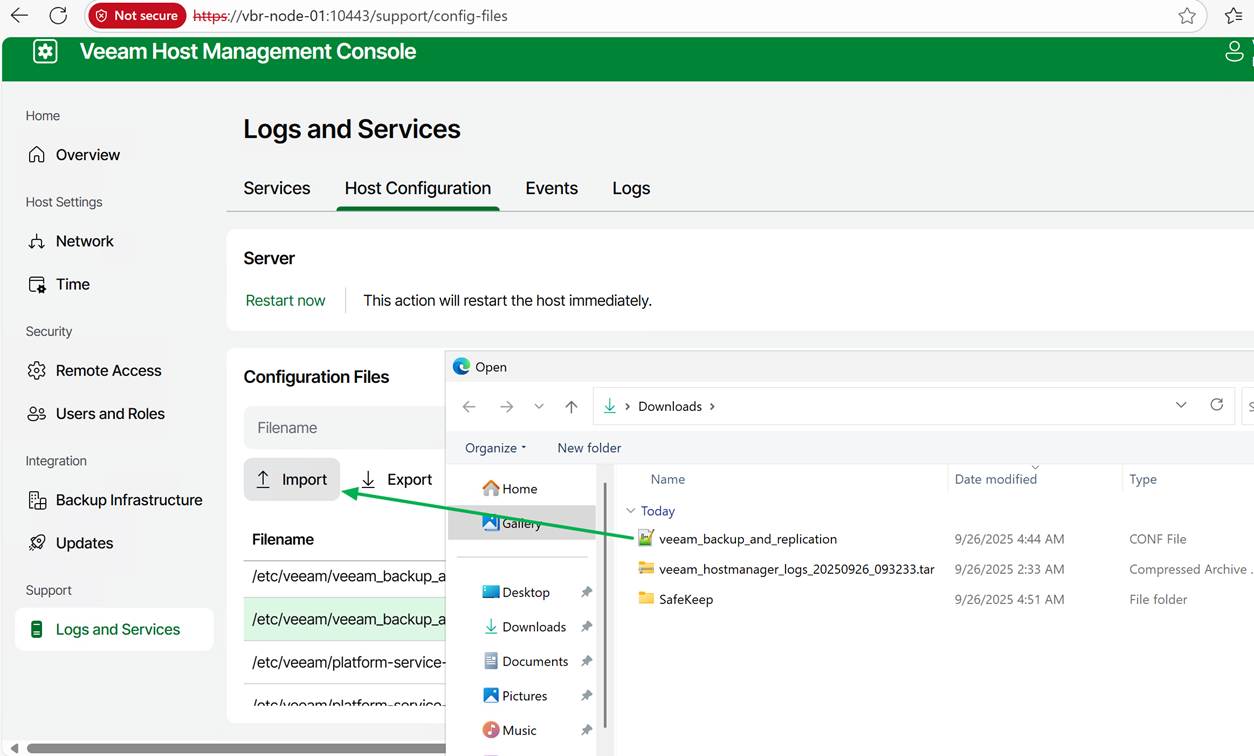
Select the correct file and click “Export”
Open the downloaded file in Notepad++ and add these three lines under [root, which is the correct path/location for these settings.
UIClassifiedMode=1
UIClassifiedStripeText=This is WorkingHardInIT’s VBR 13 Lab Server
UIClassifiedStripeColor=FF0000
Save your changes. Now, import the edited file into the Veeam Software Appliance.
As I have set up the Veeam security officer, I will need approval for this. For lab setups, you can choose not to leverage the security officer capability, but I prefer my labs to mimic real-life scenarios. It helps to evaluate the product more honestly.

Now the Veeam security officer has to log on to the appliance web console and approve my request
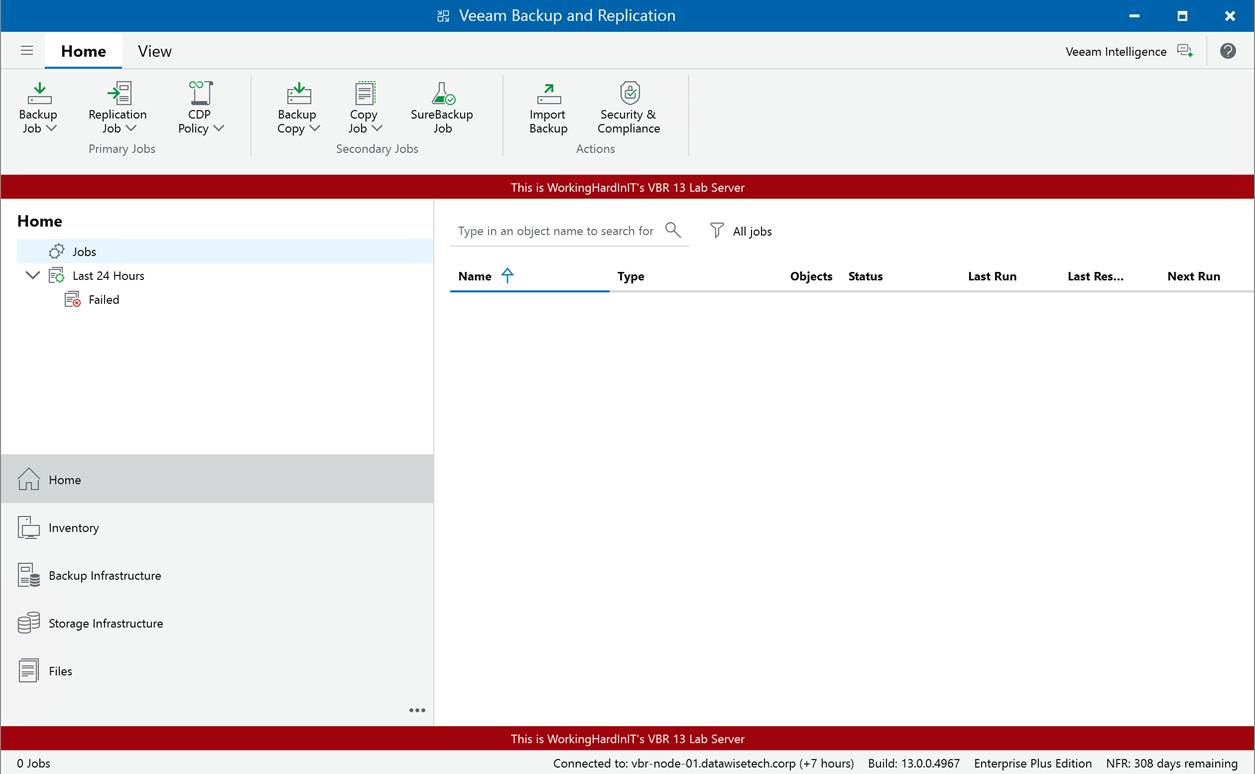
Some settings will require a restart of the Veeam services; others do not. However, if needed, you can perform this action from the web GUI.
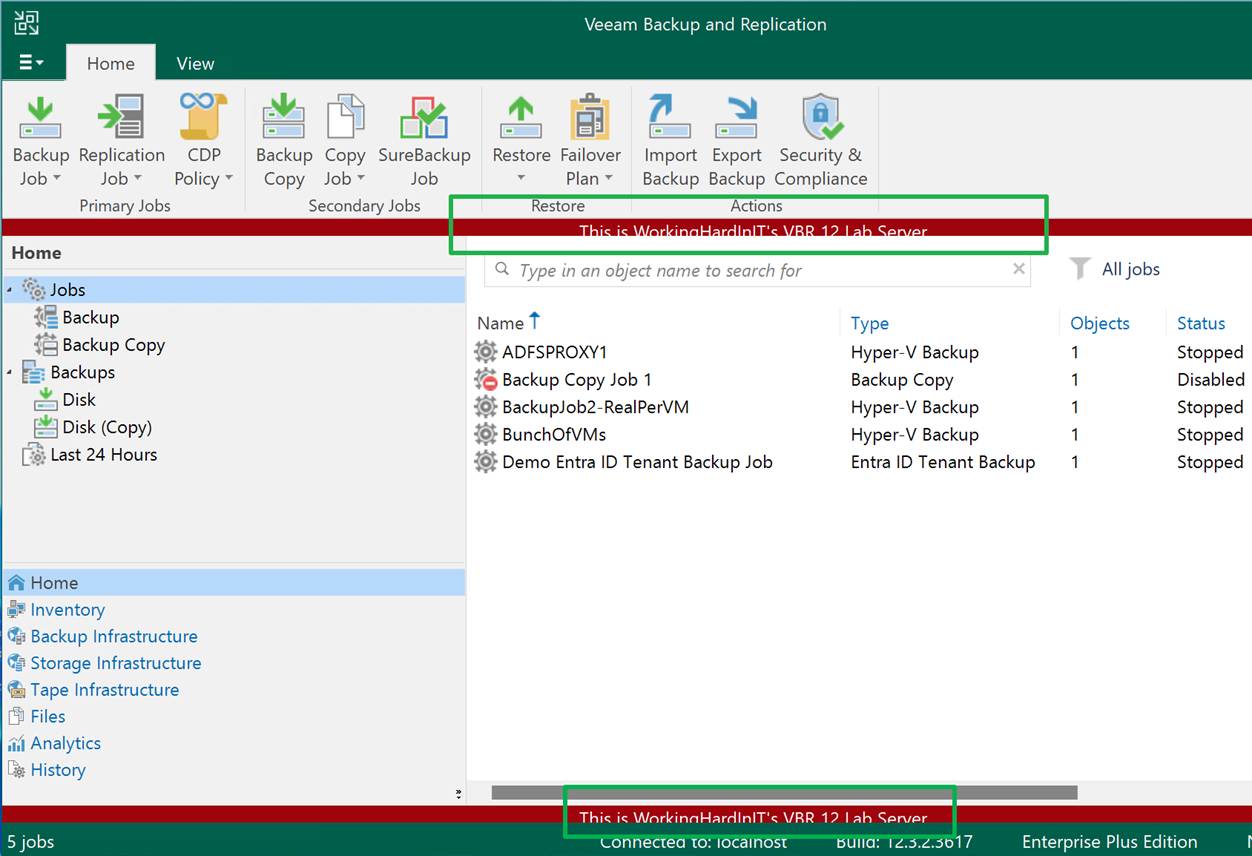
When the Veeam Backup & Replication services have restarted and you log on to the console again, you will see the banner displayed just like on Windows.
Armed with this knowledge, you can now fine-tune your configuration settings to perfection for your Veeam Backup fabric environment when leveraging the Veeam Software Appliance.
References
See https://www.veeam.com/kb4779
Conclusion
There you have it. I have shown you how to configure custom settings on the Veeam Software Appliance, just as you would in the Windows Registry. I was wondering about this myself, as I knew Veeam would not leave us with a lesser product or, at the very least, fewer configuration options than on a self-hosted server installation.
The one thing that hits home is that zero trust impacts the comfort and speed of the honest, hardworking IT professional, who, apart from dealing with all the external threats, also has to guard against insider threats, i.e., himself. If you think about it, the level of security small and medium-sized businesses now have to deal with is mind-blowing compared to what it was in the past.
Happy testing, and may your production deployments and operations go smoothly!