Introduction
This blog will be all about installing Intel I211, I217V, I218V and I219V drivers on Windows Server 2016 with EUFI boot. I’m running Windows Server 2016 as my main OS for lab, testing, Hyper-V with nested virtualization etc. I like it that way because I have all the options of the server OS at my disposal. Especially with the nested virtualization an NVME disk comes in handy. I also boot from NVMe so I need UEFI and use secure boot. That’s OK as it’s way better than the old BIOS and enables more scenario.
Windows Server 2016 doesn’t have any drivers for the I211, I217V, I218V and the I219V NICs.
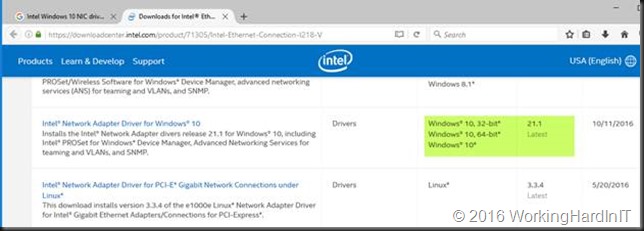
The Intel driver for them are only for Windows 10 and won’t install on a server OS. As you can see in the screenshot above that’s a system where I have the I211 driver already installed actually. We’ll work on the I218V as an example here.
That’s nothing new and we’ve dealt with this before by editing the .inf file for the driver. What might be new to some people as EUFI & NVME become a bit more popular is how to get a driver with an edited .inf file installed on your Windows Server OS.
Don’t worry even with an OS booting from EUFI with secure boot you can still disable driver signing / integrity checking when needed. We’ll walk you through an approach for installing Intel I211, I217V, I218V and I219V drivers on Windows Server 2016 with EUFI boot.
Installing Intel I211, I217V, I218V and I219V drivers on Windows Server 2016 with EUFI boot
Google for the Intel drivers of your NIC. Mine is a I218V. The instructions will work for a I217V or and i219V as well. Just adapt accordingly.
After downloading the most recent Windows 10 (x64 bit, we’ll use them with a server OS so there is no 32 bit here) Intel drivers form the Intel site we rename the exe to identify what package it is. We then extract the content to our work space. A free tool like 7zip will do the job just fine.
Prepping the .INF file
For the I211 we need to edit the .inf file and for the I217V, 218V and 219V we’ll edit the e1d65x64.inf file in note pad or your editor of choice. You’ll find it in the NDIS65 folder: C:\SysAdmin\PROWinx64\PRO1000\Winx64\NDIS65. The 65 in the folder and file names identifies our OS version (Windows 10 / Windows Server 2016).
But how do we know what .inf file to edit? We grab the hardware ID’s from the properties of our NIC or NICS.
Below you see the Hardware IDs for mu I218V. The I211 has PCI\VEN_8086&DEV_1539&SUBSYS_85F01043&REV_03 and my Iv218V has PCI\VEN_8086&DEV_15A1&SUBSYS_85C41043&REV_05.
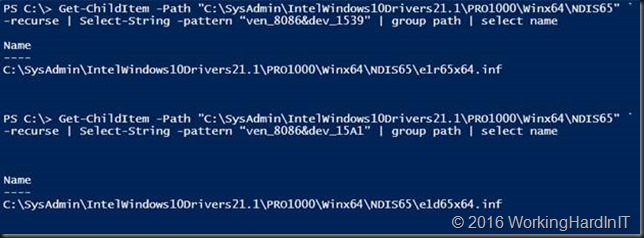
Drop the PCI\ from the beginning of the string and everything from the “&” on at the end. So for the I211 we’ll use VEN_8086&DEV_1539 and for the I218V we’ll use VEN_8086&DEV_15A1. We throw these ID strings into some PowerShell we run in our C:\SysAdmin\PROWinx64\PRO1000\Winx64\NDIS65 folder.
Get-ChildItem -Path “C:\SysAdmin\IntelWindows10Drivers21.1\PRO1000\Winx64\NDIS65” `
-recurse | Select-String -pattern “ven_8086&dev_1539” | group path | select name
Get-ChildItem -Path “C:\SysAdmin\IntelWindows10Drivers21.1\PRO1000\Winx64\NDIS65” `
-recurse | Select-String -pattern “ven_8086&dev_15A1” | group path | select name
So for my I218V I open op the e1d65x64.inf file in notepad++
I search for [ControlFlags] section and I edit the content of that section by deleting everything in it.
So it looks likes
Then I search for section [Intel.NTamd64.10.0.1] and I copy everything in there (I don’t bother to only copy the entries for my particular NIC or so.
Copy everything under that heading
I then search for section [Intel.NTamd64.10.0] and I paste what I just copied from section [Intel.NTamd64.10.0.1] nicely underneath what’s already in there.
Save the file. Basically, you’re done here.
Installing the driver
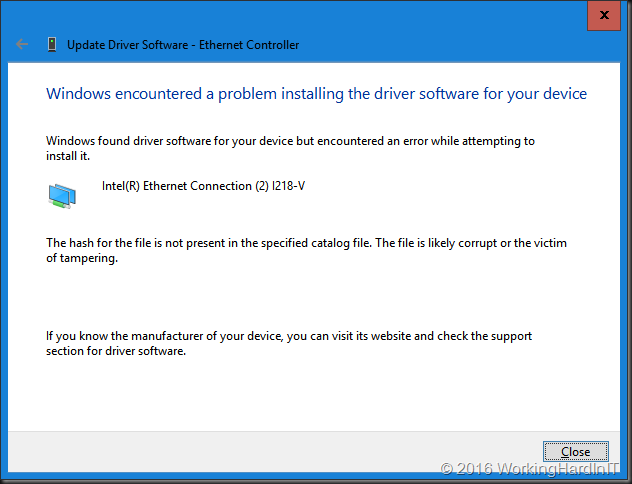
We now need to alter the standard startup setting of Windows Server 2016 temporarily because we will not be able to install a driver that’s been tampered with. If you don’t lower the security settings, you’ll get an error just like this one:
What I did is run the following in an elevated command prompt:
bcdedit /set LOADOPTIONS DISABLE_INTEGRITY_CHECKS
Note: as I’m using UEFI & secure boot the following won’t work as if you were using an older BIOS without secure boot.
bcdedit /set TESTSIGNING ON
bcdedit /set nointegritychecks OFF
But that’s OK. What we need to do is turn it of in another way. That last command bcdedit /set nointegritychecks OFF iIs not needed anyway. So, forget about that one. As a replacement for bcdedit /set TESTSIGNING ON you can use and advanced start option (requires reboot). You can also disable secure boot in EUFI, start again and then run bcdedit /set TESTSIGNING ON. I prefer the first as fixes itself the next boot and I don’t have to turn secure boot on again afterwards.
Go to setting and select Update & security.
Navigate to Recovery and click Restart Now
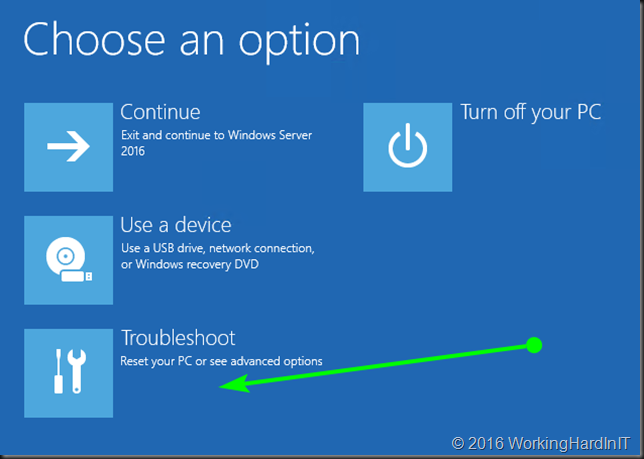
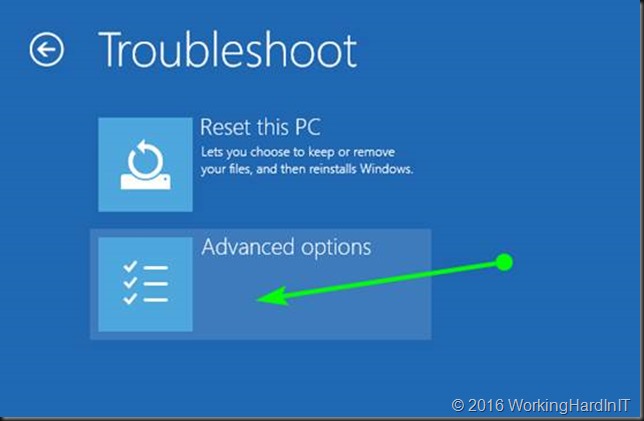
It will reboot to the following screen.Click Troubleshoot.
Select and click Advanced options.
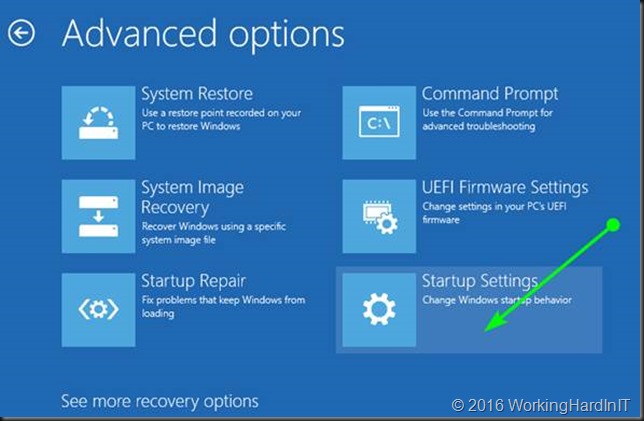
Click Startup Settings.
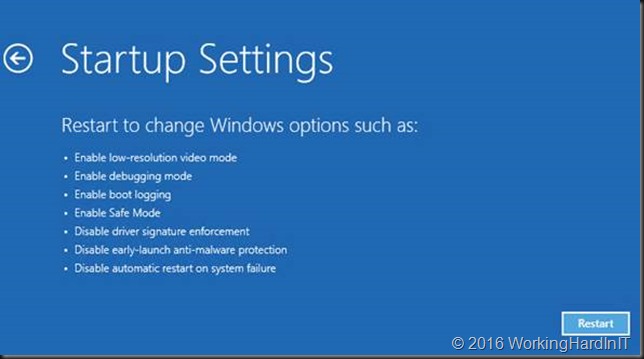
We click restart on the next screen
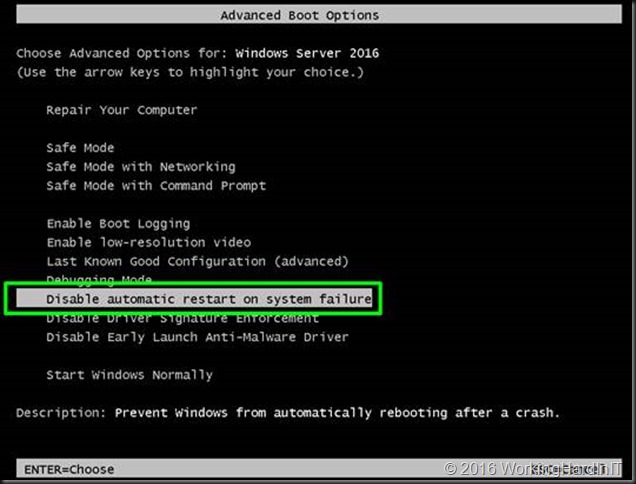
It will restart Advanced boot options. Select to disable driver signature enforcement. Hit ENTER.
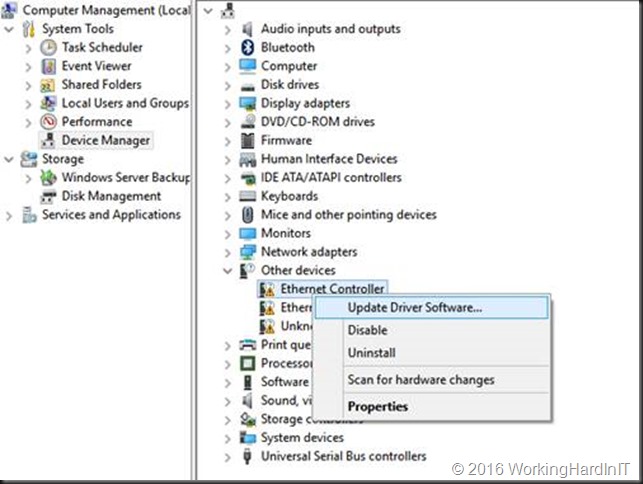
When your server has restarted, you’ll be able to install the driver you tampered with. To do so, in device manager select your NIC and click Update Driver Software.
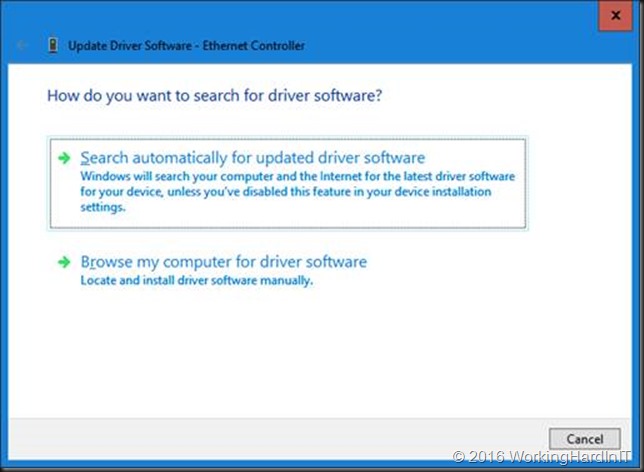
Select to Browse my computer for driver software
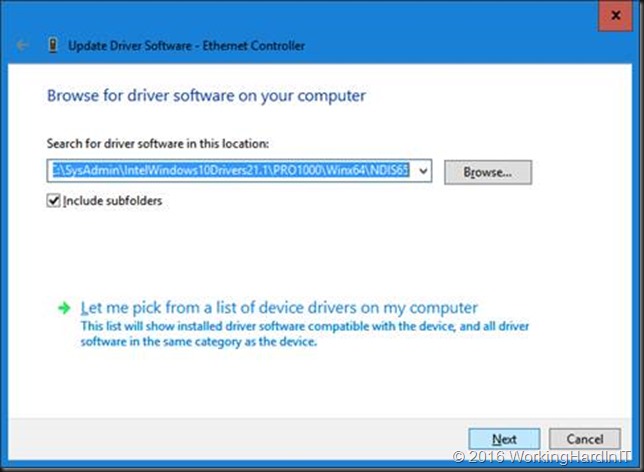
Point to the C:\SysAdmin\PROWinx64\PRO1000\Winx64\NDIS65 folder with your edited .inf files.
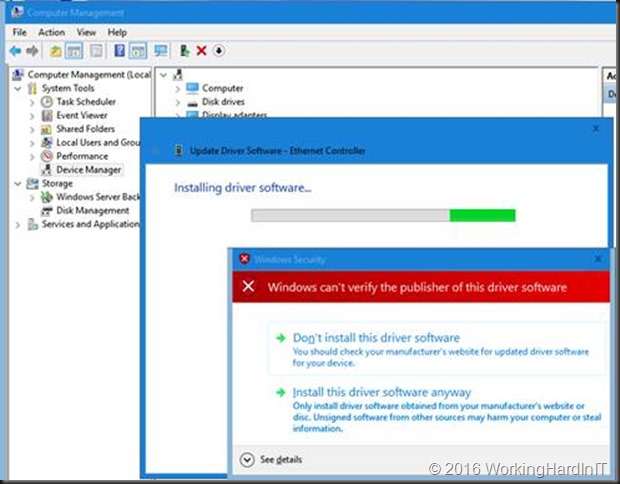
You’ll get a warning that the publisher of this driver can’t be verified. But as you’re the one doing the tampering here, you’ll be fine.
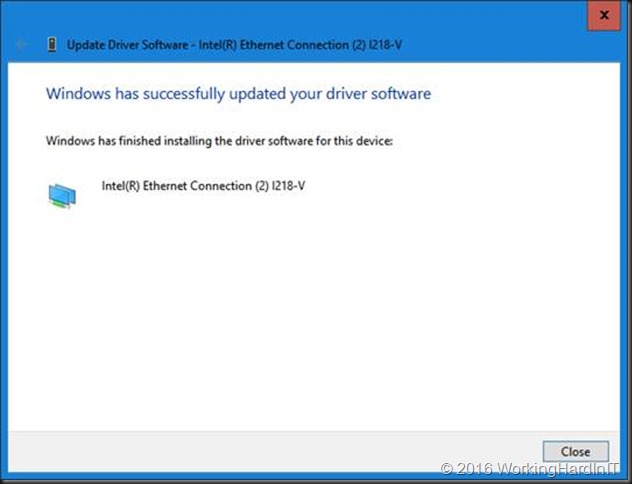
The result is successful install of the driver with a functional NIC for your system.
Cool, you’re in business!
No please reverse the setting you made to the integrity checks to make your system more secure again. From an elevated command prompt run:
bcdedit /set LOADOPTIONS ENABLE_INTEGRITY_CHECKS
Now reboot and you’re all secure again. That’s it, you’re done. I had both an I211 and an I218V NIC on my motherboard so I had to do this for both. Happy testing!








Thank you, thank you, thank you! This was a life saver getting this driver installed. You did seem to have your paths backwards with PRO1000\PROWinx64 but it was easy to follow. Thanks again!
Thanks a lot !
I had the same issue, this helped a lot to get a i219-V NIC on Windows 2012R2 working.
But i am really wondering why it’s not working by default. There is a folder for 2012R2 drivers but it does not accept. Is this a wanted behavior from Intel?
Hello Markus
Could you please upload the edited i219-v driver for windows server 2012 r2
Thank you so much
Just open the e1d64x64.inf file and add these 3 lines:
%E15D6NC.DeviceDesc% = E15D6, PCI\VEN_8086&DEV_15D6
%E15D6NC.DeviceDesc% = E15D6, PCI\VEN_8086&DEV_15D6&SUBSYS_00008086
%E15D6NC.DeviceDesc% = E15D6, PCI\VEN_8086&DEV_15D6&SUBSYS_00011179
I have added them to this section in the file:
[Intel.NTamd64.6.3]
The complete section looks like this afterwards:
[Intel.NTamd64.6.3]
; DisplayName Section DeviceID
; ———– ——- ——–
%E153ANC.DeviceDesc% = E153A, PCI\VEN_8086&DEV_153A
%E153ANC.DeviceDesc% = E153A, PCI\VEN_8086&DEV_153A&SUBSYS_00008086
%E153ANC.DeviceDesc% = E153A, PCI\VEN_8086&DEV_153A&SUBSYS_00011179
%E155ANC.DeviceDesc% = E155A, PCI\VEN_8086&DEV_155A
%E155ANC.DeviceDesc% = E155A, PCI\VEN_8086&DEV_155A&SUBSYS_00008086
%E155ANC.DeviceDesc% = E155A, PCI\VEN_8086&DEV_155A&SUBSYS_00011179
%E15A0NC.DeviceDesc% = E15A0, PCI\VEN_8086&DEV_15A0
%E15A0NC.DeviceDesc% = E15A0, PCI\VEN_8086&DEV_15A0&SUBSYS_00008086
%E15A2NC.DeviceDesc% = E15A2, PCI\VEN_8086&DEV_15A2
%E15A2NC.DeviceDesc% = E15A2, PCI\VEN_8086&DEV_15A2&SUBSYS_00008086
%E15A2NC.DeviceDesc% = E15A2, PCI\VEN_8086&DEV_15A2&SUBSYS_00011179
%E156FNC.DeviceDesc% = E156F, PCI\VEN_8086&DEV_156F
%E156FNC.DeviceDesc% = E156F, PCI\VEN_8086&DEV_156F&SUBSYS_00008086
%E156FNC.DeviceDesc% = E156F, PCI\VEN_8086&DEV_156F&SUBSYS_00011179
%E15B7NC.DeviceDesc% = E15B7, PCI\VEN_8086&DEV_15B7
%E15B7NC.DeviceDesc% = E15B7, PCI\VEN_8086&DEV_15B7&SUBSYS_00008086
%E15B7NC.DeviceDesc% = E15B7, PCI\VEN_8086&DEV_15B7&SUBSYS_00011179
%E15B9NC.DeviceDesc% = E15B9, PCI\VEN_8086&DEV_15B9
%E15B9NC.DeviceDesc% = E15B9, PCI\VEN_8086&DEV_15B9&SUBSYS_00008086
%E15B9NC.DeviceDesc% = E15B9, PCI\VEN_8086&DEV_15B9&SUBSYS_00011179
%E15D7NC.DeviceDesc% = E15D7, PCI\VEN_8086&DEV_15D7
%E15D7NC.DeviceDesc% = E15D7, PCI\VEN_8086&DEV_15D7&SUBSYS_00008086
%E15D7NC.DeviceDesc% = E15D7, PCI\VEN_8086&DEV_15D7&SUBSYS_00011179
%E15E3NC.DeviceDesc% = E15E3, PCI\VEN_8086&DEV_15E3
%E15E3NC.DeviceDesc% = E15E3, PCI\VEN_8086&DEV_15E3&SUBSYS_00008086
%E15E3NC.DeviceDesc% = E15E3, PCI\VEN_8086&DEV_15E3&SUBSYS_00011179
%E15D6NC.DeviceDesc% = E15D6, PCI\VEN_8086&DEV_15D6
%E15D6NC.DeviceDesc% = E15D6, PCI\VEN_8086&DEV_15D6&SUBSYS_00008086
%E15D6NC.DeviceDesc% = E15D6, PCI\VEN_8086&DEV_15D6&SUBSYS_00011179
Thank you very much.
I will try it and comment.
THANK YOU !!!
i211 on Win2016 is working now. You are my hero 🙂
Always nice to hear it helped some one out. Thx for reading!
Thank you for posting this detailed information!
Glad it helped. Thx for reading!
Thanks for the help and for going into so much detail!
Thanks man! Used the same approach for an I219-V on windows server2016 and worked perfect!
Thank you! The I219-V on windows server 2016 is working!
Thank you! My I219-V is now working on Windows Server 2016.
Thank you so much! , you saved me a lot of trouble.
Outstanding post. Really saved my bacon.
wow, thanks a lot, it’s awesome. i couldn’t sleep bcz this one. hahaha
this msg from korea,
감사합니다:)
and my NIC is i217-v.
i did this below step,
1. GET YOUR LAN DRIVER HARDWARE ID
Get-ChildItem -Path “C:\Users\Administrator\Downloads\PROWinx64\PRO1000\Winx64\NDIS65”-recurse | Select-String -pattern “ven_8086&dev_153B” | group path | select name
——————————————————————————————————————————————————————————-
PS C:\Users\Administrator> Get-ChildItem -Path “C:\Users\Administrator\Downloads\PROWinx64\PRO1000\Winx64\NDIS65”-recurse | Select-String -pattern “ven_8086&dev_153B” | group path | select name
Name
—-
C:\Users\Administrator\Downloads\PROWinx64\PRO1000\Winx64\NDIS65\e1d65x64.inf
2. EDIT e1d65x64.inf
3. CMD – BCDEDIT
bcdedit /set TESTSIGNING ON
bcdedit /set nointegritychecks OFF
4. REBOOT BY DISABLE AUTOMATIC RESTART ON SYSTEM FAILURE
5. INSTALL DRIVER MANUAL
6. CMD – bcdedit
bcdedit /set LOADOPTIONS ENABLE_INTEGRITY_CHECKS
Hi all, I found that fx the I217-V card can be made to work by forcing install of the certified I217-LM driver, available in the device manager driver db on Server 2016.
It does complain, but choose to load anyway and its been working all day here.
Cheers
Pingback: Building a Server II – Construction & Installation – The IT Guy Next Door
Pingback: Building a Server I – Hardware – The IT Guy Next Door
Thanks A Lot really . You saved my time & money ..
It worked exactly what you described above…
Thanks !!!!
You are most welcome.
gracias funciono perfecto
Happy it helped!
thanks it works 100% ^^
I’ve installed the driver but windows says that there is no connection, mine is i219-v can you help me, thanks.
I used Shift key & restart to get into start up options, any differences between that and going thru security
Downloaded latest ver of proset 23.1 and run install. after about 3rd to last prompt of install. (leave install open) you go to users\”insert username here”\appdata\temp\ and copy RarSFX0 folder (directory) complete to the desktop or somewhere. when you exit install, install erases this folder. (install will fail, but that does not matter the goal is to get the drivers). This folder has all the inf files. You still need to edit .inf as shown above and turn off driver signing. Works great on any server version. The only Issue I had was I did not realize power shell 4 lines of command was all one command. Once I did powershell as one long command all was good. Did on Asrock 270z with 211 and 219v nic. Both nics work. I wonder if I can “TEAM” the nics next. I transferred terabytes with no issues.
This worked like a charm for the I219-V driver, but this doesn’t seem like it is possible to modify the RTL8822BE 802.11a/b/g/n/ac WiFi adapter driver in the same way. It would be nice to get this working…
Thanks for the detailed solution and clarity of your solution.
I is disappointing that vendors like intel don’t simply make the drivers install, they could state that they are not supported for server, but at least allow them to install. Windows server operating systems install fine on desktop motherboards and this is a valid requirement for developers, testers, support and education, or simply running a server workstation so why on earth does Intel block installation?
We have never had any driver issues with AMD based systems when installing Windows server versions.
Equally the motherboard manufacturers could make the changes for their OEM driver downloads to at least install.
Thanks to community posts like this we have solutions and thanks for taking the time to share this solution.
WOW, Thanks man
Thank you so much for relieving that terrible headache!!
You’re most welcome!
Legend! Worked a treat.
Thanks for the article!
Glad to read it helped you out!
Now my I219-V NIC works like a charm!
Thank you very much!
Happy to help!
Big thanks frome Russia
You are most welcome.
Hey, Any thought about Server 2019? I219B is not working, so I just thought somebody should have an idea.
Wow, this worked! Thank you so much.
Very very big thanks! 🙂
Thank you very much! Thank you for your support! Congratulations! Helped me here in Brazil !!!
Thank you very much for the detailed explanation. I had recycled an old Z97 desktop to WIndows Server 2016 and was pulling my hair out over the lack of network driver support. You saved the day! Followed your instructions and it worked first time.
Happy to hear it worked.
The screenshot to select to disable driver signature enforcement is wrong, the wrong option is highlighted.
Thanks for the instructions, life saving!
Hello Didier and thanks you for your help to make that drivers works on WS16. \o/ It helps me a lot and i’ve learn somehing new that’s why i’m happy now o/
The interweb was built for posts like this!
Thank you so very much Didier, you saved me hours of time and pain. Thanks to you I’ve painlessly upgraded my Intel NUC with an I218-V from Windows 2012 R2 to Windows 2019.
Pulling my hairs out and spent hours on this using your procedures but doesn’t seem to work for me using i219v on Win 2012 R2. I checked every step but just not working for me. Can you help review my file as well?
i couldnt figure it all out thanks
We must have the same motherboard because this worked like a charm for me. Thank you much!
Saved my day! Thank you so much.
NICE! I have a very similar scenario: new motherboard with I211 and I want WS2019 for Dev/Test, etc and boot from NVMe just like you. I was about to give up when I ran across your blog. Voilà! There be internet here! Thanks so much!
Winner winner chicken dinner!!!!!
Thanks, this information got me able to install WinServ 2016 on an AsRoc B360 board. Fantastic, and thanks for sharing!
Thank You so much for the instructions!!
Thank you so much, helped me to avoid return of the mobo.
My I219V lan card works just on Windows Server 2016 now
Well done.
Thank you very much.
Just got my I1219v from an MSI Z390-A Pro board running under Windows Server 2019 by following your instructions (mostly)
Great to hear!
For those interested. Also works for NUC7i3BNK running Server 2019.
Works just fine with Server 2019 and I219V (MSI MPG Z390 Gaming Plus).
Thanks for sharing!
GESUS, YOUR MY GESUS
THANK YOU THANK YOU THANK YOU SO MUCH MY LORD
Thanks 1M
You’re a legend. Thanks!
Thanks! Ur the man!
Happy it helped.
thx a lot in my Case (I211) with a Prime X370 Pro i have to use the .inf file:
e1r65x64
Driverversion 23.5.2
Link:
https://downloadcenter.intel.com/de/download/25016/Ethernet-Intel-Network-Adapter-Driver-f-r-Windows-10?product=64403
and the rest worked by me with the how to from:
Shon.7 on January 9, 2018 at 3:33 am said:
Thank you! Thank you! Thank you! Life saving to me too!
This article is brilliant., thanks. Helped me solve the driver issue with NUC and Windows server 2016.
Thanks for your share! Before I buy NUC, I’d like to know if it can hibernate and wake up by WOL without any issue after by following this guide to install the driver? Does anybody tried this with Windows Server on this NIC?
Thanks in advance!
Dude! You are amazing! Got a l219-V working on Server 2016.
Greetings from Brazil!! Thank you!
Happy to help!
Thank you for the tutorial, it worked on Server 2019.
I’m not sure I have enabled secured boot so after the following command
bcdedit /set TESTSIGNING ON
bcdedit /set nointegritychecks OFF
I have restarted and was able to install the driver.
What a pain though, not much of a plug and play. You would think that with Intel Nics you shouldn’t have any issues… sigh.
Thanks again, well done!
Happy you found it to be helpful and I’m glad you got it working.
Strange, i’m using this trick on intel 12i9 v on MSI z290 a pro,
ocassionally the nic would become “unindentified network” and i had to disable and enable the nic to get it working again,
anyone know how to solve this?
Superb instruction, fully up and running. You helped me in a big way so thank you.
Worked like a charm. Thanks!
Just to let you all know, there’s now an official driver for I219-V and I219-LM for Windows Server 2019 (including Version 1903):
https://downloadcenter.intel.com/download/28396/Intel-Network-Adapter-Driver-for-Windows-Server-2019-?product=36773
sorry about my previous comment, didn’t test before posting, those drivers don’t install in windows server 19 :·(
No worries, it happens to the best of us. Thx for letting us know. At least the method in this blog post still lets you install the drivers.
Thank you a million ! Worked beautifully for my (recently purchased) MSI X399 SLI PLUS mobo with (on-board) Intel I211.
Very glad to hear it helped! Enjoy.
Thanks! Your method worked like a charm. You are, indeed, The Man, as previously posted.
On Windows Server 2019, I installed an Intel i211-AT driver, changing your NDIS directory reference in the instructions to “NDIS68” and updating the appropriate INF file there. (And, of course, loading the driver from that directory.)
(System: Asus Prime X470-PRO w/5220 BIOS, AMD Ryzen 2700X overclocked, 32 GB RAM)
Thanks a very useful guide – I’ve managed to get my Evaluation copy of Server 2019 to use the i217-V built in LAN on my Gigabyte Motherboard.
You are most welcome.
Thanks! Everything works on Server 2019
Good stuff, thank you!
Worked for Server 2016 on a HP zBook with Intel I219-V
Worked similarly for 219-V (integrated on MSI MB) on Windows Server 2019.
Thank you thank you thank you, cannot believe it does not work out of the box when buying “quality” intel stuff.
Great to hear it helped you out.
THANK YOU MAN!!!!! Works on 219-V on windows server 2019!
YOU ARE THE GREATEST!
Awesome Stuff Man!!! I got the integrated Intel® I219V Gigabit LAN Controller (ASUS Prime Z370-A II) working with Windows Server 2019, Thanks For the Guide!
You are most welcome.
Yepyep, got an Asus 2390 ethernet port working.. I have a few more gaming rigs I have been using as servers which I will also apply it on.. you the man.. attache you paypal link here bud.
Thx and you’re welcome. You can buy me a coffee or a burger … https://www.buymeacoffee.com/workinghardinit
I downloaded the driver from my Mother Board maker, ASUS for Windows 10.
I then told Windows 2016 to use the folder where this was, and chose I219-LM, at it complained, but installed….and works.
Great write up but Intel is basically pushing an up-sell here to get you to buy a more expensive mobo to run a server OS. Complete BS.
Amazing! Thank you so much for this!
Glad to read it helped!
Still works. Amazing KB article.
Worked on Lenovo T440s , Server 2016 edition
Here from May 2020 – just got my I219-V working on 2019 server thanks to your help!! This is what the internet is all about, ppl taking the effort to help each other out and teach each other on the way.
Thanks so much. It finally worked. I had same problem on Lenovo M720s NIC I219-v. The ethernet controller drivers could not be installed on OS Win Server Std 2012 r2. For my case I edited the e1d64x64.inf file. & Voila! Once again thank you.
thank you
Thanks and RECPECT!!!!!!!!!!! it Really Works!
THANX THANX THANX!
Happy to help!
You are a gentleman and a scholar! Thanks for the great tip!
Amazing! Worked on a Shuttle DH370 with dual i211 adapters on Server 2016. Followed the instructions exactly with no issues. Thank you!
Hello Markus
Could you please upload the edited i219-v driver for windows server 2008 r2
My i211-at works on WS2019 now, THANKSSSS.
Great job ! That works with a z390 gigabyte + windows serv 2019
I launch PROWinx64 driver then in %appdata%\local\temp
i copy RarSFX0 folder (directory) complete to the desktop
After i follow the .ini edition in PROWinx64\PRO1000\Winx64\NDIS65
I launch BCEDIT to launch test mode => reboot
I install manually the Lan i218
That worrrrrrks
I disable test mode in bcedit => reboot
Thannnnkkk you..
Pingback: Windows Server vNext (20201) auf einem Intel NUC5i3RYH - Jan's Cloud
Amazing. Worked perfectly the first time and the instructions were very clear. I now have my test bench back. Thank you so much!
Thanks. I’ve been running Windows Server 2012 R2 on a few older NUC models (NUC7i7BNH and NUC6i5SYH) without any issues but with a new NUC10i7FNH i’m running into NIC Card drivers for VEN_8086&DEV_0D4F.
I’m trying to install Windows Server 2016 on NUC10i7FNH but just can’t find the right settings and have tried NVMe and SATA III both without any luck. Can you share your BIOS settings if you hare using a NUC10?
Thanks.
Intels strange hw politics gave me a hard time installing the i219V nic (asus z390m board) on win server16. Yes, in oct20 this amazing help/howto still works.
You didnt save my life, but you really saved at least a useless week of my live finding the right driver 😉 Thanx a bunch
Yes folks, it works!
Edit that .inf, fire some bcedit commands and you will be able to happily install the Intel NIC driver. And then enjoy server16 on a “consumer” mainboard
Greetings from germany
Mike
Always happy to hear it helped out someone. Thanks, for letting me know.
Brilliant post. I can’t believe this is still an issue. I have a couple of boxes I use for my home lab. All with SuperMicro motherboards because they are excellent if expensive quality. Yet they build them with NIC that are not tested or certified for Server OS. I wonder how much they or Intel saved by this shortcut.
Happy it helped. It is one of my most long-running and still much read blogposts indeed. I don’t expect this to change any time soon.
i’ve install it on a strix b365-f board. its now working. but my problem is it only runs/speed at 100mbps, can anyone help me?
THANK YOU!!! perfect instructions. fixed my issue. After hours of research I found this page and it fixed my issue (Using i218-V on 2019 server to leave this message). Thanks so much for the time it took to leave such a detailed instructions on this.
You are most welcome. Happy to read it helped you out.
u r my hero.
I’m using I217-V, server 2019 and this method worked very well.
Happy it helped!
The gift that keeps on giving!! Thanks for posting this. It enabled me to install the i219 drivers for Server 2019 on a NUC 10. Now I have to figure out how to apply this to the wireless bluetooth drivers.
You are great, Thanks Man
Glad it helped.
It is a great article and thanks for sharing. However I had a considerable amount of trouble getting it to work on my brand new motherboard a Gigabyte B460M D3H
Actually it is the B460M (I think the M is micro) that gave me issues in the first place since I originally bough a Asrock B460M Pro4 but when the Lan adaptor wouldn’t install I returned it as faulty… only to find the SAME issue with the Gigabyte. I knew it wasn’t the motherboard when the Gigabyte had the same problem.
Anyway for those with the same board and windows server 2019 I had to faf about with the file in the PRO1000\NDIS65\e1d65x64.sys
first I had to copy the entire section
[Intel.NTamd64.10.0….} and all the entries below.
open command prompt and run ver
my version of windows 2019 was [version 10.0.17763.107]
So I as mentioned above I copied the entire section, but renamed the line
[Intel.NT with my version so it read
[Intel.NTamd64.10.0.17763.107]
followed by all the entries below.
Then!
my card was this one.
%E0D55NC.DeviceDesc% = E0D55.10.0.1, PCI\VEN_8086&DEV_0D55
%E0D55NC.DeviceDesc% = E0D55.10.0.1, PCI\VEN_8086&DEV_0D55&SUBSYS_00008086
You must make sure every section with [Intel.NTamd64.10….] has this entry
once save file
Then it will manually install if you force it. It will say driver unsigned but thats fine.
Fiddly, but it works.
Great post thanks for the help.
Happy to hear you got it to work, and I’m glad you found this helpful.
Thanks so much, this also works perfectly on standalone Hyper-V server 2019 on an intel NUC style PC with an I219-V network interface. Instructions below if this helps anyone.
From CLI
bcdedit /set LOADOPTIONS DISABLE_INTEGRITY_CHECKS
bcdedit /set TESTSIGNING ON
bcdedit /set NOINTEGRITYCHECKS ON
Reboot the machine
pnputil -i -a driver.inf (modified inf file from tutorial)
allow install of untrusted driver and there you go!
Pingback: Setup Hyper-V Environment in a cheap way - Cristian Licari
Thanks a lot buddy! I was about to give up with my lenovo m710q when i saw your tuto. Worked like a charm with WinSer 2019. Thanks again.
You are most welcome. Glad to read it was helpful.
Hi WorkingHardInIT, I want to start by saying my company uses NUCs w/ Server OSes on them (Windows) and I used this years ago with fantastic results on a Intel NUC Gen. 7 micro-PC installing WS2012R2, so definitely a huge thank you for that! On the other hand, I find this does not work with NUC Gen. 10 (still trying to install 2012 R2). This is a VEN_8086&DEV_0D4F, which is listed as “Ethernet Connection (10) I219-V” in devicehunt.com. I noticed that in the Win 8.1 Drivers from the Intel site, they no longer have the same folder structure upon decompressing and the .INF files are MUCH MUCH shorter, missing all of the parts that you show editing of in this guide. I was hoping for a little help if you have time. Thanks for doing what you do! -Brandon
As a quick & dirty workaround try extracting the Intel installer exe (download here https://downloadcenter.intel.com/download/22283/Intel-Ethernet-Adapter-Complete-Driver-Pack) . Via Device manager navigate to your NIC and right click it, select update driver, select “Browe on my computer for driver software”, and select “Let me pick from a list of available drivers on my computer”, choose “have disk”. navigate to \C:\26_3\PRO1000\Winx64\NDIS64 (correct to your path) and select I219LM instead of I219V. That should work, but your NIC will be identified as a I219-LM, wich technically is not true, but it will works. Now if you need to have it identified as the I219-V editing the file is a trial/test/error/fix game.
unbeflippin-leavable.
I am just testing windows 2022, datacentre version on my very old Toshiba Portege Z30-A-1FD laptop.
On install of 2022 I have no wired or wireless networking.
After your wonderful tutorial, which taught me a lot, I have wired intel I218 working
After some further tweaking I also got the Intel AC 7260 working too
So happy.
I don’t often see such complete documentation, I know how long this takes.
m
Hey, thank your for this nice feedback. I am glad to read this blog post helped you out. Enjou testing Windows Serverv 2022.
Thanks, it worked 🙂 I could not be sure it was I219-V … found it in BIOS..
Windows Server 2019. (I did not have this problem last time I installed on same machine…)
Brilliant! It worked for me on a Lenovo M70T with Windows Server 2019 Essentials
Wow, four years on and the solution is still relevant. Thank you so much.
Easier way for Intel desktop LAN chipsets…. Device Manager, find the Ethernet card, Update Driver, Manually, pick from a list, Intel Corporation…. depending on which one you have, find the I217/I218/I219-LM driver (it’s one with out a number in parenthesis at the end) and install it over the ominous warning Windows always issues. Works like a champ, problem solved. Tested on 2019 and 2022 server.
Yes, but I think I remember it identifies the NIC ad another model/type then (if that is important to you) and I had some bad luck messing up a NIC over it.
send me your cashapp or paypal. I need to buy you a beer 😀
Awesome!
awesome. followed your instructions, and got my WS2019 & I218-V ( ASUS X99-E) board working.much thanks.
Happy to read it helped you out so well, enjoy!
Thanks man, you are a life saver, saved me from a big embarrassment.
You are most welcome. Glad it helped you out.
My man, you are genius. Thanks for that, it worked perfectly
You are most welcome!
i need LAN driver I219-V for WS2019. pls share the details
Same process, just adapt for I219-V, grab those hardware IDs
Darn it, no matter what, can’t get Intel i211 Gig NIC on a Gigabyte AORUS XTREME X570 motherboard to install in Windows Server 2022 21H2. Tried ALL the .inf edits, even tried adding 10.0.2 section, but no luck. Windows doesn’t load it at all, like it completely skips it.
On the other hand, Windows Server 2019 1809 has no problem loading after making the .inf edits.
I’d rather keep the WS2022 config pristine and not used the i217 workaround.
Anyone got any magic??
If you do not mind having your NIC identified as another type you can always just download the Intel Drivers https://www.intel.com/content/www/us/en/download/18293/intel-network-adapter-driver-for-windows-10.html and unpack them. Then navigate to the NIC that is not being recognized in device manager and right-click to select Update Driver. Choose “Browse on my computer for driver software”, and select “Let me pick from a list of available drivers on my computer”, navigate to C:\Drivers\Intel\PRO1000\Winx64\NDIS68, select the I219-LM driver and install that one. That will give you an easy fix,
Thanks for your help! I really wanted the i211 driver, so I kept pounding on this problem. Before uncovering a solution, I had downloaded the latest Intel i211 NIC drivers for Win10 x64, installed them into Windows 10 and extracted them, to use in Windows Server 2022, but that didn’t work. As I mentioned previously, WS2022 completely ignored the driver, no matter what .inf adjustments I tried.
After grueling days of frustration, when I was about to give up, I stumbled across a built-in WS2022 .inf file that includes the i211!! It’s filename:
C:\Windows\System32\DriverStore\FileRepository\net1ix64.inf_amd64_f28032f8e690970c\net1ix64.inf
Once that .inf file is edited as you describe in this web page (add the %E1539NC…. line to the Windows Server [Intel.NTamd64.10.0] section), then, finally!, WS2022 recognizes the NIC driver.
As for the i217, et al, there are a few NIC Advanced settings in the i211 that are not in the i217 Advanced properties. 99.99999% of people likely won’t ever though those settings, but there are differences, so it’s not exactly the same. Though, both the i211 and i217 i218 i219 uses the same driver file and version 1i68x64.sys.
Thanks for your great information
your solution work for Windows server 2022 🙂
OMG – Thank you so much. Used this trick for the I255-V ethernet controller for Windows Server 2022. You are a life saver! Why oh why do intel not supply the drivers for the NUCs to run server OS?
Happy it helped you out!
Thank you so much for this guide, it has been very helpful so far. Unfortunately, I am stuck at the Powershell part of the step where I am guessing we make an ini file? When I try to mimic your steps in powershell, I keep getting errors so I was wondering if you could help me with that section? Thanks!
No, we are reading the ini files, to find the string we need. We then edit the ini file based on what we found.
This is awesome stuff – thank you.
There is a little effort involved, but if you follow the instructions this works!
Happy to read it helped you out.
Sir my problem is that i couldn’t install sound drivers in windows server 2022.Please Help MSI H410 board
THANKS SO MUCH. VERY CLEAR INSTRUCTIONS WITH GRPAHICS, GOOD JOB. YOU SAVED MY TIME. KEEP GOING. HELP EACH OTHER. THANKS AGAIN.
Nossa você é Top!! Parabéns pela publicação, foi a única solução que funcionou, todas as outras que eu tentei foi sem sucesso… Muito Obrigado!!¡!!
For Windows Server 2022, you’ll want to edit e1r.inf in the WS2022 folder. I also found that in the current driver package (27.6), I had to create an entry specifically for my network adapter with a “.10.0.0” name. Not sure why, but it worked:
;——————————————————————————
; Intel(R) I211 Gigabit Network Connection
;——————————————————————————
[E1539.10.0.0]
Characteristics = 0x84 ; NCF_HAS_UI | NCF_PHYSICAL
BusType = 5 ; PCI
AddReg = e1r.reg, TcpSeg.reg, ReduceSpeedOnPowerDown.reg, JumboPacket.reg
AddReg = EnableWakeOnManagmentOnTCO.reg
AddReg = Copper.reg, Copper1000.reg
AddReg = Powermgmt.reg, WakeOnSlot.reg, WakeOnLink.reg
AddReg = LLI.reg
AddReg = RSS.reg, RSS2Q.reg
AddReg = IntelANSVlanID.reg
AddReg = EEE.reg
AddReg = ProtocolOffload.reg
AddReg = CoInKS.reg
AddReg = UninstallW2.reg
CopyFiles = win10.CopyFiles, MessageDll.CopyFiles
*IfType = 6 ; IF_TYPE_ETHERNET_CSMACD
*MediaType = 0 ; NdisMedium802_3
*PhysicalMediaType = 14 ; NdisPhysicalMedium802_3
[E1539.10.0.0.Services]
AddService = e1rexpress, 2, win10.Service, win10.EventLog
[E1539.10.0.0.HW]
Include = pci.inf
Needs = PciSriovSupported.HW, PciIoSpaceNotRequired.HW
AddReg = MSIX3.reg
It worked on Server 2022 too. Nice job!
Thank you!!
You are most welcome.
Thank you! Really really helpful! Just installed I226-V drivers on Windows Server 2022
Thank you very much. Great job really!!!
You are most welcome.
You did a great work my friend. I know lot of people visit this blog. Just add a cent to your hard work … this is another good approach without editing inf file… I downloaded latest Release of network drivers pack
https://www.intel.com/content/www/us/en/download/15084/intel-ethernet-adapter-complete-driver-pack.html
Then I followed the following youtube … instead of his folder in the youtube, I pointed the folder win2022 folder in the downloaded and I selected my network card name and worked for me. Hope this work for other who didn’t get success with this friend process.
Hi! Do you know how to modify driver for Intel Ethernet Connection (11) I219-V for Windows 7?
Super work mate, worked a treat!!
THANK YOU. The second time you save me with this.
Glad to hear it, always good to hear it helps out consistently and continuously over time.
Pingback: A beautiful driver hack – Login AS
I have an Intel 7265 AC dual channel Rev_59 chipset that has wifi 2g/5g and BT 4.0. I extracted the Dell driver v18.40.0.9 from MSoft update catalog for my Intel x64 I3 processor.
I followed the steps to modify the inf that only needed to delete the entries in Control Flag area. There was no other i.e. 10.0.0.1 area to copy. No problem. The driver installed, and I was able to download updates to Win Server 2022 and activate it. Great!
However, the Bluetooth on the Intel 7265 didn’t load…..
So, I used 7zip to extract the Setup.exe, The Wifi.msi, the Driver.msi. The “msi” directory created each had a “cab” file which were extracted.
Thus the Driver.msi had a Drv1.cab and within it had the BT inf files along with inf files for Windows 7 & 8 (don’t need to modify these). I repeated the process to delete entries after the Control Flag area.
Now, I tried to reinstall the wifi/bt driver. It complains it can’t find a file but doesn’t specify what. Thinking I need to reconstruct the msi and cab files, I ran the cabmaker program to reconstruct the Drv1.cab file with my revised BT inf files and the others. It still won’t install.
Therefore, I’m stuck at how to reconstruct the Driver.msi which contains the original files plus my revised Drv1.cab file?????
If I leave the Driver.msi alone, I still can reinstall only the wifi part since it has all the msi files it needs and thus can find the file.
Any good way/program to use to reconstruct an “msi” file?
I’d have a look at utilities like https://msi2xml.sourceforge.io/ or https://learn.microsoft.com/en-us/windows/win32/msi/msidb-exe. Maybe that will help with yourt efforts.
Oh man… It’s 2024 and this post is still useful! Thank you so so much! You’re a life saver!
Win Server 2022, Intel I219-LM on an Optiplex 7010 Micro
Great write up, thank you – Got my Dell 5050 with Server 2022 working. with its Intel l219
Cool!
Pingback: _AMD Ryzen ThreadRipper Server Einrichten – FAQ ComService neu
This included for the .INF is invalid? I just installed Win Server 2022 for learning and those INF invalid.
for the love of god dude! well bloody done! you’re a life saver. worked right off the shelf on a m73 thinkcentre with windows server 2019
That’s a screenshot mistake I’m afraid
just manually force the installation of the network card driver with a similar number – i210 works on i211 for me, without lowering security…
https://www.intel.com/content/www/us/en/support/articles/000055236/ethernet-products/gigabit-ethernet-controllers-up-to-2-5gbe.html
Thanks for this!
Having problem getting Intel i255 ethernet driver running in Server 19. I tried the available driver packs on Intel but didn’t work.
Question about the screenshot where you write that during advance boot, to select the “disable driver signature”, but in the screenshot is shows highlighted “disable automatic restart…” What am I missing here?
Also not sure if that same .inf file being referred to will actually work for my ethernet being that it is a different model, or how to determine which is the inf I’ll need.
This is a bigger problem than most people are aware, and no real support from manufacturers, so huge thanks
Hey…I hope I’m not late. I have Server 2022. My NIC is i225-v. I’ll try today and see if it works.
Still working for Windows Server 2022 qith i219v. Many Thanks
Happy to hear it. Have a great 2025!
Hey man good to go, wonderful explanation, thx a TON
You are most welcome, happy to read it worked for you.
Yup 🙁
it worked for win 2022, just fine.
Happy to read it helped you out!
Thank u for the post, it saved me !